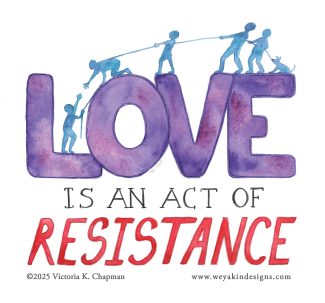
Hello, friends! It’s time for my 4th Annual Birthday Fundraiser Extravaganza! My birthday is at the beginning of March, but I’m starting my fundraising a month ahead of time. Each year, since I’ve turned 40, I have celebrated by hosting a fundraiser for organizations I care about or whose missions I believe in. This fundraiser is also a fun opportunity for you to get a free art sticker! In light of all the recent events in this country, this year I’ve chosen to fundraise for the American Civil Liberties Union (ACLU) and Earthjustice. Because lots of people and the Earth need their rights defended right now.
So, how does this work?
Donate $10 or more to one or both of these organizations.
Share this fundraiser with the people you know.
Then, fill out this form to let me know you donated (include a screen shot of your receipt).
Include your mailing address in the form and I’ll send you a free “LOVE IS AN ACT OF RESISTANCE” art sticker (while supplies last)!
More About the ACLU
The American Civil Liberties Union has been defending the rights of Americans for over 100 years. Their current work includes fighting injustice against immigrants and LGBTQ+ people, fighting for reproductive rights, upholding and continuing to fight for civil rights, racial justice, and voting rights. The list goes on. Your donation to the ACLU will go toward lawyers fighting court battles on these issues. It helps disperse information to Americans so they know what their rights are. It goes toward campaigns to help uphold civil liberties and get the public involved. Plus so much more. Read more about the ACLU on their website at www.aclu.org.
Earthjustice was founded in 1971 to preserve wildlife and wild spaces, protect people’s health, advance clean energy, and fight climate change. This is a premier nonprofit environmental law organization with more than 200 attorneys throughout the country working on cases to defend the Earth. They partner with hundreds of organizations, tribal communities, and other communities throughout the country whom they represent for free. Your donation goes toward the research and lawsuits they work on. These lawyers have done a lot of important work, including representing the Standing Rock Sioux Tribe during the Dakota Access Pipeline case. Read more about Earthjustice on their website at www.earthjustice.org.
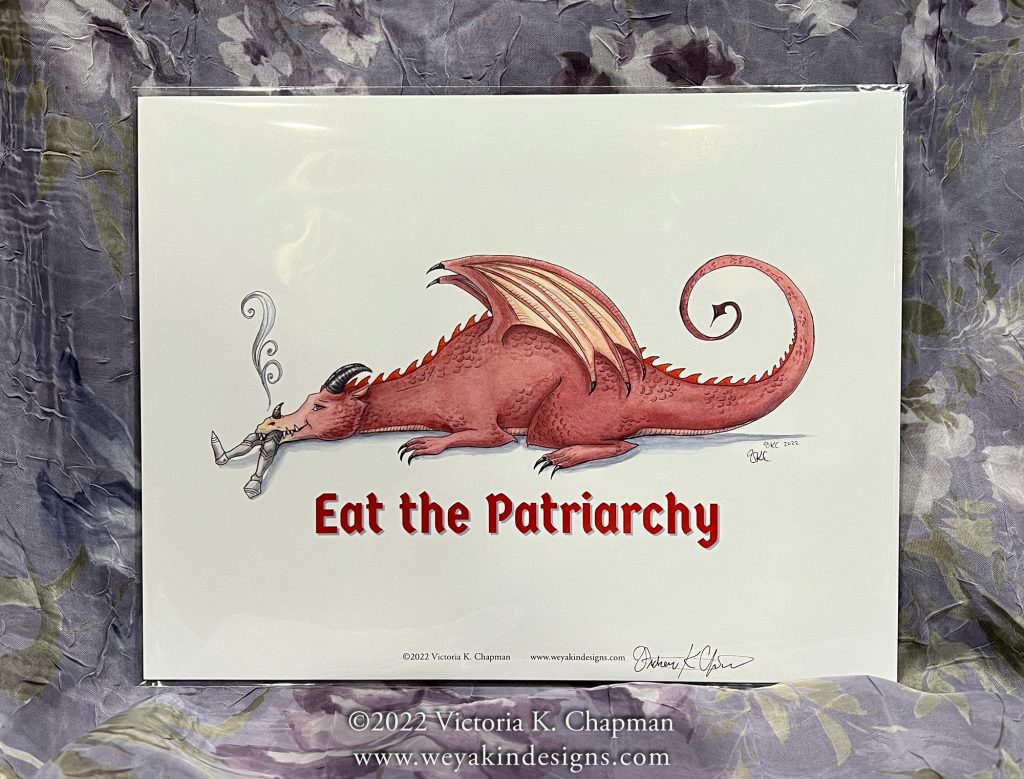
Don’t forget the fill out the form and include your mailing address to get your FREE art sticker! There are only 100 available, so I’ll send them as long as supplies last. I created this piece with watercolors and colored pencils to convey a sense that caring for each other is how we will resist tyranny and oppression. And I’m getting my art put into sticker form to share with YOU!
The stickers are currently being printed and I’ll have them in hand within the next couple of weeks. These stickers are vinyl and weather-proof so you can stick them on all sorts of surfaces. They’ll be aproximately 3” wide. I’ve been printing my stickers with Vermont-based company StickyBrand, who also use eco-friendly inks in their printing process. Spread the word and do good! Now is more important than ever to stick together and share LOVE.
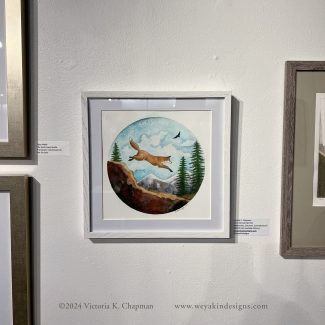
The art from the video framed and up on the gallery wall at the WSU Dolphin Gallery
A friend asked me for help on how to frame illustrations for a show. Since I thought it would be helpful for others as well, I put together this video to share how I frame and wire my illustrations. While illustrators aren’t always gallery artists, we do sometimes have the opportunity to show our work in galleries and other exhibitions. It’s important to know how to frame up your pieces for shows and how to wire it properly for hanging.
You’ll often find gallery shows and other events have specific instructions for framing that include “framed and wired for hanging”. It’s important you follow their instructions and make everyone’s lives easier.
This post outlines how to create a hinge mat, frame your piece, and wire the frame to be hung. It applies specifically to flat work on paper, such as watercolors, pen art on paper, digital art printed on paper, etc. If you’re framing pieces painted or printed on canvases or boards, you’ll need to find another framing method.
Watch the Video:
The Steps for Matting, Framing, and Wiring Art for Hanging:
Gather all of your materials
Create a hinge mat
Line up top of cut mat and backing board
Measure out hinging tape and cut
Place hinging tape across top inside of backing board and cut mat board
Flatten tape so it’s smooth
Fold mat board over onto backing board
Place art under mat board
Center art in your cut mat board
Carefully place photo corners on each corner of the art
Put art into frame
Open up frame back
Clean inside of frame glass (and let dry)
Place art inside from, face down onto glass
Be sure your art looks good from the front before closing it up
Place frame back back into frame and latch into place securely
Wire the frame for hanging
Find your desired placement of wire hanging brackets (mark with pencil if needed)
Hold bracket in place while screwing in screw to secure it
Repeat on the opposite side
Measure and cut your wire (leave extra on each end for securing)
Thread wire through bracket loops
Secure wire either with crimp tubes (squeeze into place with pliers) or by wrapping around itself until secure
Clean front of glass
Label back of your art as necessary according to gallery instructions
Materials List:
Your art
A frame appropriately sized for your art
A pre-cut mat board sized for your art
Backing board
Linen hinging tape (archival)
Photo corners (archival)
Framing wire, brackets, screws, and optional crimp tubes
The art being framed in this video is Sierra Nevada Red Fox and is available for purchase. Contact Me to purchase the original (including this frame). You can also buy prints and stickers of this piece in the online art shop.
Feel free to leave your questions or comments in the comment box below. Thanks for watching!
Right now, so many of us here in the United States and across the world are sad, heartbroken, angry, scared, worried, and so many other emotions. I know I am, especially worrying for my children. It’s easy to get lost in the sea of what is and what might come to be. Now, more than ever, it’s important that we stick together and keep shining our light. Let’s mobilize together to fight the good fight. For our children. For our planet. For our friends and family. For our communities.
Originally this November, I was going to hold a holiday sale on my art. But, I’ve decided instead to hold a donation sale. For every sale I receive on my art and art products, both online or in-person during the whole month of November, I will donate 30% of the entire sale. The three organizations I’ve chosen for this sale represent areas that are going to need our help in the coming times. These organizations are:
First, pick the art you’d like to buy in my online shop. When you go to check out online, use the “Comments” section at the end of your order to type in which of these three organizations you’d like me to donate to. If nothing is indicated, I’ll donate some to all three. I will total up and make all donations after the month of November, once all sales have come in.
**If there is something you’ve seen me have before that’s not on my website, or there’s an original you’d like that’s not currently listed, please let me know! I’m happy to work with you to get you what you want. I can even put together custom packs of cards.**
I wish I could donate more than just 30%. But, part of caring for others, is also caring for myself and my family. This is my livelihood and as a small business artist, it’s hard to keep things afloat. I’m doing what I can.
Though, I recognize there are so many more places that can also use the help, I chose to focus on these three for this moment. I’m sure I will be holding other donation sales in the future. I also encourage you to donate direct to these or any other organizations dedicated to helping the environment, fighting climate change, helping marginalized communities, disability rights, and fighting for bodily autonomy and women’s rights.
And if you can’t afford to donate, please don’t feel guilty. You must take care of yourself first. You can always share these causes with others, which is free. There is so much to fight for. And we are all in this fight together. Let’s shine our light together, take care of each other, and march forward.
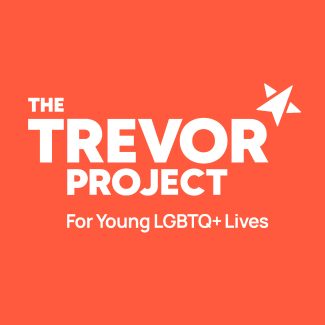
The Trevor Project is a leading organization in suicide prevention and crisis intervention for LGBTQ+ young people. They provide 24/7 crisis help and information. During these trying times, queer youth are negatively impacted more than most. Your donation will help provide counseling, peer support, crisis hotlines, and educating allies and families of LGBTQ+ young people.
Earth Justice is an impactful legal organization fighting for the rights of our planet. They provide top-tier legal representation for many clients fighting for land protections, clean water, wild spaces, and more. I believe they will help make a big impact for fighting climate change, pollution, and protecting vulnerable land in this country. Your donation will help support their lawyers who fight every day for the Earth.
The National Women’s Law Center has spent more than 50 years fighting for gender rights around the country, with special focus on women of color, LGBTQ+ communities, and low income women and families. A donation to NWLC will support advocacy for marginalized communities, legal cases for abortion rights, fighting sex discrimination in the workplace and beyond, and advocating for bodily autonomy.
Please, leave a comment to let me know of other international, national, regional, or local organizations that you believe are worth supporting. And if you donated directly, comment and let me know!
Many times through my life, I’ve heard this myth about artists: A true artist doesn’t need to look at pictures to help them draw—they can draw anything right from their own imagination. But, contrary to this tall-tale, reference images and research are wonderful assets for most artists, especially illustrators. And really, how many people actually have a photographic memory? Very few, if any.
Think about art schools. Life drawing is a basic foundation class most artists take. And what do they draw from? A live model—not just their imaginations. Artists don’t draw or paint in a void. Reference images and research are key tools to keep in your artist’s toolbox.
Collecting Reference Photos
Like many artists, you may first have an idea about something you want to draw or paint, and perhaps you’ll scribble a few rough sketches and jot down some notes to flesh it out. But, once you’ve got an idea, you need to develop it into a cohesive composition, whether it’s a one-off piece of art or part of a larger project, like a picture book or gallery series. This is when I turn to reference photos.
Reference photos are images you may find or take yourself to help you with accuracy in your drawing or painting. I usually use a mix of images found and images I’ve taken myself, depending on what I’m able to find and what my specific subject is. Once I have an idea of what the elements of my piece will be, I’ll start collecting reference images that help me accurately portray those elements.
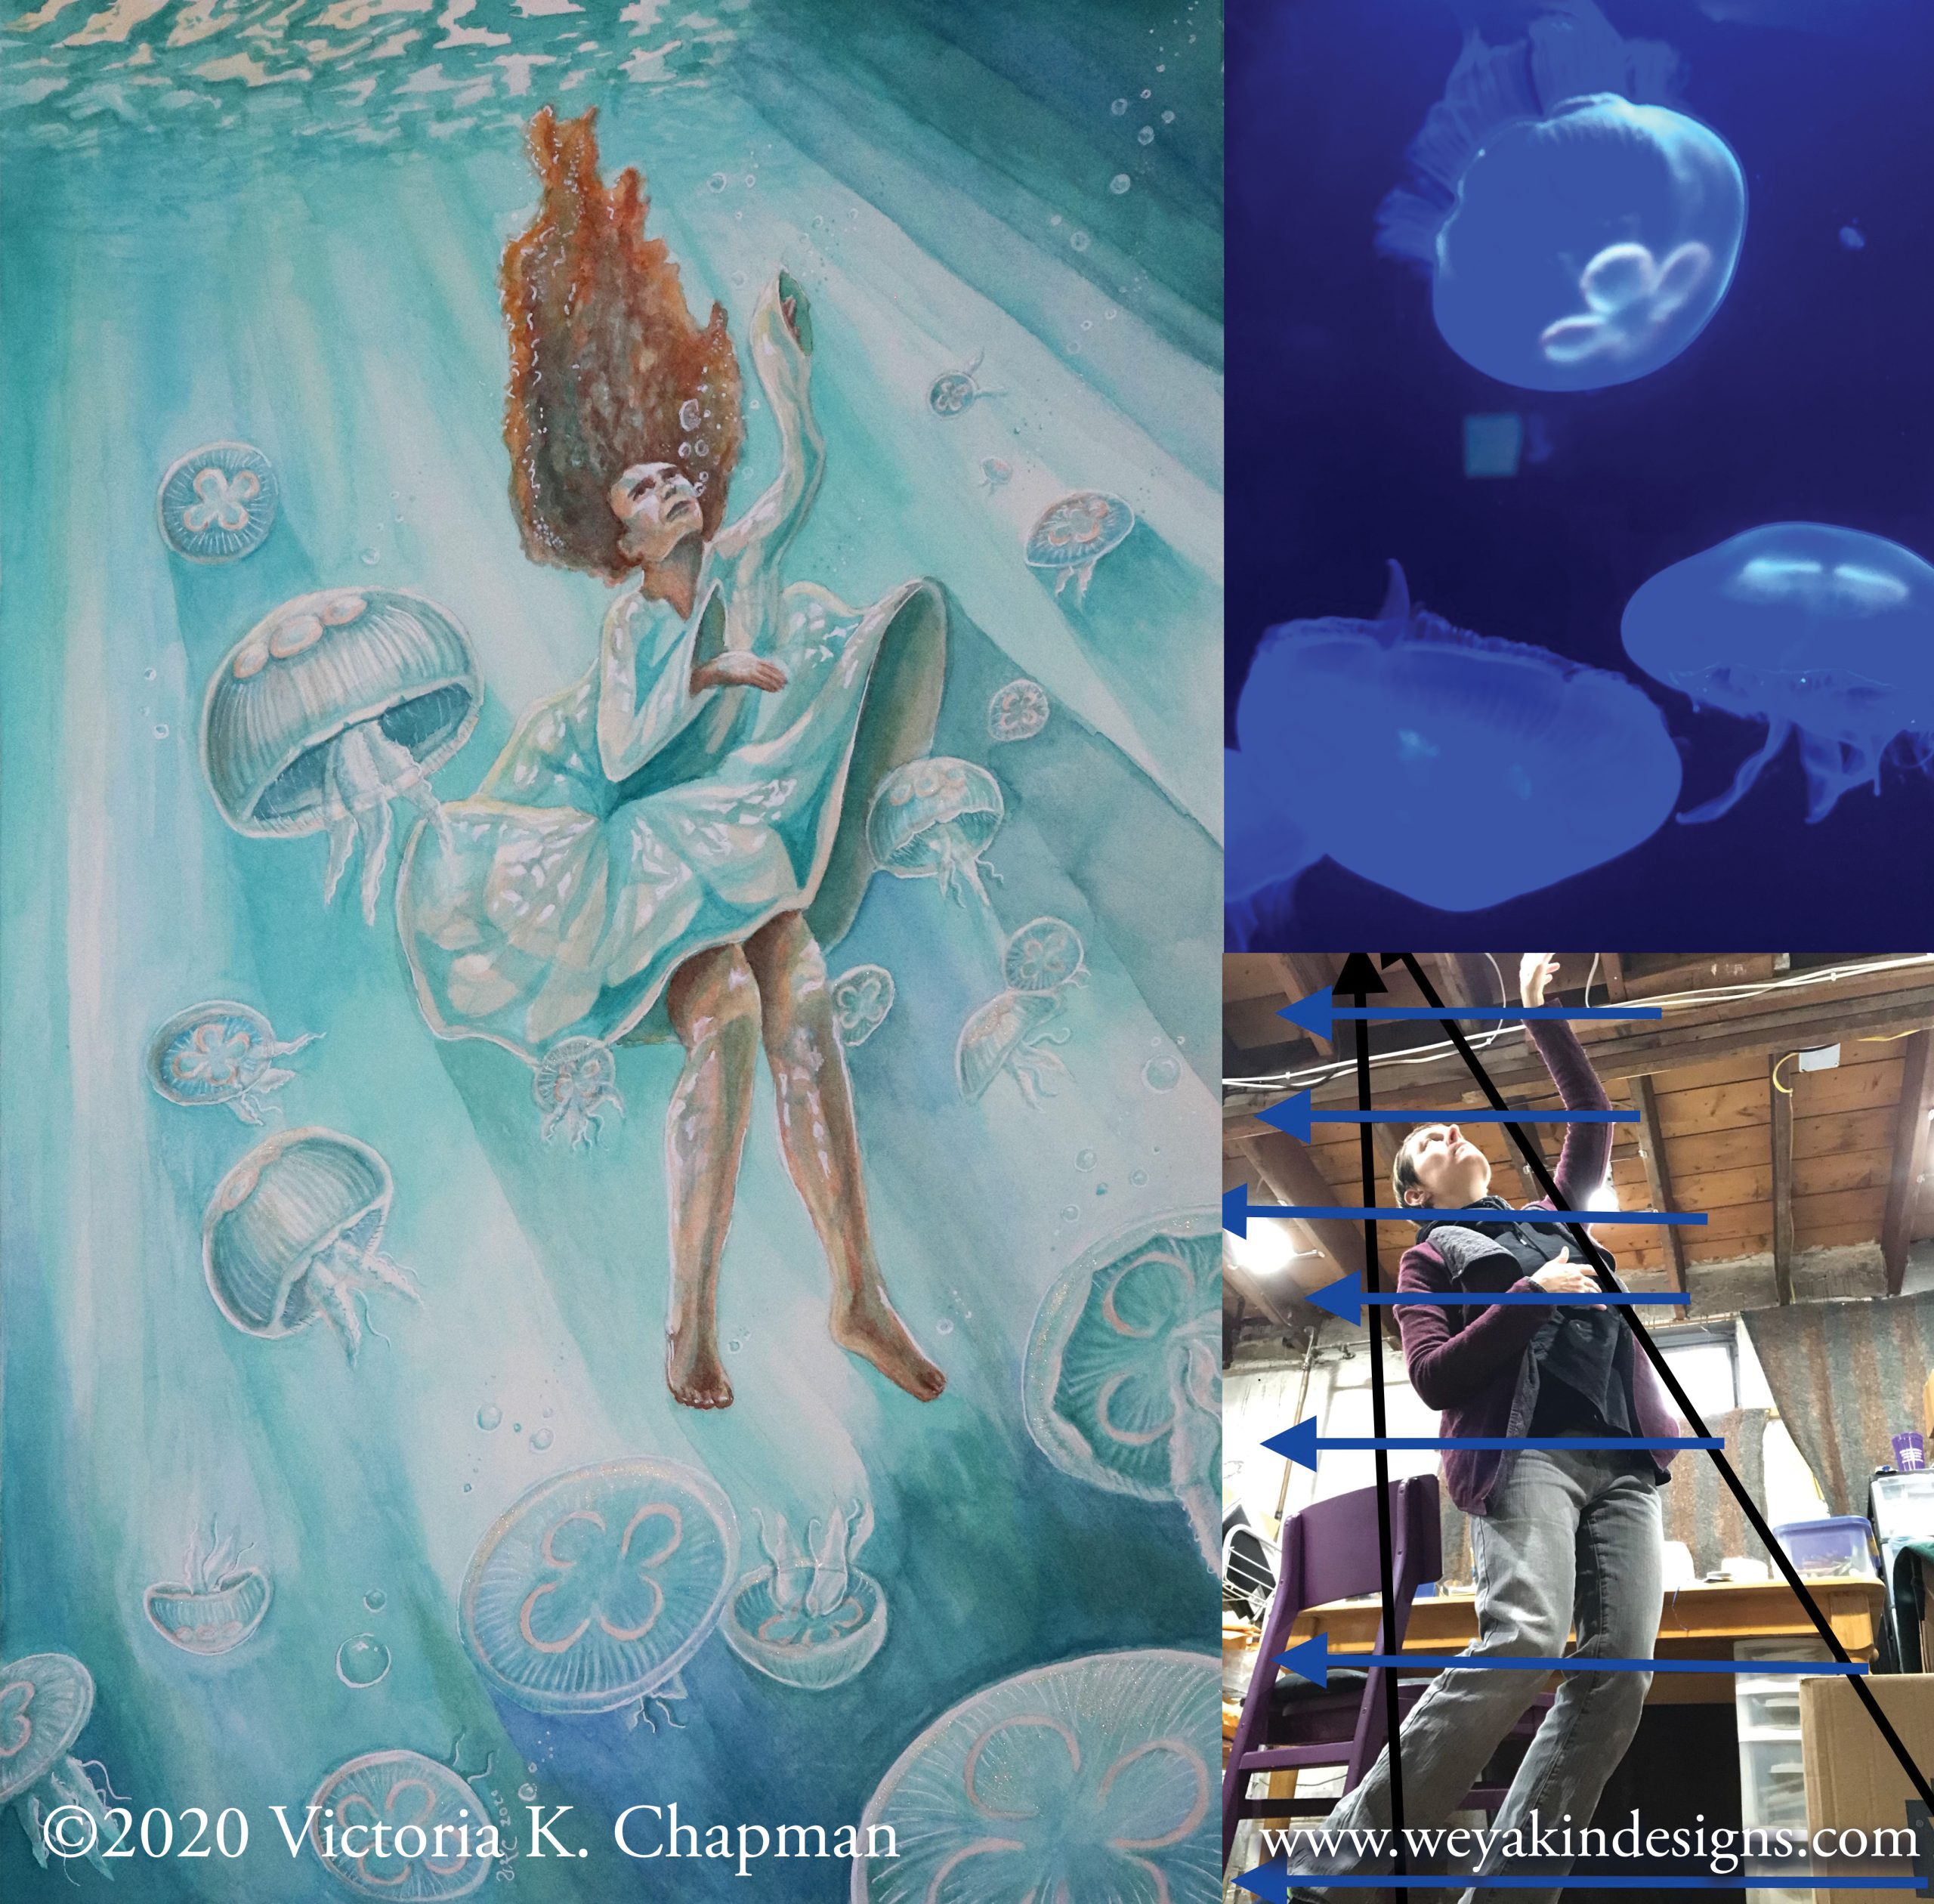
Final art of “Falling, Floating, Free”, next to two reference photos taken by me. Moon jellies at the Mystic Aquarium and me posing myself with lines to help me figure out perspective.
Taking Your Own Reference Photos
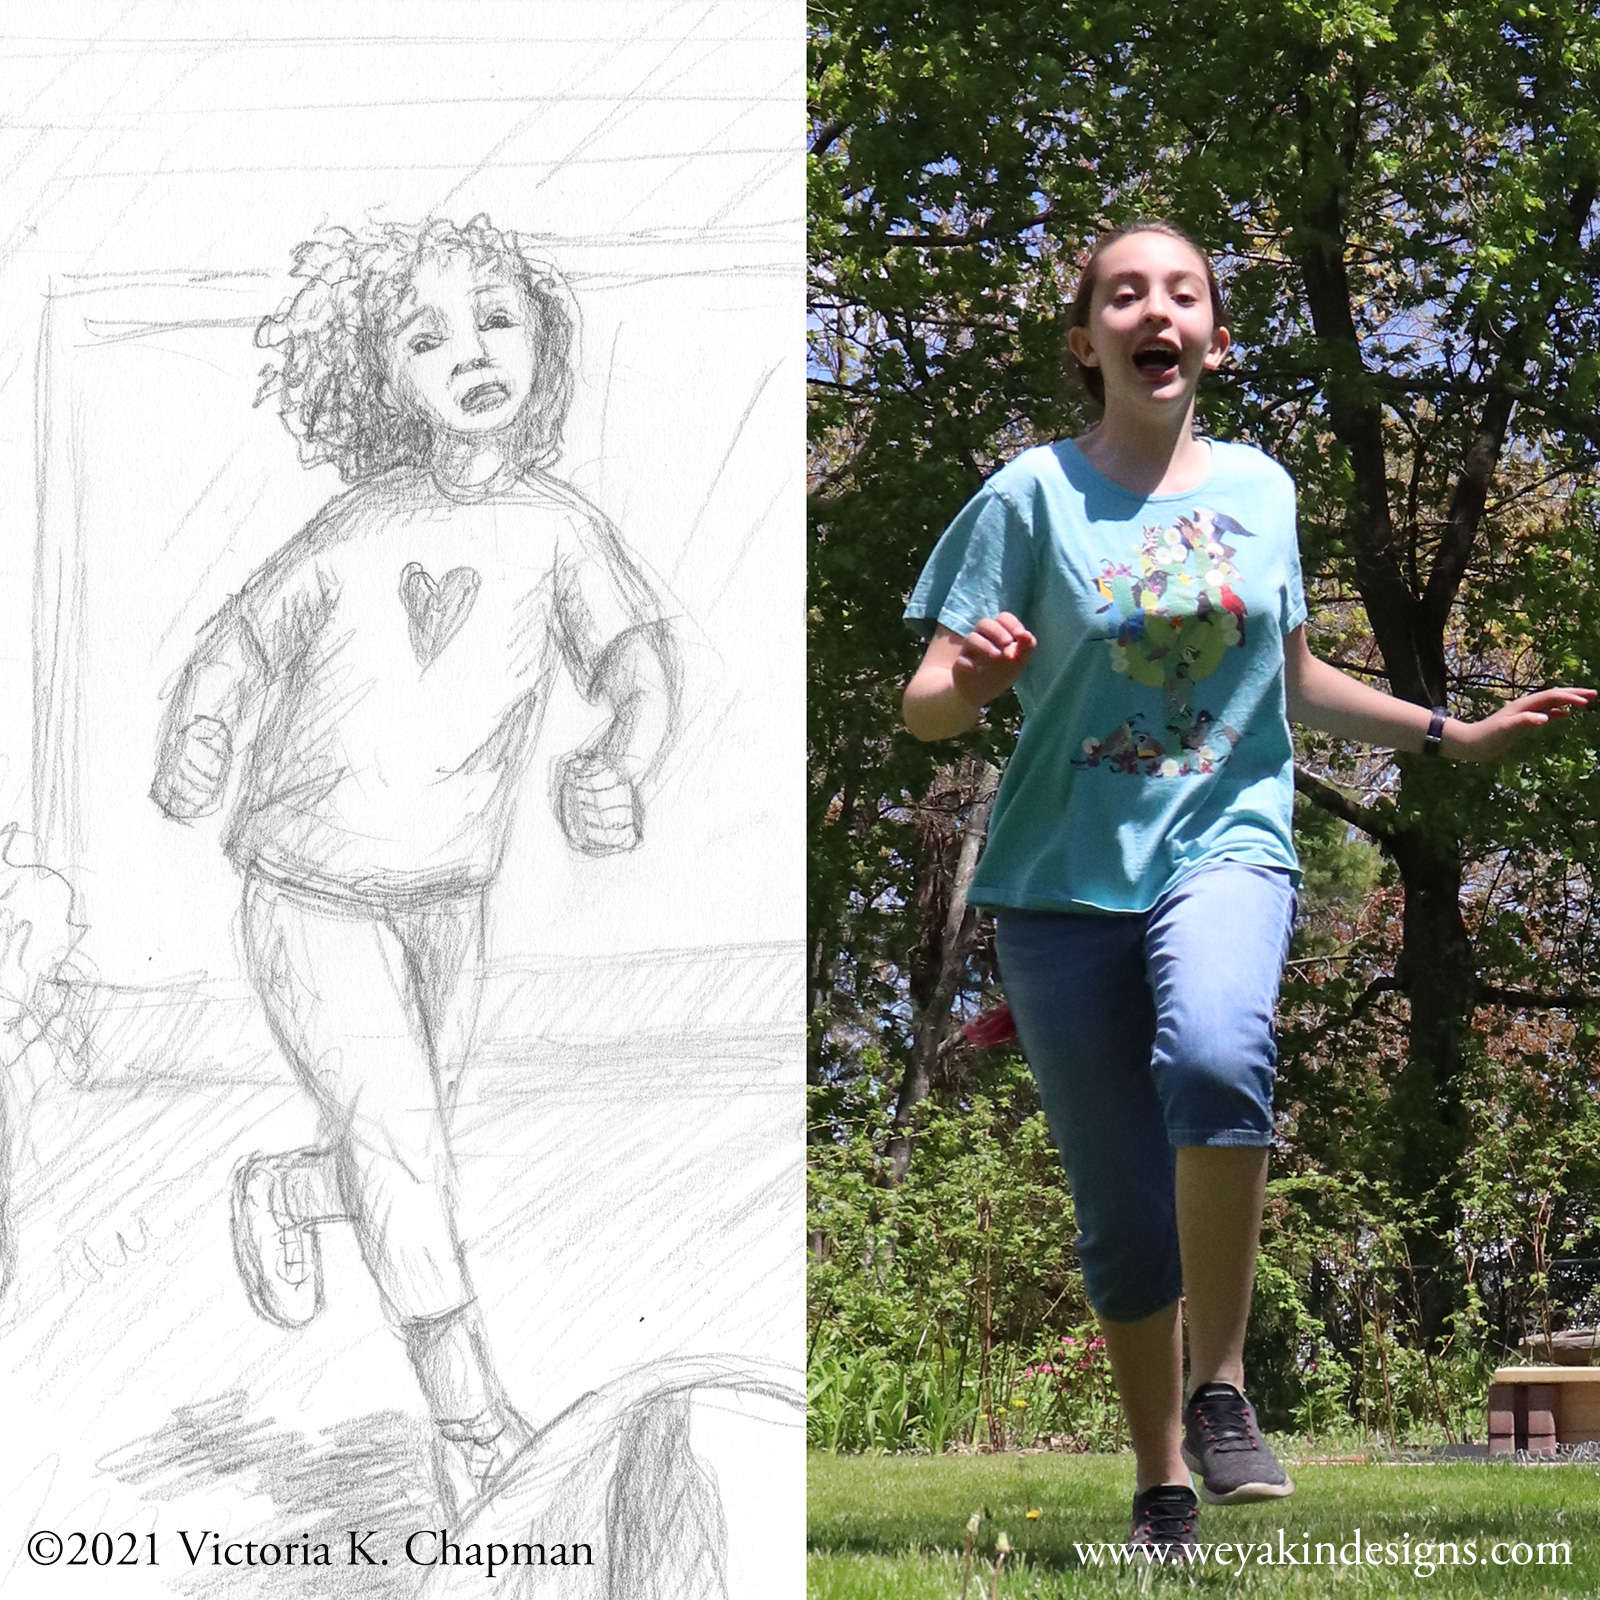
If part of my piece includes something I know I can find locally, I’ll go out and take some photos myself. Or if it involves a person in a specific pose, I’ll often pose myself or one of my family members to make sure I’m drawing that pose accurately. Sometimes, I’ll even use my dog as a reference (dogs are some of my favorite characters to add to a visual story). If a stranger were to look through some of the photos on my phone, they’d either think I’m a very interesting person, or downright crazy. Don’t worry though—it’s just reference photos.
A pencil drawing for a picture book dummy and one of several reference photos of my daughter running taken from the ground.
Drawing From Live Reference
Another option for reference images is drawing from a live reference. You can have a friend or family member hold a pose for you while you draw. Or, go to a zoo to draw the animals you’re hoping to capture. You could even sit in your back yard to observe the birds or flowers.
Often it’s easiest for most artists to take photos of live references, so you still have that image to use back in the studio. But, sitting and enjoying the slow-down time of drawing a live reference can be a lovely experience in itself. I’m lucky to have places like the EcoTarium and New England Botanic Gardens at Tower Hill near me which I visit to find inspiration and references.
I recommend exploring local opportunities near you that can provide some surprisingly wonderful reference opportunities. Here are some resources to help you find great places near you.
You can search for zoos and aquariums near you using AZA.org
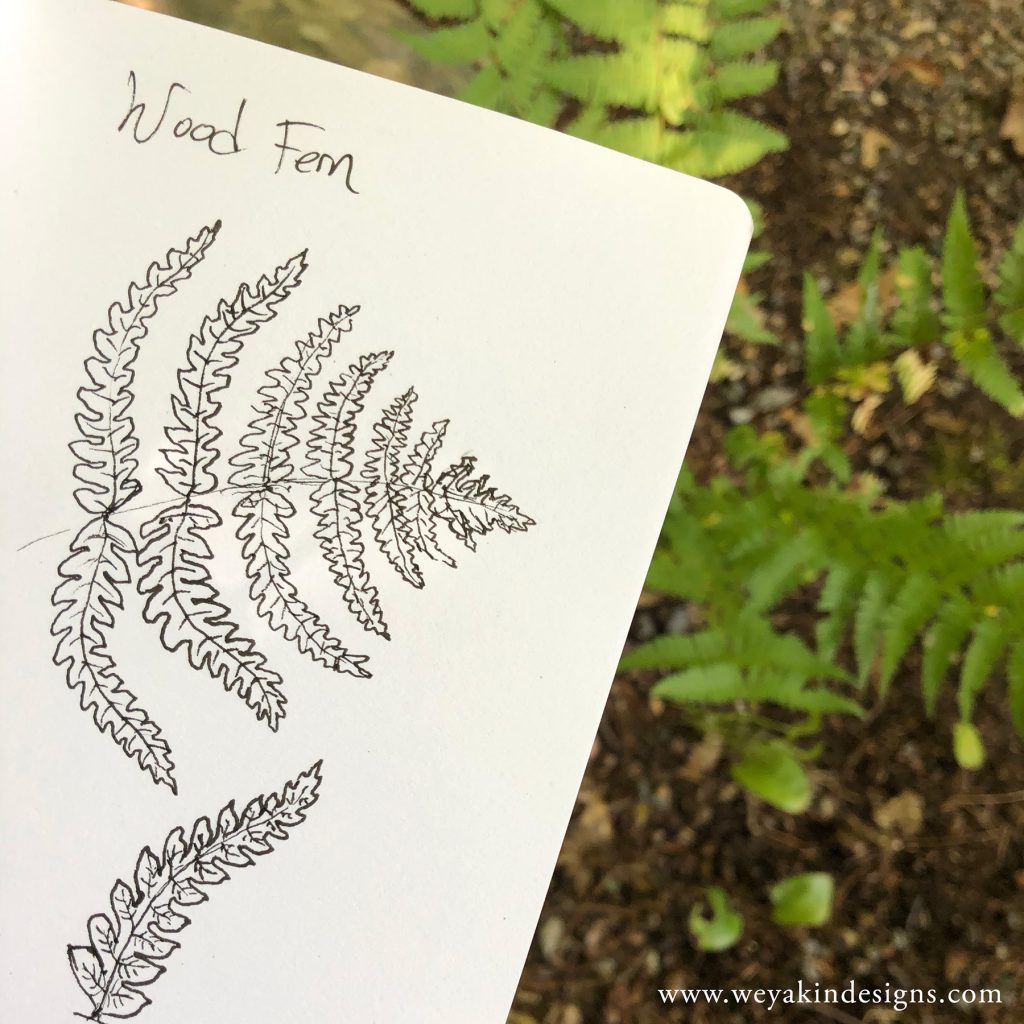
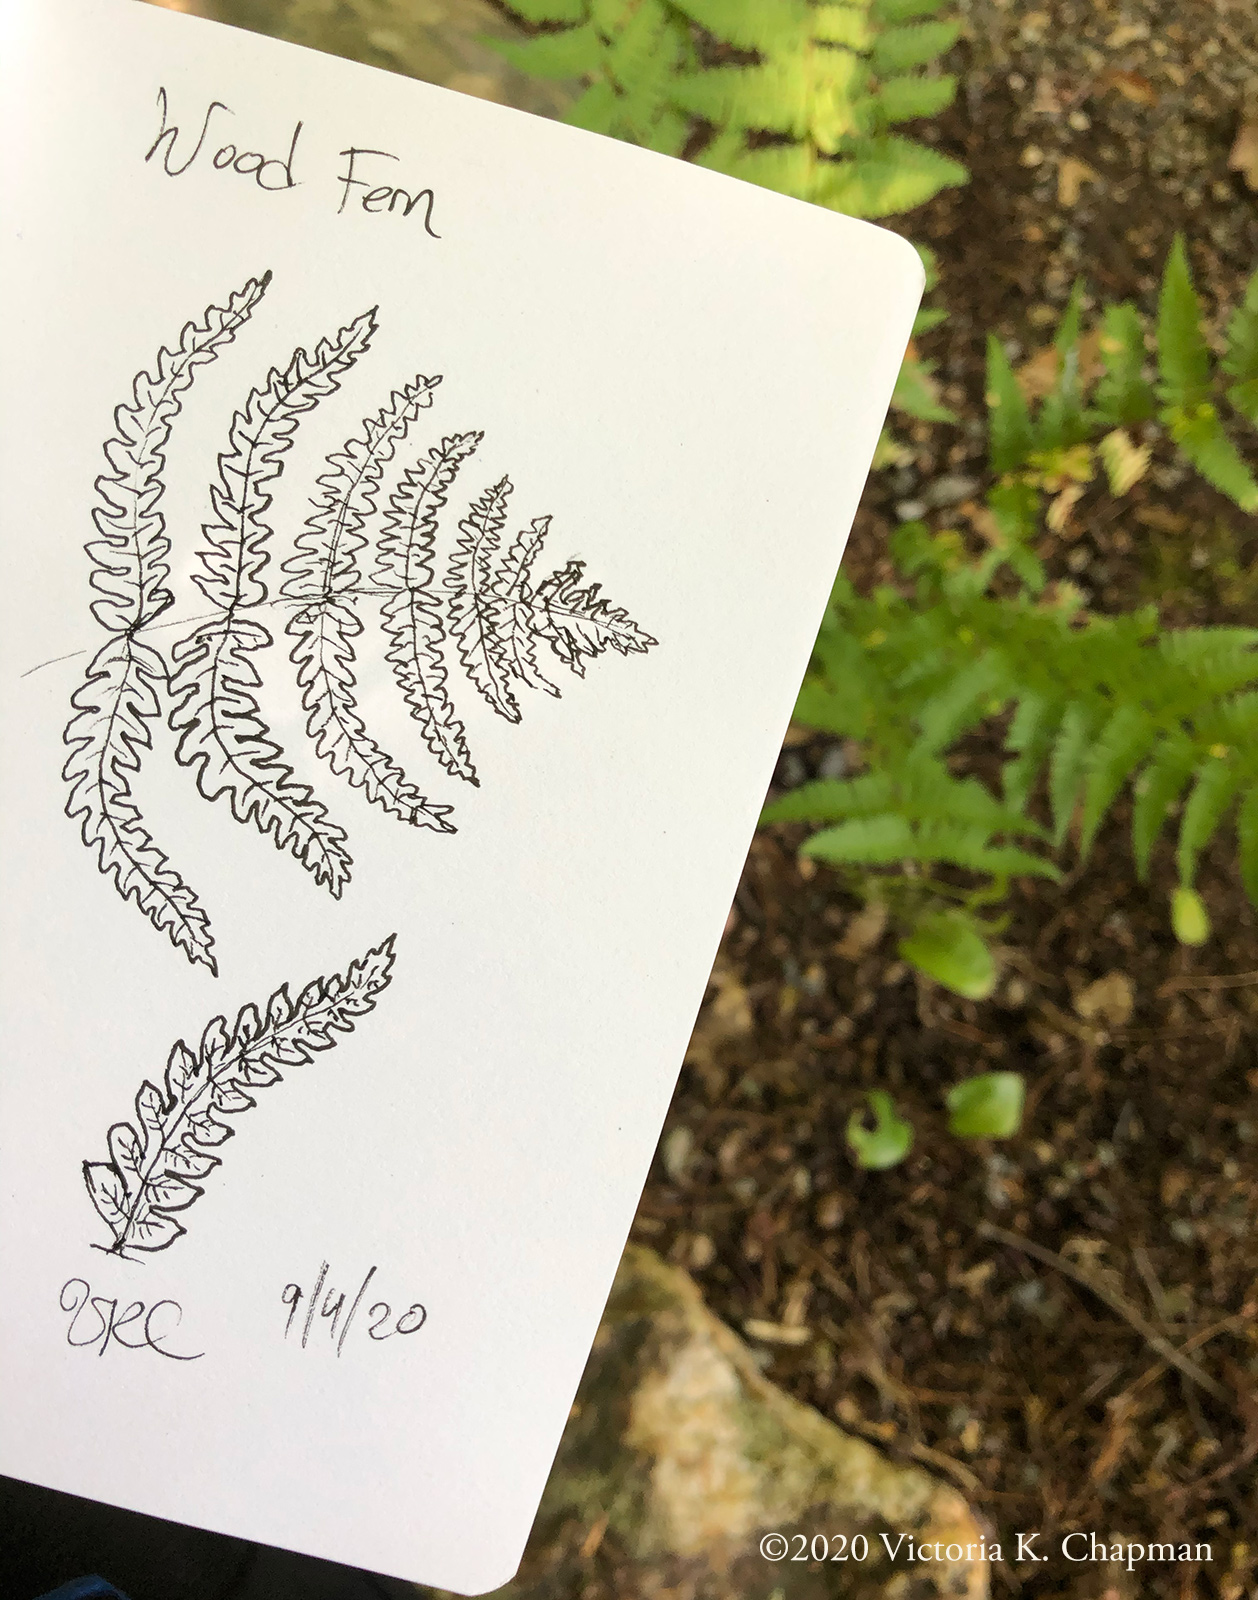
A sketchbook drawing done from live reference in the woods of a species of wood fern while at New England Botanic Garden at Tower Hill
Collecting Found Images
For some subjects, it’s not always easy to go out and take or draw from live references. As nice as it would be to hop on a plane and travel to Hawaii to take reference photos of volcanoes, it’s usually not realistic, unless you live there. That’s when the internet comes in handy.
I don’t condone the stealing of other people’s images by any means, but looking at photos and other images for inspiration and to get a sense of what something looks like can be very helpful. As long as, in the end, your final piece of art isn’t a direct copy of somebody else’s work. Found reference photos are a means of practicing and finding inspiration, not plagiarism. Don’t steal the images—practice and learn from them, but then create your own composition from what you’ve found in your own style.
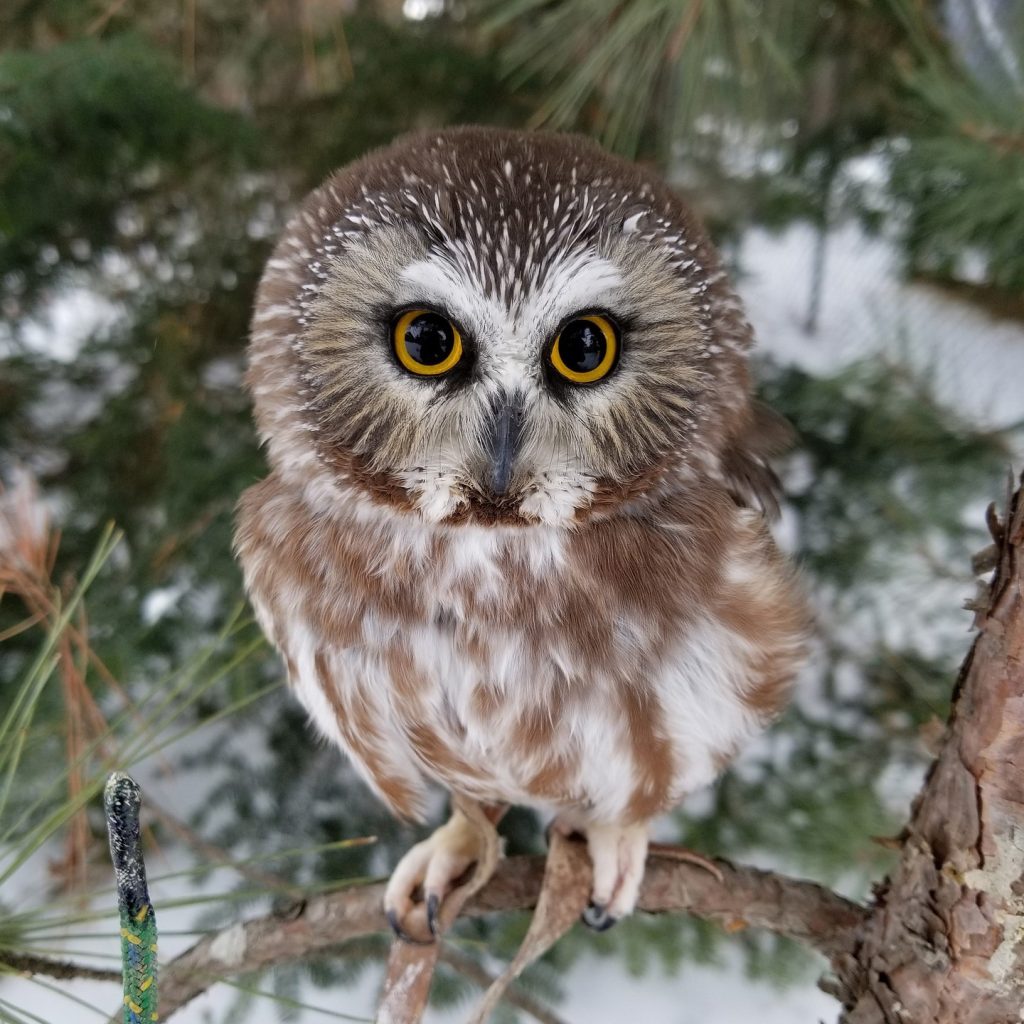
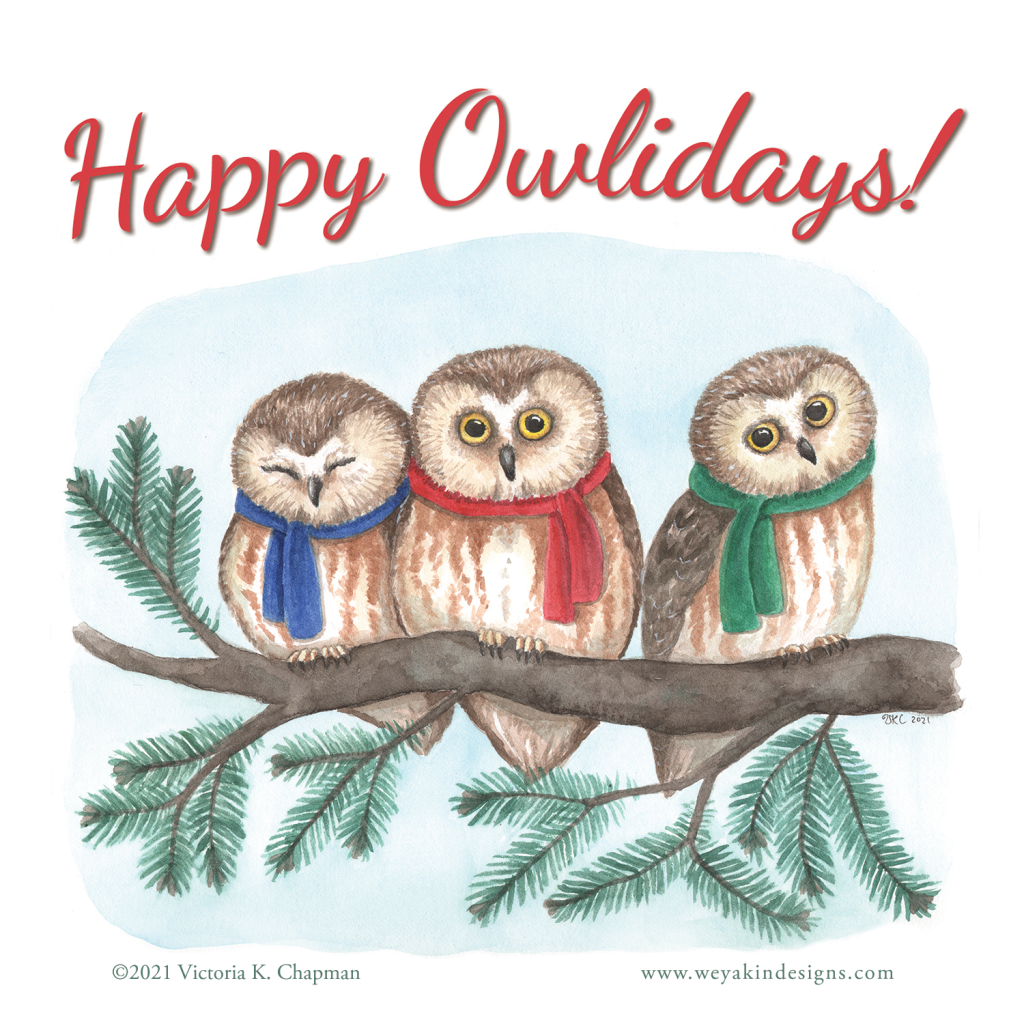
An example of a reference photo used to help me learn what northern saw-whet owls look like, next to the final piece of original art. This photo is a royalty-free photo from Pixaby taken by Chris Tolman.
Keep it Legal!
If you love a particular pose or way of lighting a figure that you want to borrow to use in your art, there are ways you can legally do so without violating copyright laws. There are a number of royalty-free reference photo websites out there that won’t step on any photographer’s toes, and can also support them and their art. Some are completely free, but it may be harder to search those and they may not always have what you want. Others have a nominal fee to give you access and you support photographers and their art through that. Artists supporting artists. Its’ a win-win.
Alternately, you can also reach out directly to a photographer and ask them for permission. Just make sure you get a clear “yes” and what their terms and restrictions are.
IMPORTANT: Always be sure to check out the terms for use. Some photographers require attribution if you directly use their work. Others require you pay an additional fee if it’s something you’ll be selling commercially.
Lisa Clough from Lachri Fine Art also has this great video about using reference photos legally that you can check out:
Doing the Research
Often times, I’ll realize I simply need more information before I can finalize part of my composition. I started to draw a child lying in a field of flowers, but realized I wasn’t sure which flowers actually bloom at the same time. Sure, many people wouldn’t notice if you drew a spring daffodil blooming at the same time as fall mums (unless they’re like me), but you might feel better knowing that your piece doesn’t contain gross inaccuracies.
Places to do the research
There are a lot of ways to research your subject matter, a classic place to do so being your local library. Books are an excellent resource if you can find a book about your subject. Libraries also have access to newspapers, magazines, and sometimes videos, microfiche, and photo slides. Libraries are an important local resource for so many reasons.
There is also, of course, the internet. But, you also need to be careful that your searches make use of reliable resources. Here are some of my favorite reliable sources of information for my nature research:
A lot of reputable newspapers, magazines, and education organizations have websites with free information. Just be careful of where you find your information and double-check it against other sources.
For this image, I did some research to make sure dandelions, white clovers, and asters all bloom around the same time.
An example of why to do the research:
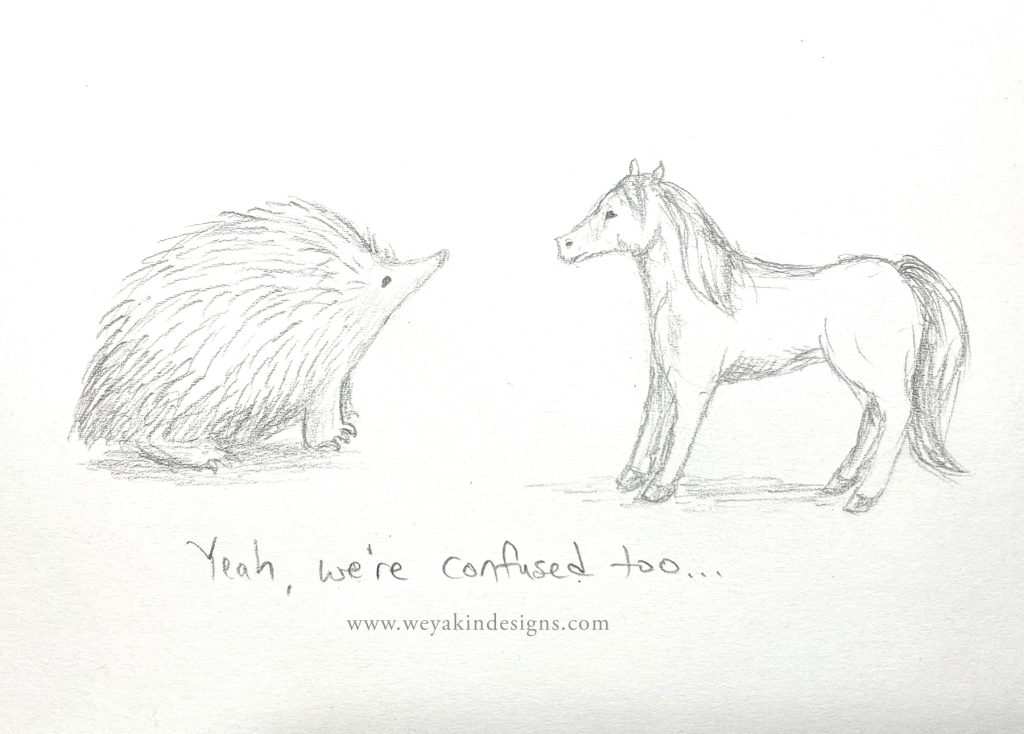
Perhaps you are drawing an echidna, a curious egg-laying mammal from down under as part of a non-fiction book you’re working on. It’s helpful to also find out where the echidna lives, its general size, its behavioral characteristics, and what its habitat looks like. If you draw an echidna in a New England forest, it’s going to seem awfully out of place. They’re actually from Australia, Tasmania, and New Guinea. Or if, for example, you draw an echidna next to a horse, but you draw them the same size, it’s also going to look rather odd. Echidnas are closer to the size of a large house cat.
A rough sketch of a horse-sized echidna next to a horse. Or…maybe it’s a tiny horse? We’re all confused here.
Doing the research will save you a lot of headache later when you find you included some innocent, but terribly inaccurate detail. It may be a little extra work, but I personally find it to be one of the most interesting parts of my job as an illustrator. And if you do have the opportunity to go on-location to do research for a piece of art, do it! That is, if you enjoy traveling and learning. I sure do.
Reference is Your Friend
Reference images and research are amazing tools that can help your art not only be more accurate, but more interesting as well. Research can help with precision, but it can also help with inspiration. And what artist doesn’t like feeling inspired? I love looking at photos, going out into the world to see new things, and spend time really looking at the amazing things around me. Plus, learning something new in the process can bring a whole other level of joy to your work.
Just remember that it’s okay to learn from other artist’ images, but stay away from plagiarism. Learn and practice, and then create something new and original that’s yours. If you want to copy another image, make sure to do so legally. And most of all, enjoy the time spent really looking at the world around you. This Earth is an amazing gift and there is so much to see!
Do you have other resources relevant to reference images and research that you’d like to share? Leave a comment here.
Do you have an art-related topic you’d like to hear about from me on this blog? Let me know!
A short poem created in the “Word Garden” at The Highlights Foundation
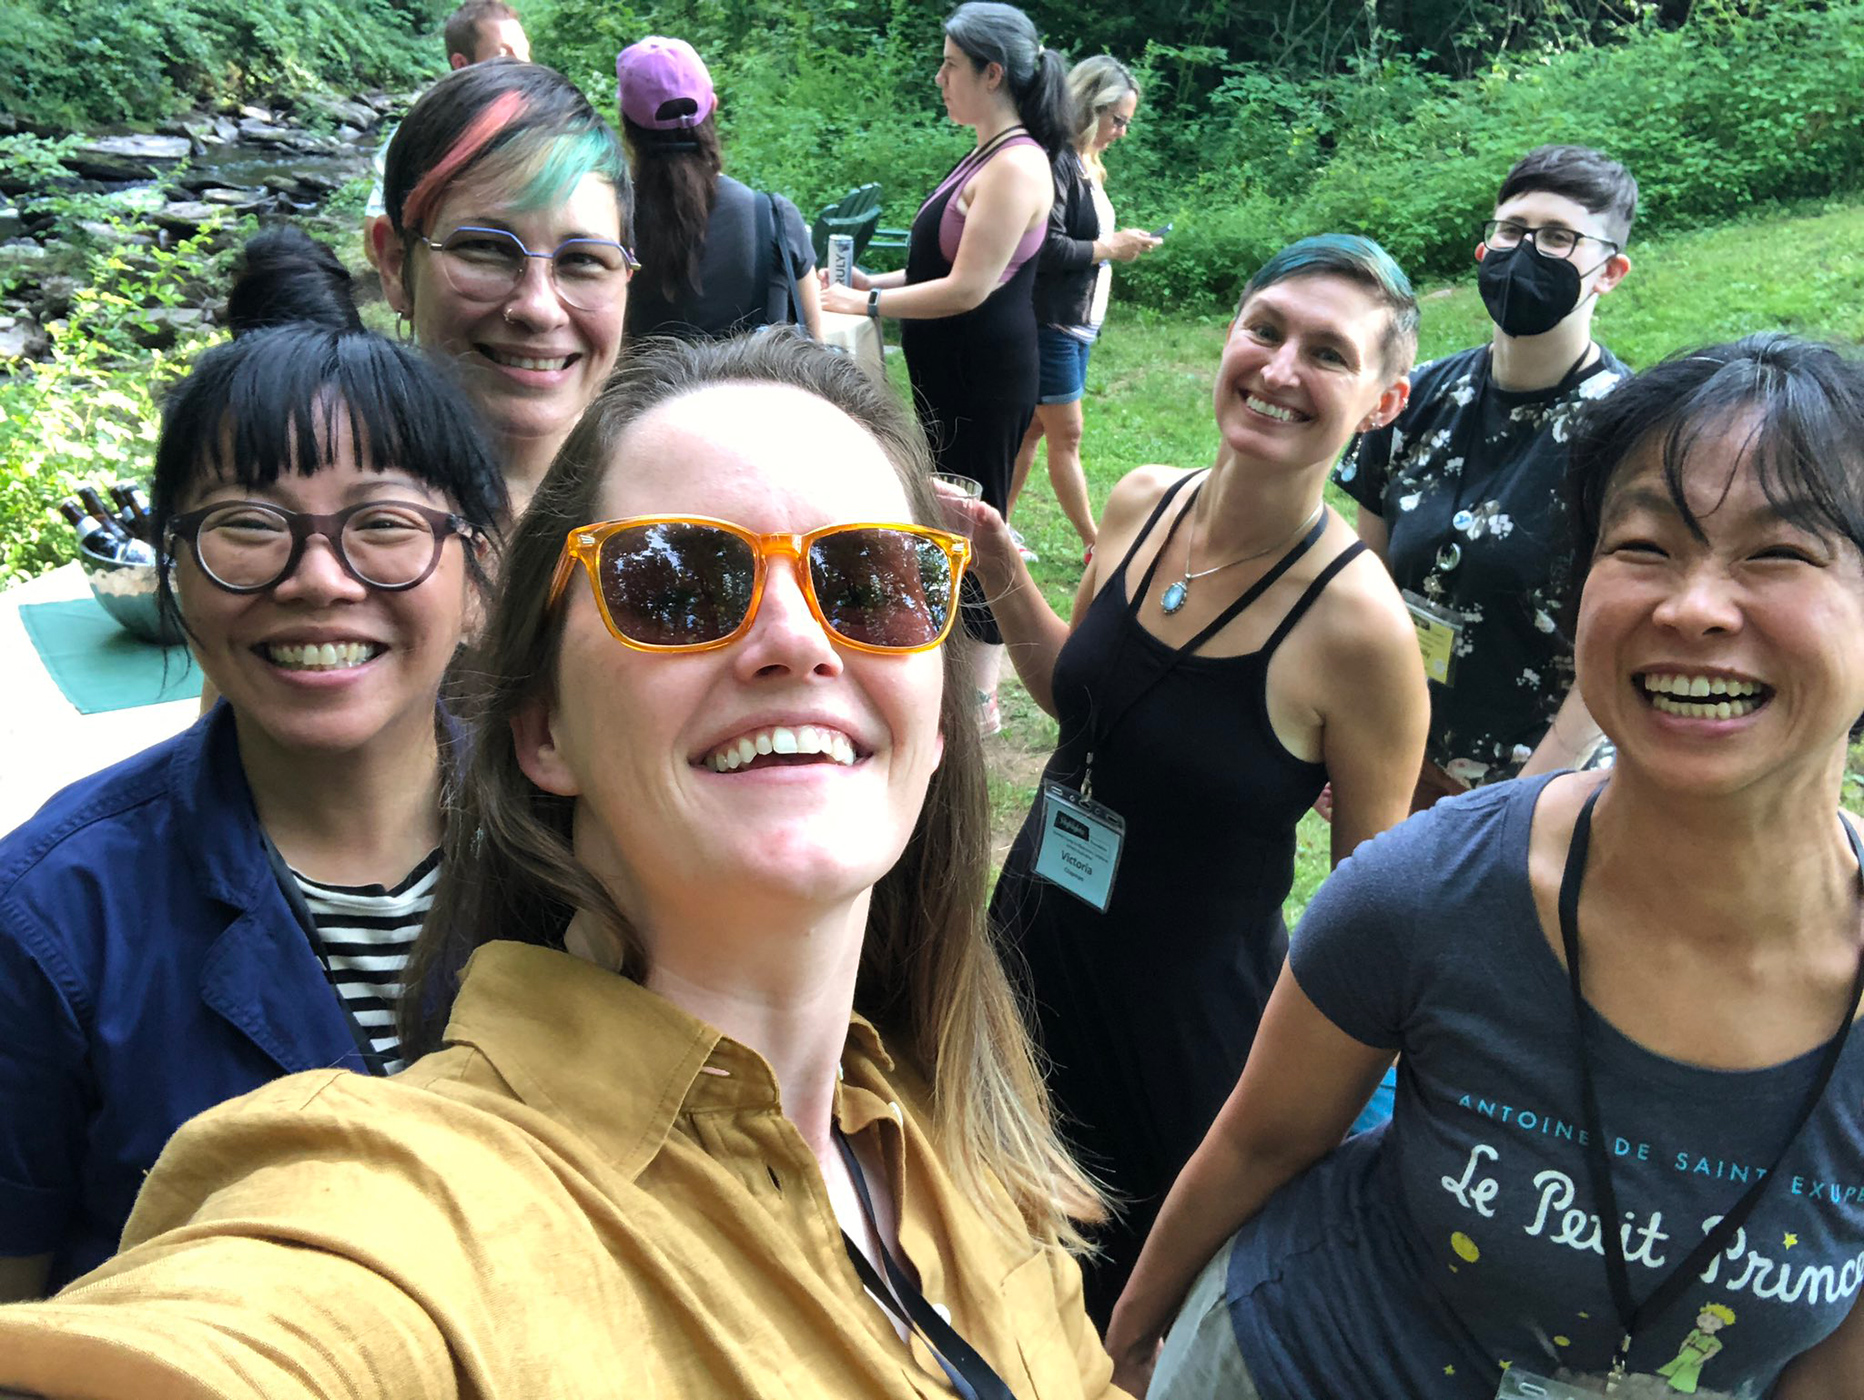
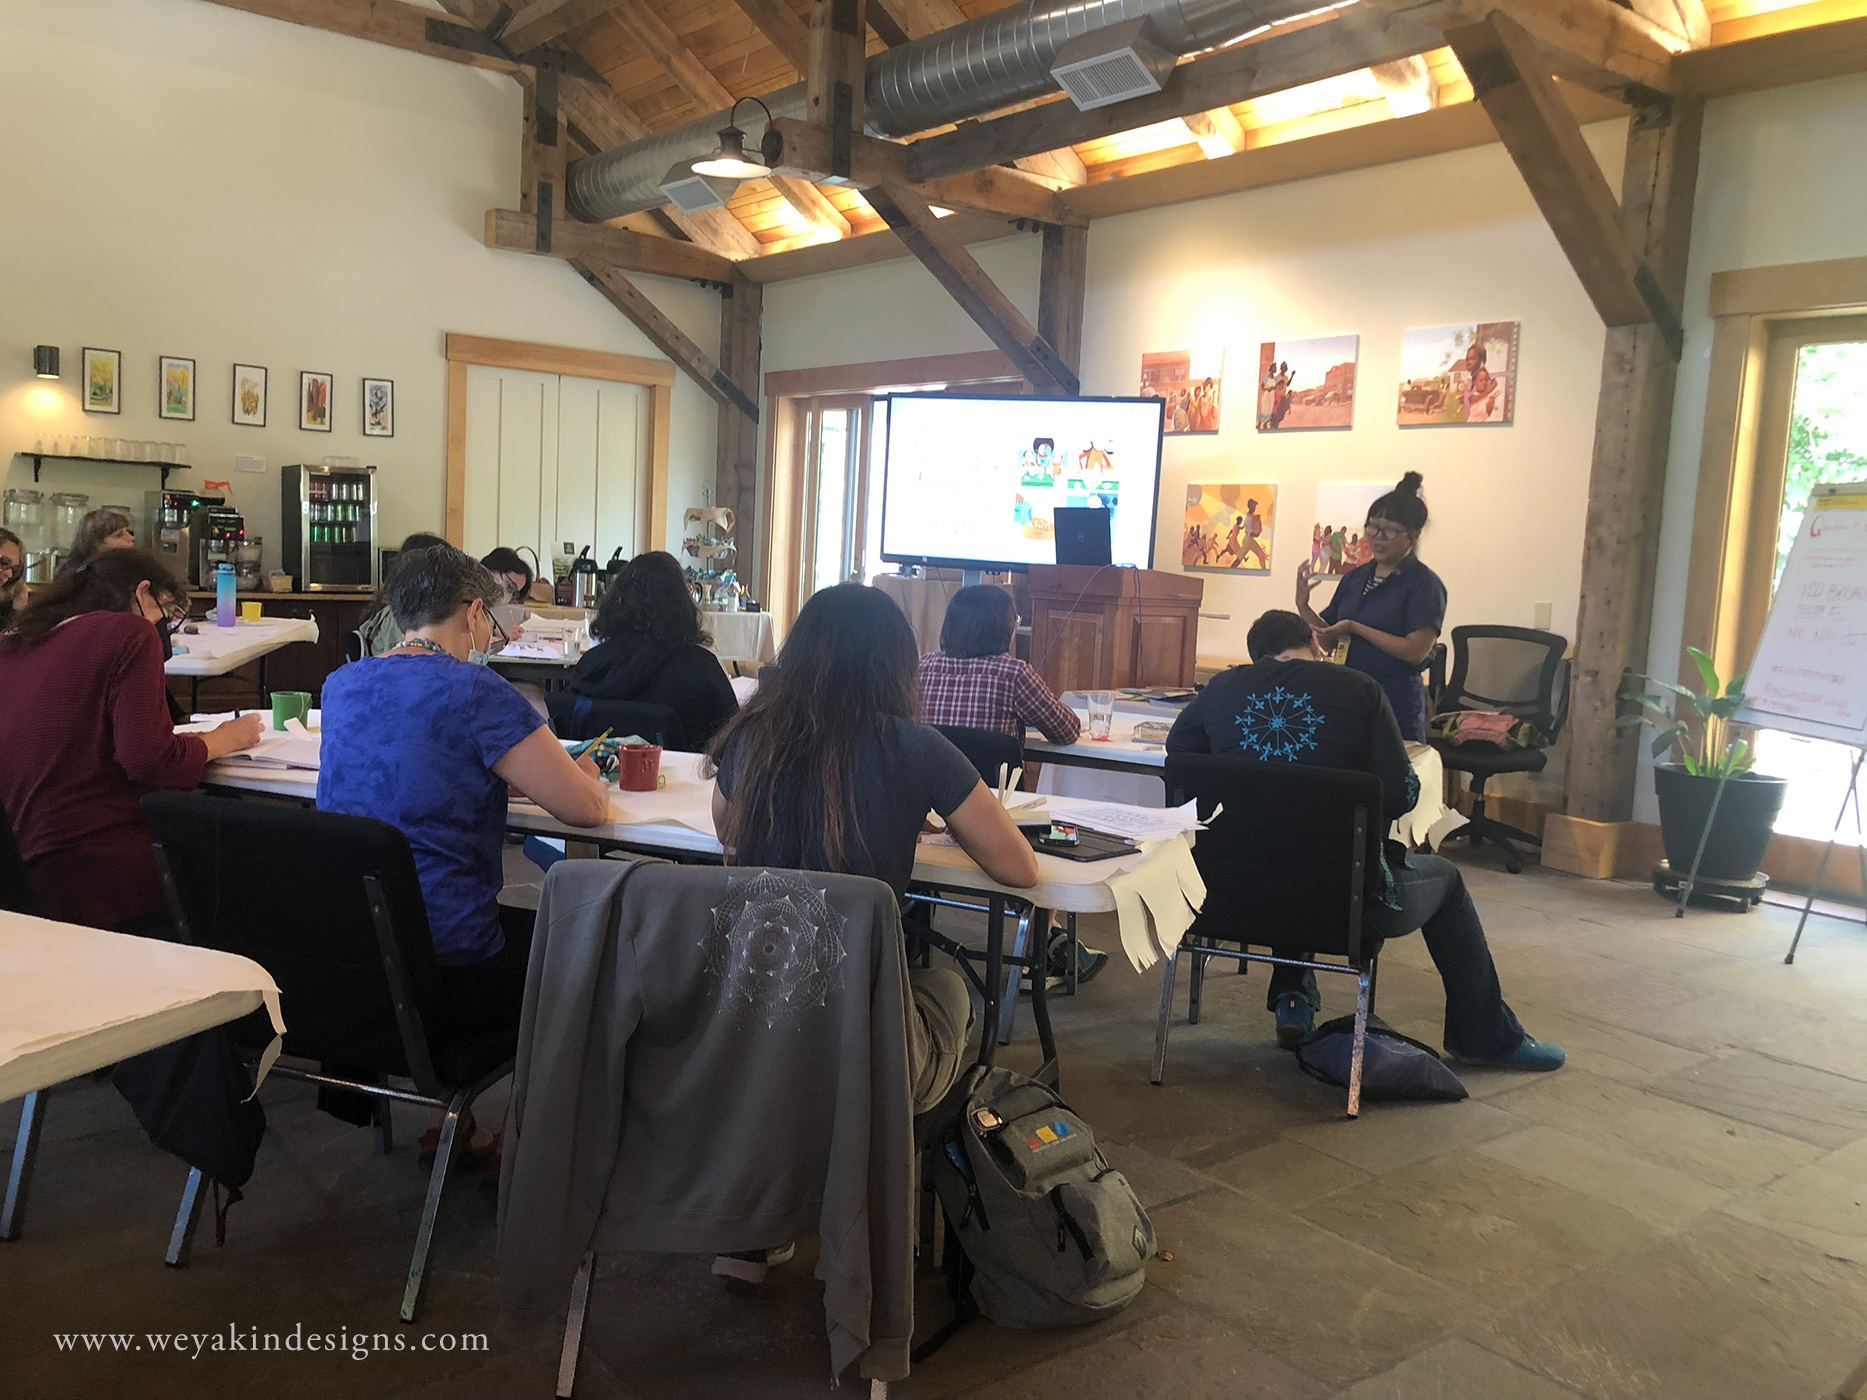
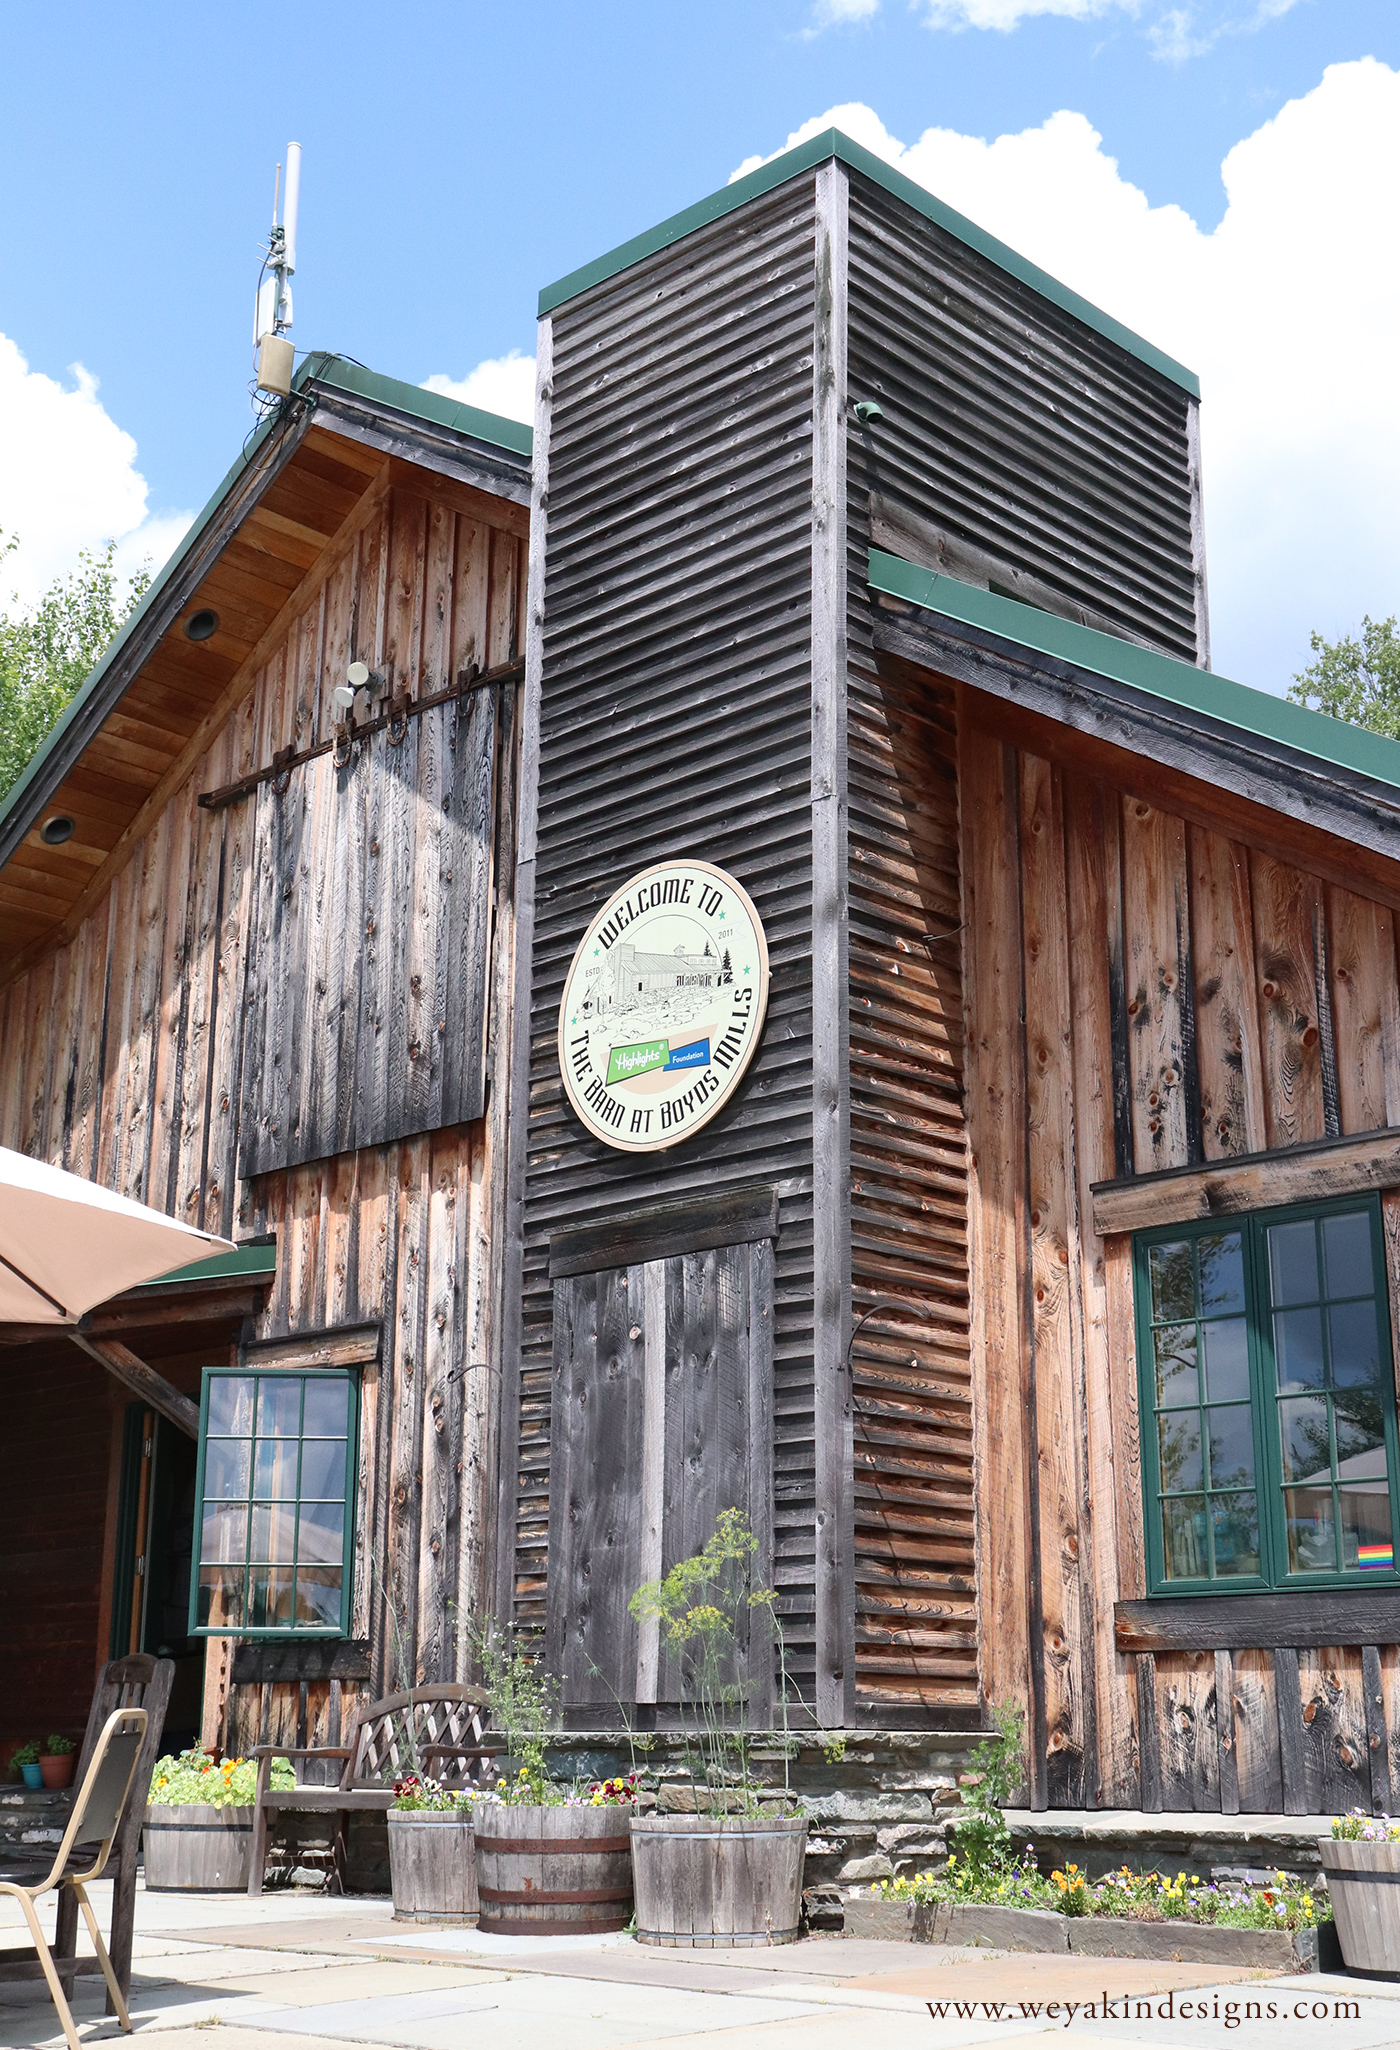
Earlier in July, I went away for almost a week to stay at The Highlights Foundation at The Barn at Boyds Mills in Pennsylvania. I attended the Summer Camp in Illustration intensive in order to grow my craft, learn from others, and make new connections in the children’s illustration field. Being there physically gave me the chance to really be immersed in the work and connect in a way I couldn’t if it was online from home. After two and a half years of everything online thanks to the pandemic, this was a welcomed change.
After my six days at The Highlights Foundation, I found myself struggling to succinctly and clearly describe my experience there. It was such a mind-opening and spirit-lifting time, it’s hard to put into words. Knowing that everyone’s experience is different, I’m speaking from my own perspective. And since my head is still buzzing with so many things I could say about my trip, I narrowed down to this list that I hope you find helpful.
Ten Things to Consider When Attending an In-Person Highlights Foundation Workshop:
Be open to experience. Don’t arrive with a specific expectation. Arrive with your mind and spirit open to receive whatever it is that happens. I couldn’t predict how my week would go. And it was so much better than I might have guessed.
Arrive hungry. Because they feed you three meals a day and snacks in between. And it’s not just any old food. It’s amazing, local, fresh, and different every day. If you have a special diet, don’t worry—they’ve got you covered. I’m a vegetarian and I had one of the best culinary experiences I’ve had in a while.
Be social. I know not everyone has an easy time with being social among strangers. But, believe me—people at Highlights who attend a workshop with you will not be strangers for long. Connecting with other kidlit illustrators and author/illustrators was one of the best parts of my trip. It made the experience so much more worthwhile. I had the pleasure of getting to know not only my fellow participants, but also the teaching faculty, and the staff. They were all amazing people and I’m so glad I got to spend time with them.
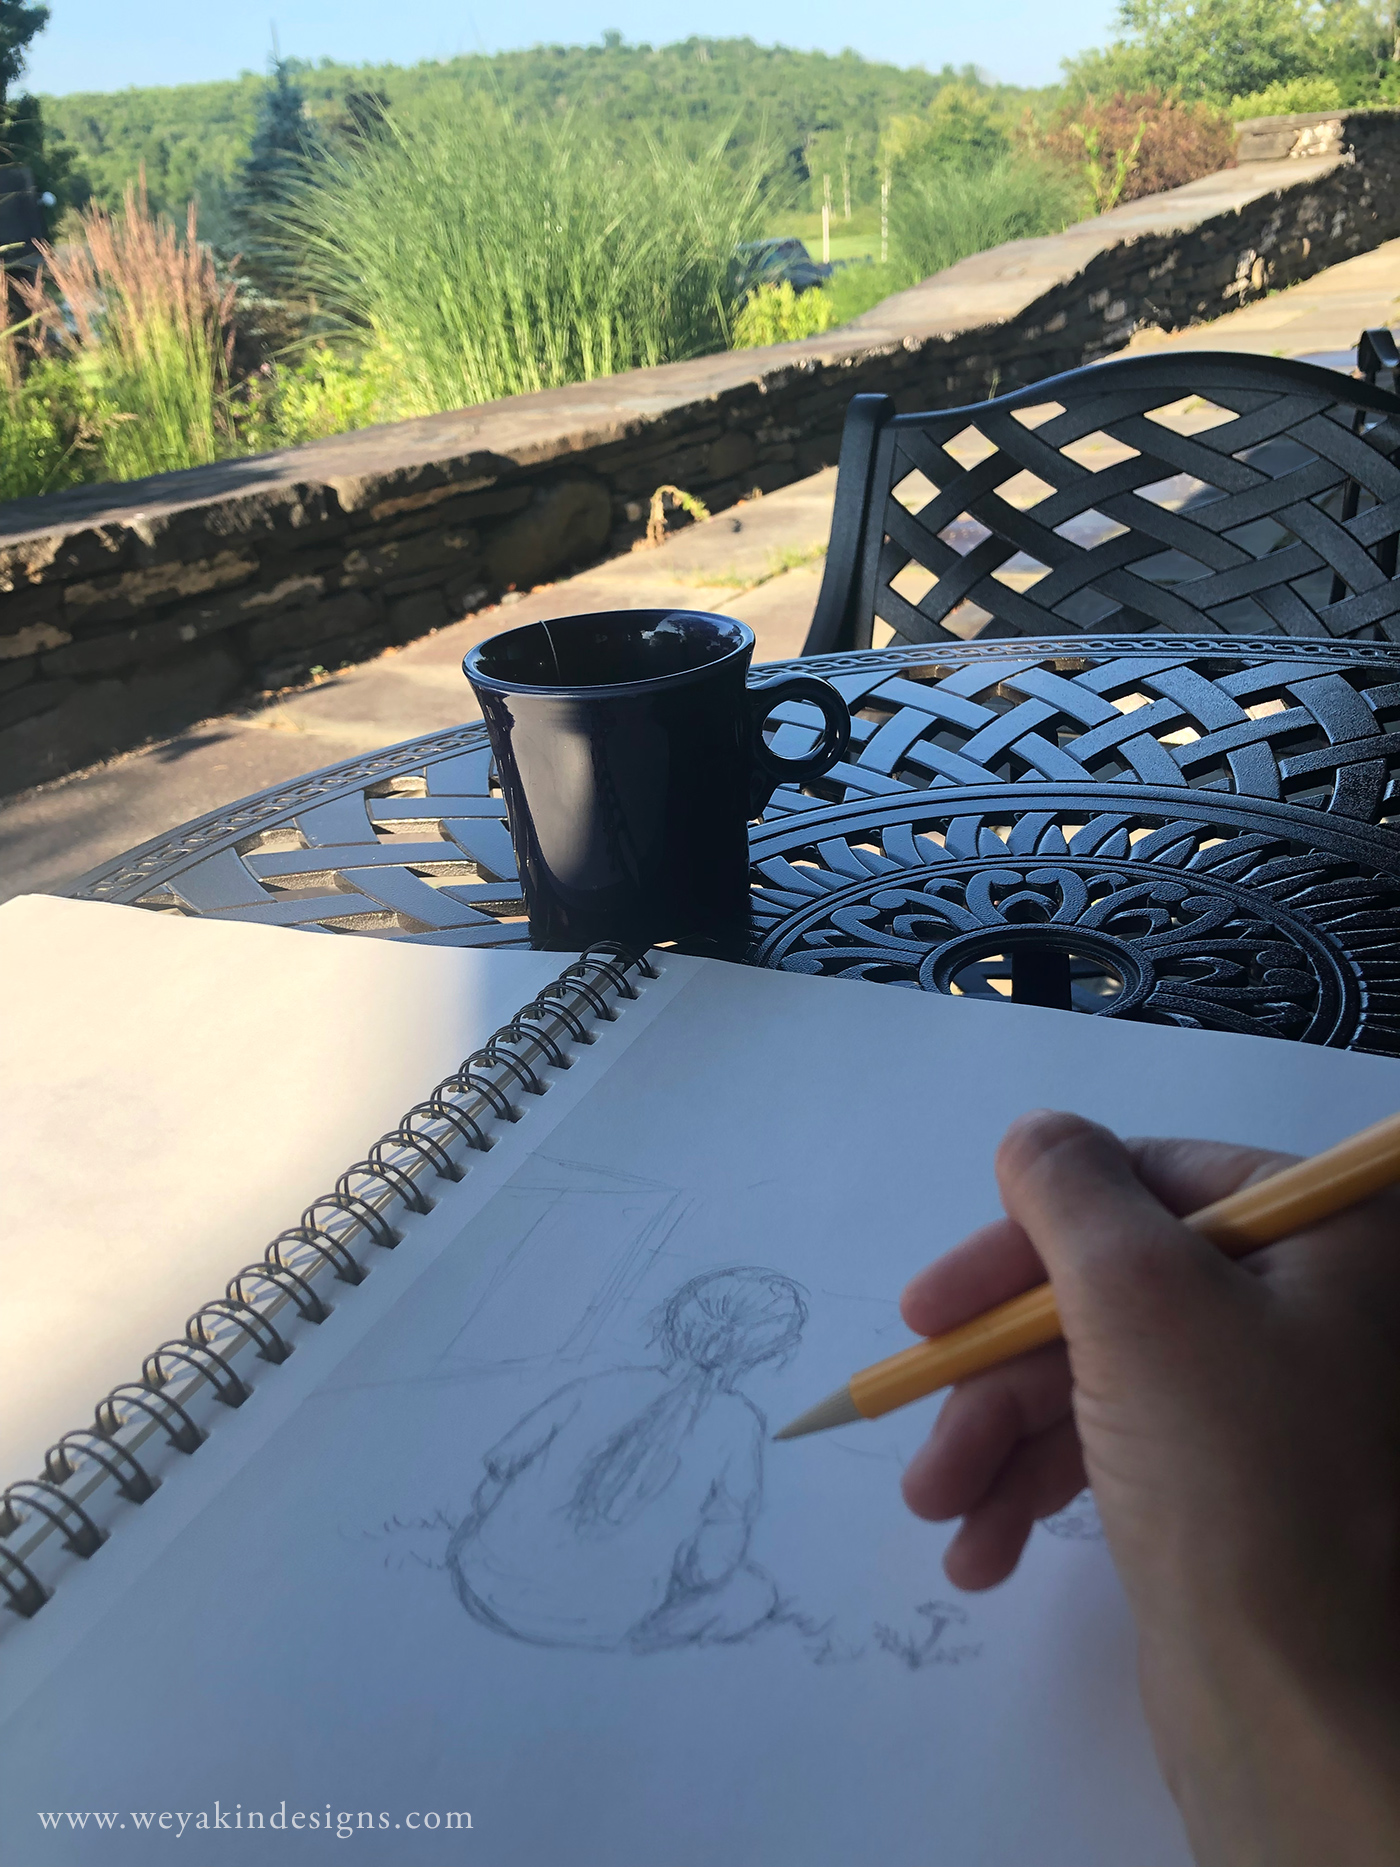
Give yourself time. Time to rest. Time to process. Time to be alone if you need it. I had the privilege of being able to add a personal retreat day to the beginning and end of my trip in order to let myself settle in and decompress. It was a great decision and if you have the ability to do so, I really recommend it. It allowed for some more quiet time, but also some more intimate time with the handful of others who stayed extra time. And if you can’t do that, make sure to give yourself time during the day or evening to take a break alone somewhere, especially if you’re an introvert like me. There are plenty of great places to do that.
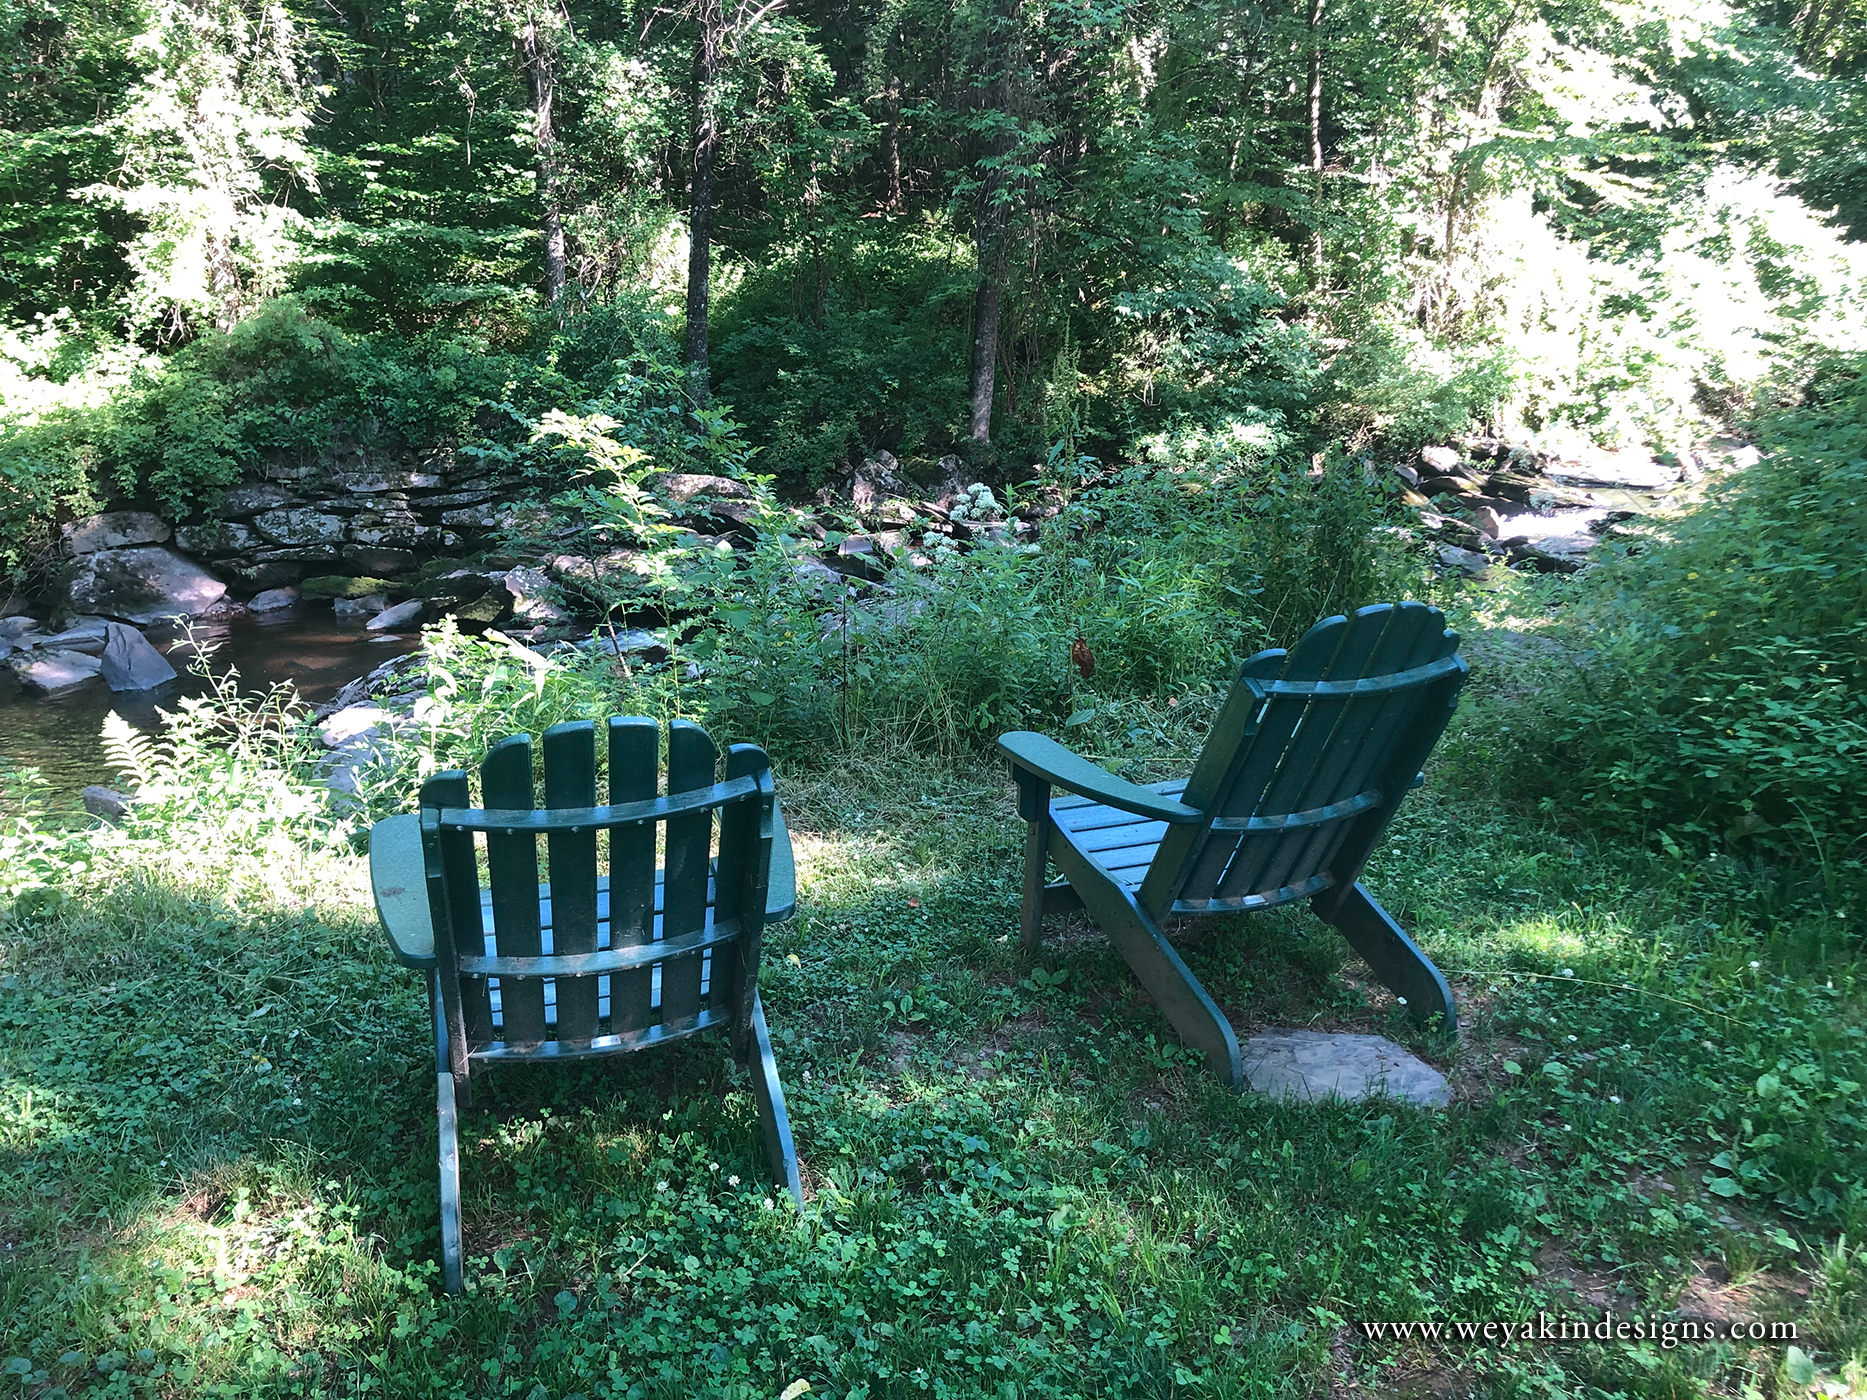
Take advantage of the outdoor spaces. The Barn at Boyds Mills is full of outdoor trails and places to sit. Be sure to visit the brook and sit down to enjoy the sound of the babbling water. Take a hike up one of the trails if you’re able to (but be sure to put on bug spray to avoid the ticks and flies). Or just enjoy time at one of the outdoor tables to quietly sketch or write. And if there’s a fire in the evening outside at the Barn, enjoy the time to sit by it and chat with others. Fireside times with fellow illustrators were some of my favorite moments.
Document your time there. You’ll want to take notes, you’ll want to draw, you’ll want to write. There’s a lot of information to take in. Make sure you have your favorite ways to take down and process information with you. I brought both a writing notebook and several sketchbooks and I ended up with notes and sketches in both. I’m glad I have them to refer back to. I also took photos to remember some of the spaces and people I spent time with. Looking back at them makes me smile.
Be present and in the moment. While you’re documenting your time there, also remember to be present and in-the-moment. It’s easy to jump ahead in your mind to what you’ll do when you get home. But, it’s also an experience you’ll really want to savor. It goes by quickly! Enjoy each moment while it’s happening.
Unplug and disconnect. From your regular life that is. It’s okay to check in with the family, especially when you have kids. But, be mindful of how often you’re checking your phone, email, or social media. Fortunately, the cellular service at Boyds Mills is pretty spotty and the wifi can be touch and go depending on where you’re standing. That can be frustrating if you’re doing research online. But, for the most part, it wasn’t a huge issue for me, and it allowed me to remember to unplug for a while and focus on the workshop and the people.
Be open to feedback. For many of these workshops, there is a critique or mentor component to it. One of the most helpful things you can do for yourself is to be open to the feedback you receive. It doesn’t mean you have to use all of the feedback if you don’t agree with it. But, at least listen. And thank the people who took the time to look at your work with you. They are there for the love of children’s books just like you are.
Exchange information with colleagues. You’re going to meet people there and you’re probably going to want to stay in touch. Be sure to ask others for their information, such as social media handles and email addresses. To make it easy to share your information, you could bring business cards or postcards with the info you want to share. I was so glad I brought my business cards with me so people could find me later.
And the biggest piece of advice I can give for a Highlights Foundation workshop trip is that the experience will be what you make it. People I know who have gone before have told me there’s a magic to the space that they haven’t found in other places. I found that to be true myself. But, being open to experience and present in the moment made the trip even more pleasant and remarkable. I hope you’ll find the same is true for you.
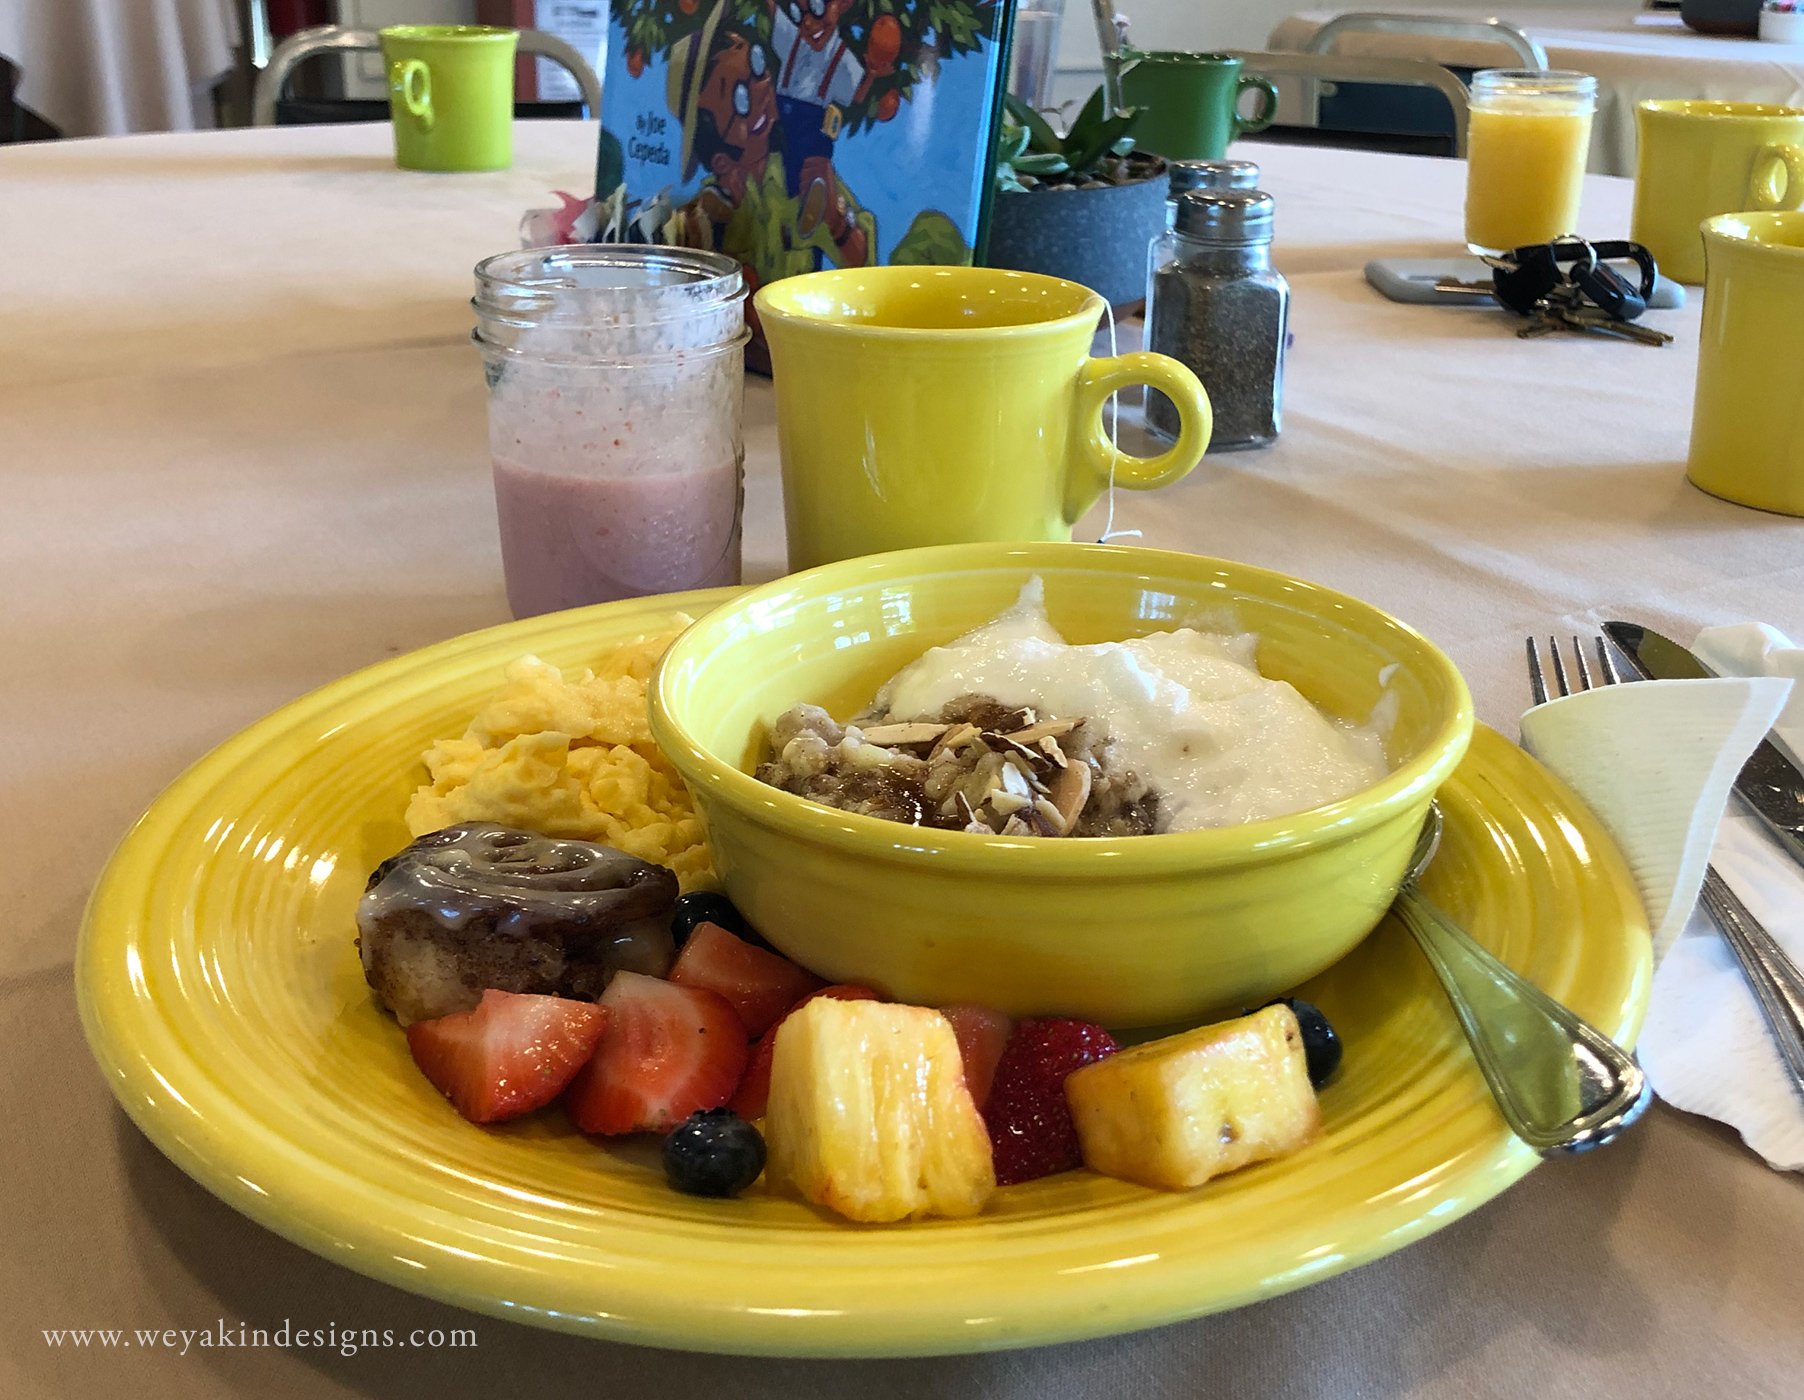
One of the amazing breakfasts I had at Highlights.A quiet place to sit by the brook.Appetizers by the brook with friends. Selfie by Mallory Grigg.Isabel Roxas presenting at the Illustration IntensiveThe front of The Barn where much of the action takes place.I enjoyed sketching in the morning with a cup of tea outdoors.
All of us as creative beings need something to nurture our creative souls. Every human has the potential and capacity for creativity, even those who think they have lost it. As I’ve talked about before, being creative is like breathing. In order to breath out, you must breath in. In order to create something new, you must also take inspiration in. For me, one of my favorite ways to breath in inspiration is by spending time out in nature.
I’ve mentioned the book The Artist’s Way by Julia Cameron in the past—a 12 week program to nurture your inner “artist child”. I keep bringing it up because it’s a program that has helped me through some of my artistic ruts and given new life to my creative spirit. One of the weekly assignments when doing The Artist’s Way is an “Artist’s Date”. It doesn’t really matter what you do on your artist’s date, but the criteria are as follows:
You must go on your artist’s date alone
Your artist’s date is something that you want to do for you
Your artist’s date will help inspire your artist child
Some examples of dates I’ve taken myself on include:
Going to the local botanic garden
Going to an art museum
Watching a new movie I’ve been wanting to see (by myself)
Buying a cheap bubble set and blowing bubbles in my front yard
Going for a long hike on a new trail I’ve never been to before
Taking photos at a local park or garden
Browsing the plants at a local garden center
Connecting With Nature
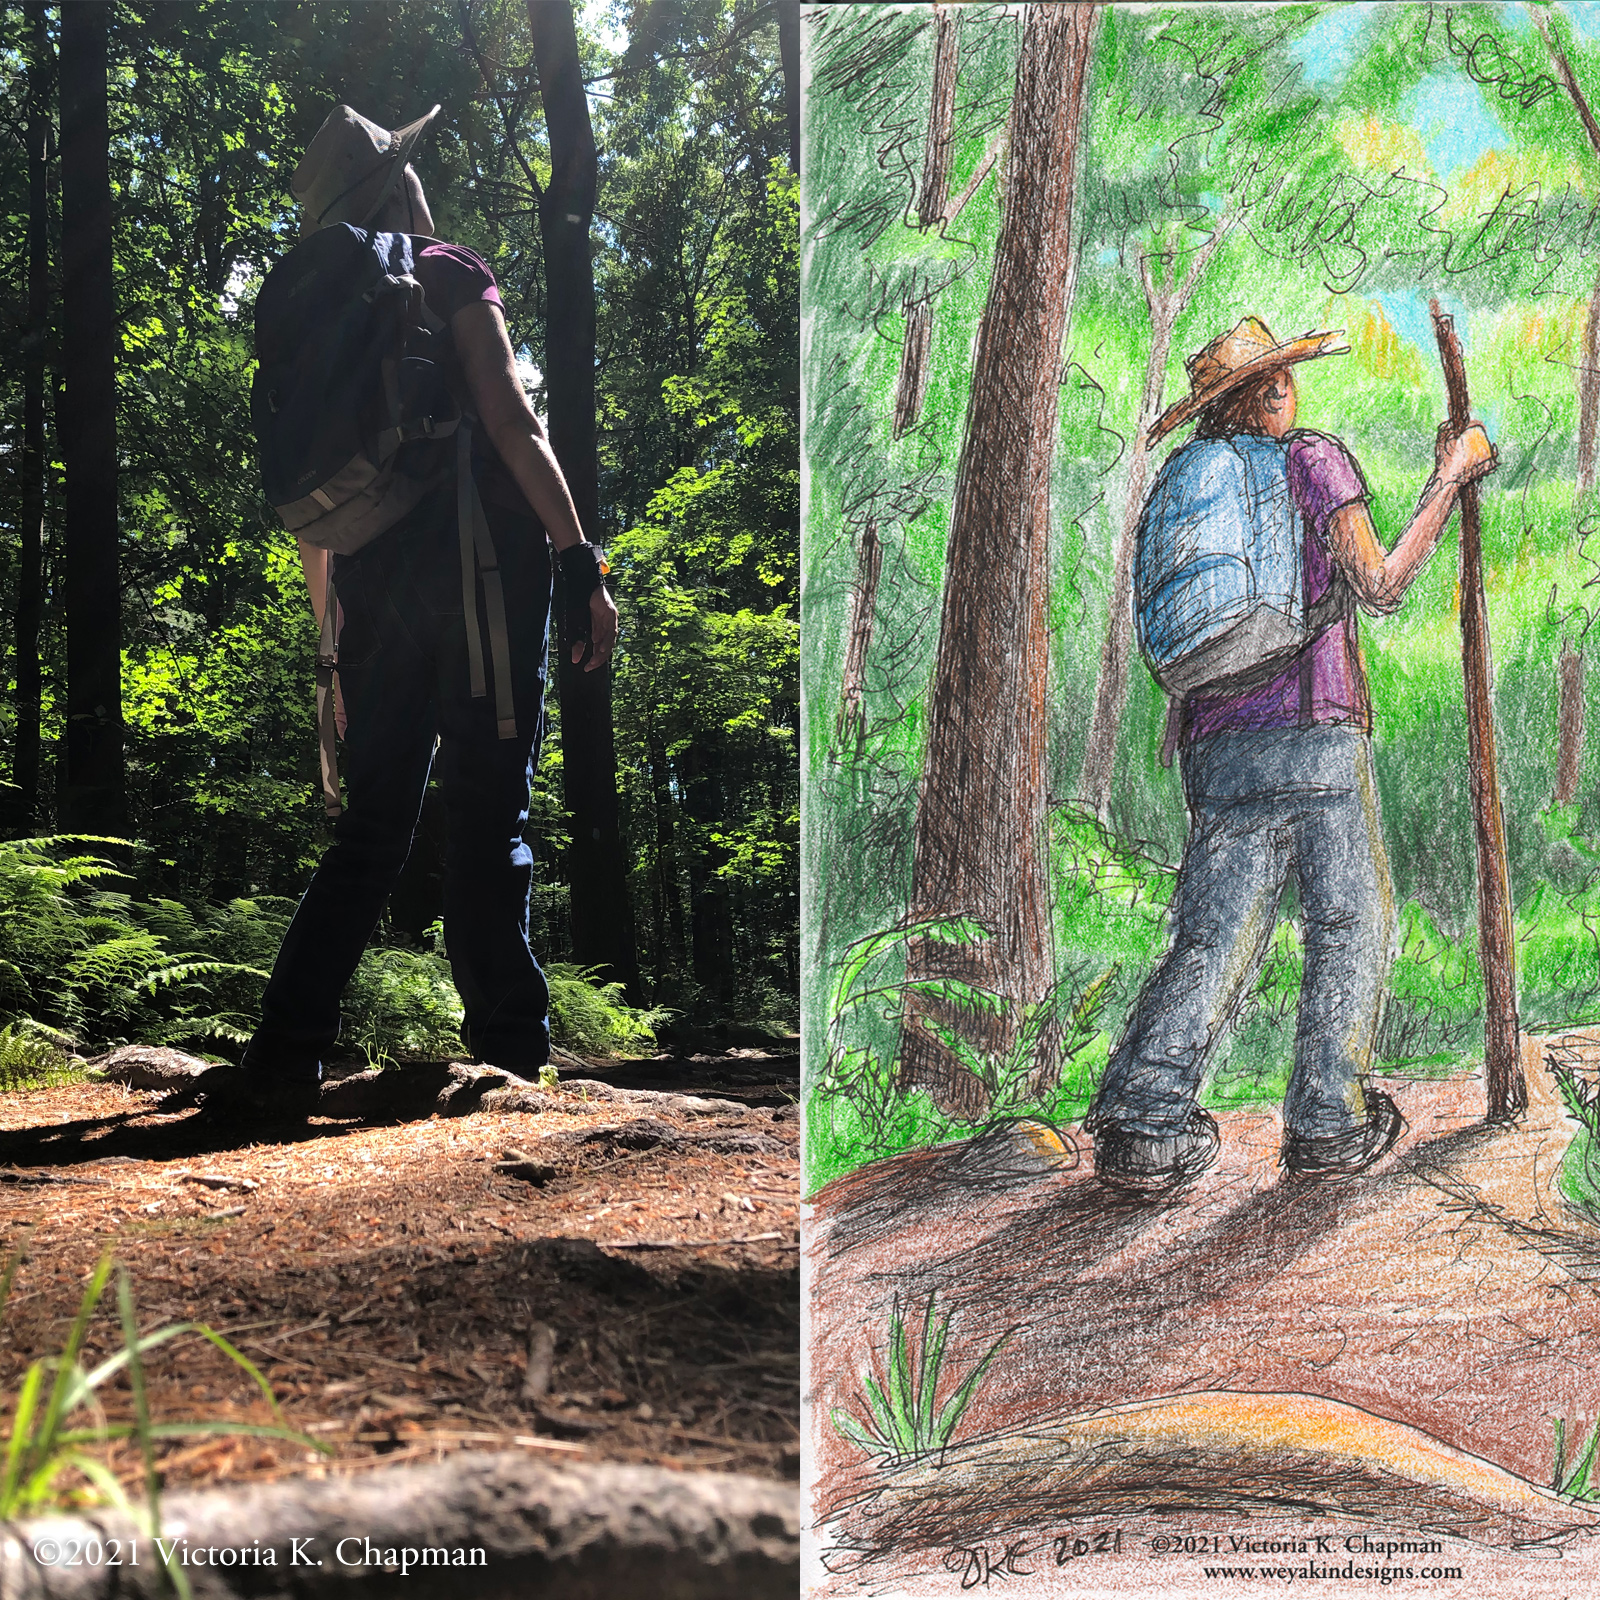
The possibilities for artist’s dates are endless. But, of all those possibilities, my favorite ones are the dates where I really get to connect with nature. Take the time to observe. Here are examples of things I’ve noticed while out in nature:
Feeling my feet on the trail and how the pine needles give it a soft springiness.
Stumbling upon a huge grove of ferns under a forest canopy.
Discovering the variety of bees attracted to mountain mint flowers.
Feeling the warmth of sunshine on my face when I close my eyes and breath in fresh air.
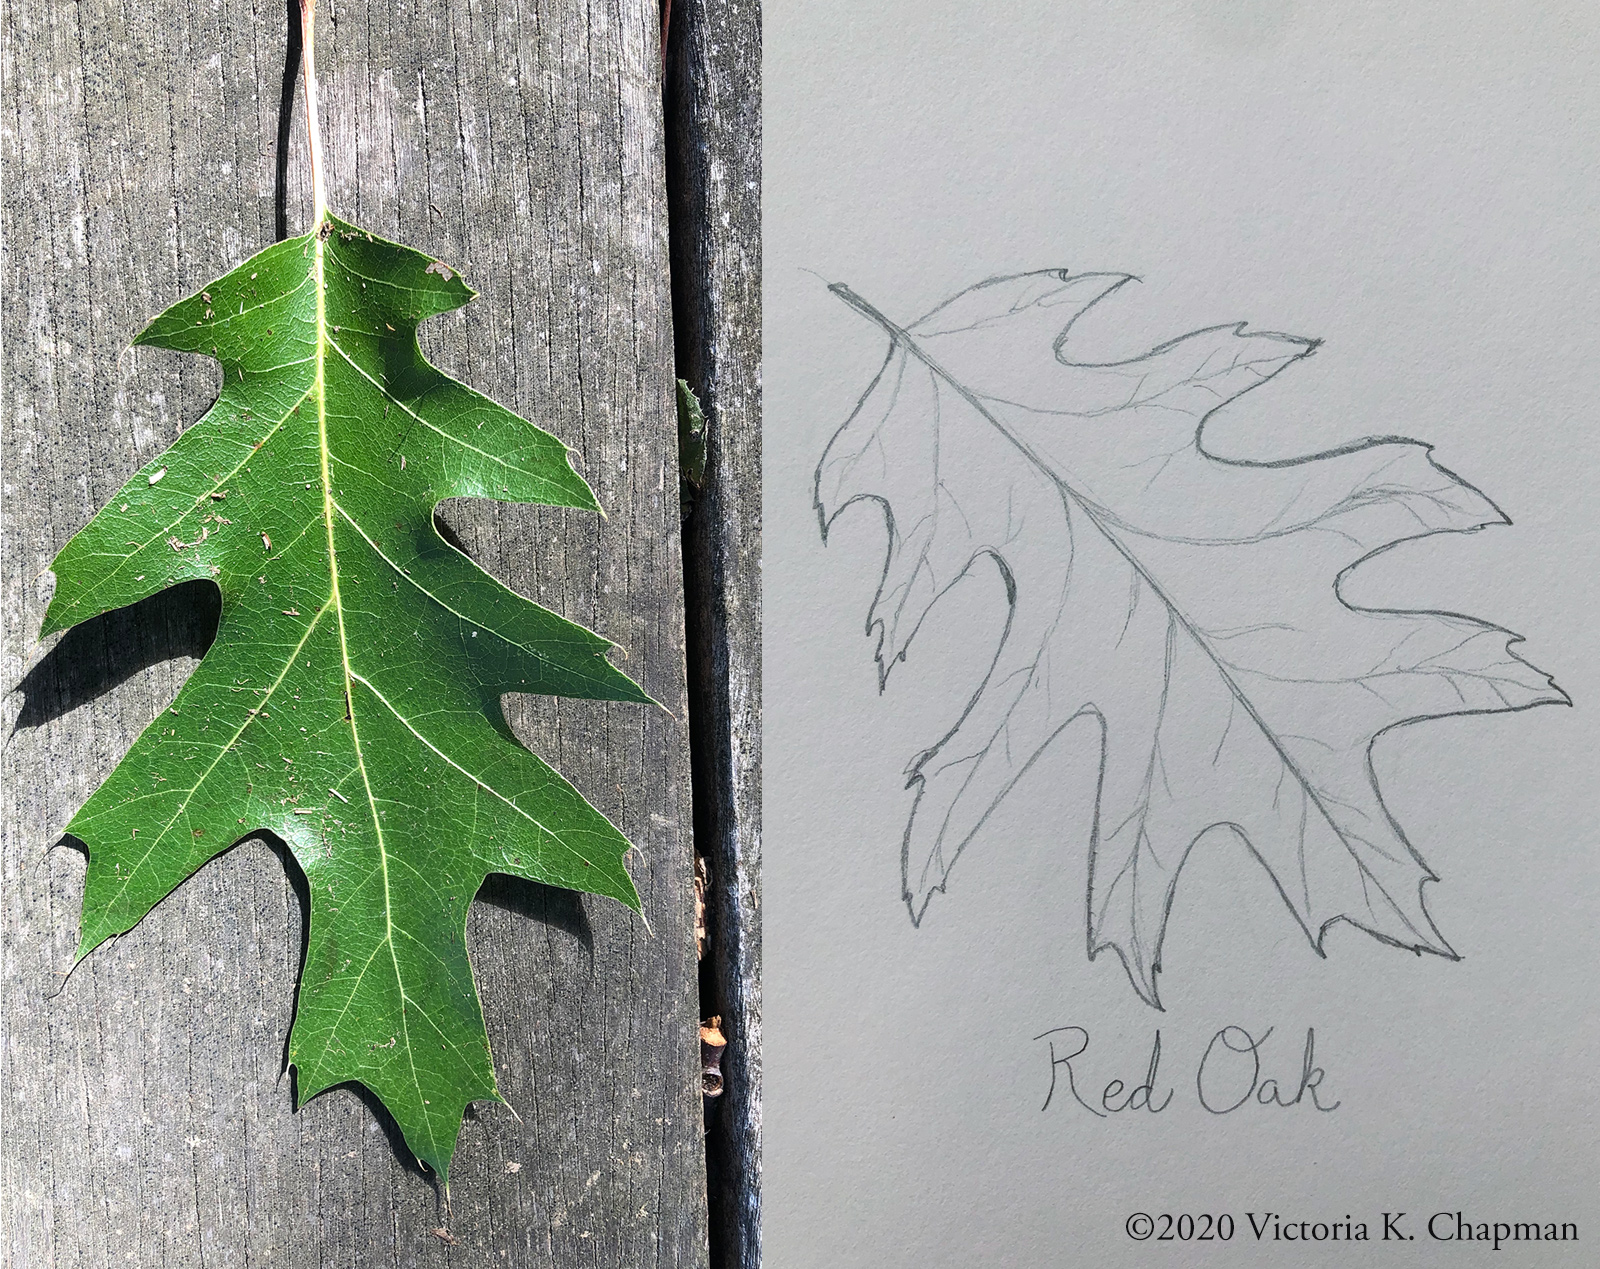
Stopping to notice the number of species of oak trees in a particular area.
Being surprised and charmed by wildlife scurrying by while sitting quietly on a boulder.
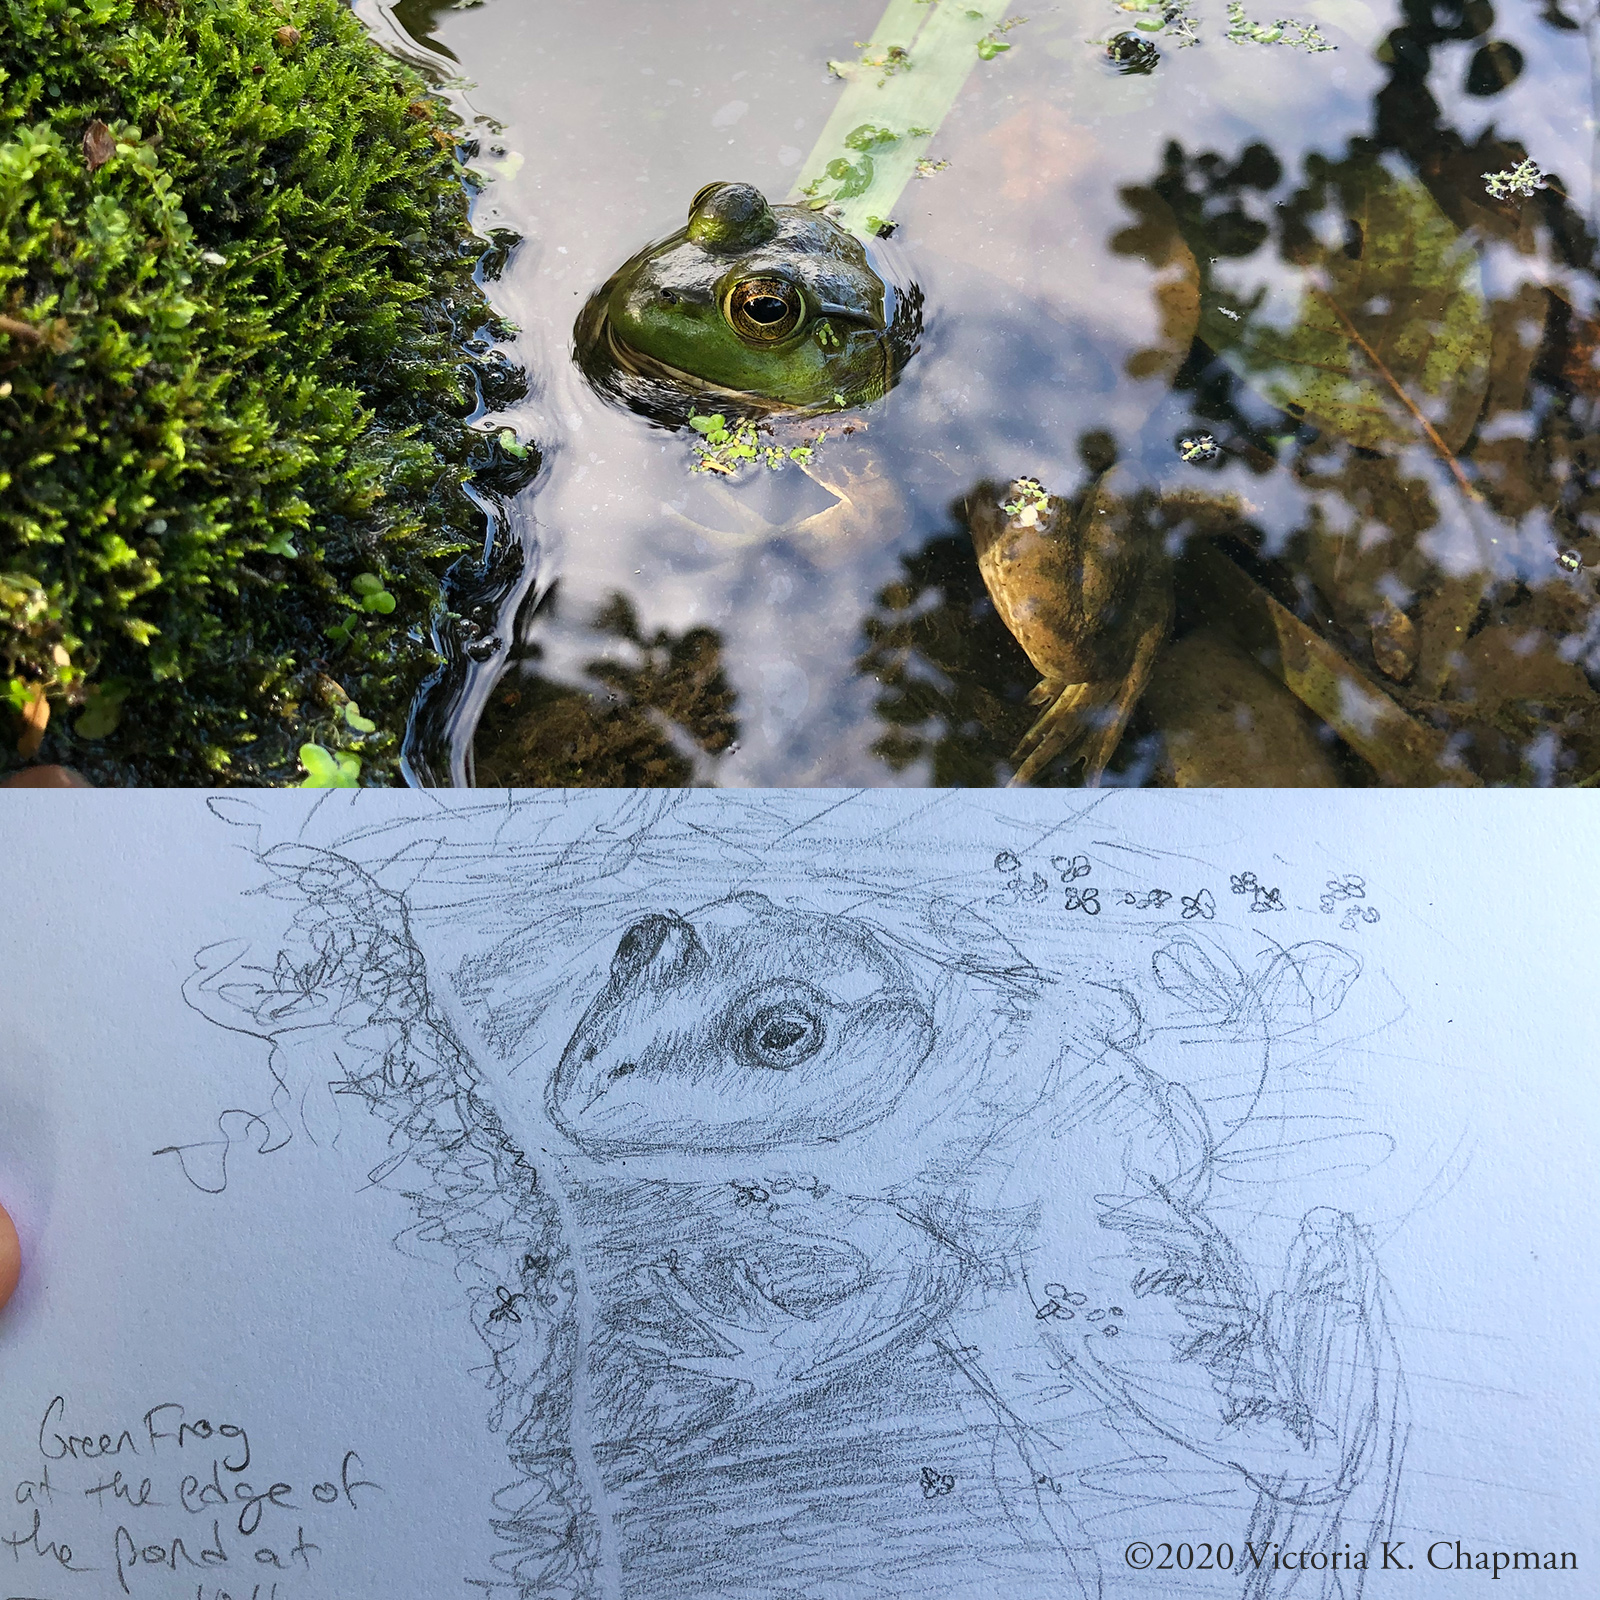
Greeting a green frog in a pond while watching the red-winged black birds across the way.
Similar experiences can be had for yourself when embarking on a solo trip into nature. It doesn’t even have to be a long adventure. Is there a local trail nearby? Go explore it for half an hour. Is there a lake or pond within walking or driving distance? Go there, sit, and observe. Bring a sketchbook or notebook to jot down ideas that might come up. Bring a camera if you wish to capture something that way. But mostly, focus on the moment of being present with nature, however that happens for you.
The important piece of going on your nature date is finding some way to connect with nature, be it big or small. And the most important part is just doing it. Don’t let limitations and excuses get in your way. Even exploring your own back yard can be a date. Put out some bird seed or a hummingbird feeder and see what happens. What’s under the rock over there? What does the lichen growing over on that tree really look like up close? Be curious. Be open. Be willing to take in whatever comes to you. And most of all, let your artist child explore the wonders and joy of nature. Nurture your artist’s soul.
Various Measuring and Templating Tools for Artists
As illustrators and artists, there are a vast variety of tools at our fingertips that can make our work more interesting, easier, and more fun. This post is the first in a new series I’m writing called AN ARTIST’S TOOLBOX. The first topic for this series is about measuring and templating tools.
While many of us may prefer to freehand everything as much as possible because it feels more natural and more easy to go with the flow, there are also times where measuring and templating tools can not only help make measurements and shapes more accurate, they can also make our lives easier. In this post I’ll go through some of the measuring and templating tools I find myself using most often and some of their possible applications.
L-Square
L-Square ruler to create 90° angles.
The L-square as been one of the most helpful tools I own for measuring the initial dimensions of a piece, ensuring the corners are square and the horizontal and vertical lines are the same length. In the past, using only a ruler, I sometimes found myself with corners that weren’t quite square, resulting in one measurement being slightly longer than the other. Having to erase the initial lines and start over is just plain annoying. If you don’t notice your error until the piece is finished, it goes from annoying to downright frustrating. The L-square helps fix this measuring dilemma with nice precise square corners.
Draw one horizontal line and one vertical line all in one shot, making sure to mark where the end of your lines are. Then, flip the L-square around and do it again on the next two horizontal and vertical lines, lining up with the ends of the previous drawn lines. You end up with nice square corners and even lines!
I have an L-square from Blick that is 24” on one edge and 14” on the other edge. This is usually sufficient for my illustrations. But, squares come in many sizes, so consider what works best for your own work. Many places carry L-squares, including local hardware stores.
Benefits of the L-square:
90° square corners
Precise line measurements
Easier and faster to make accurate outlines for a new piece
BONUS: Metal squares are also helpful for creating a straight edge for cutting paper with an X-acto blade
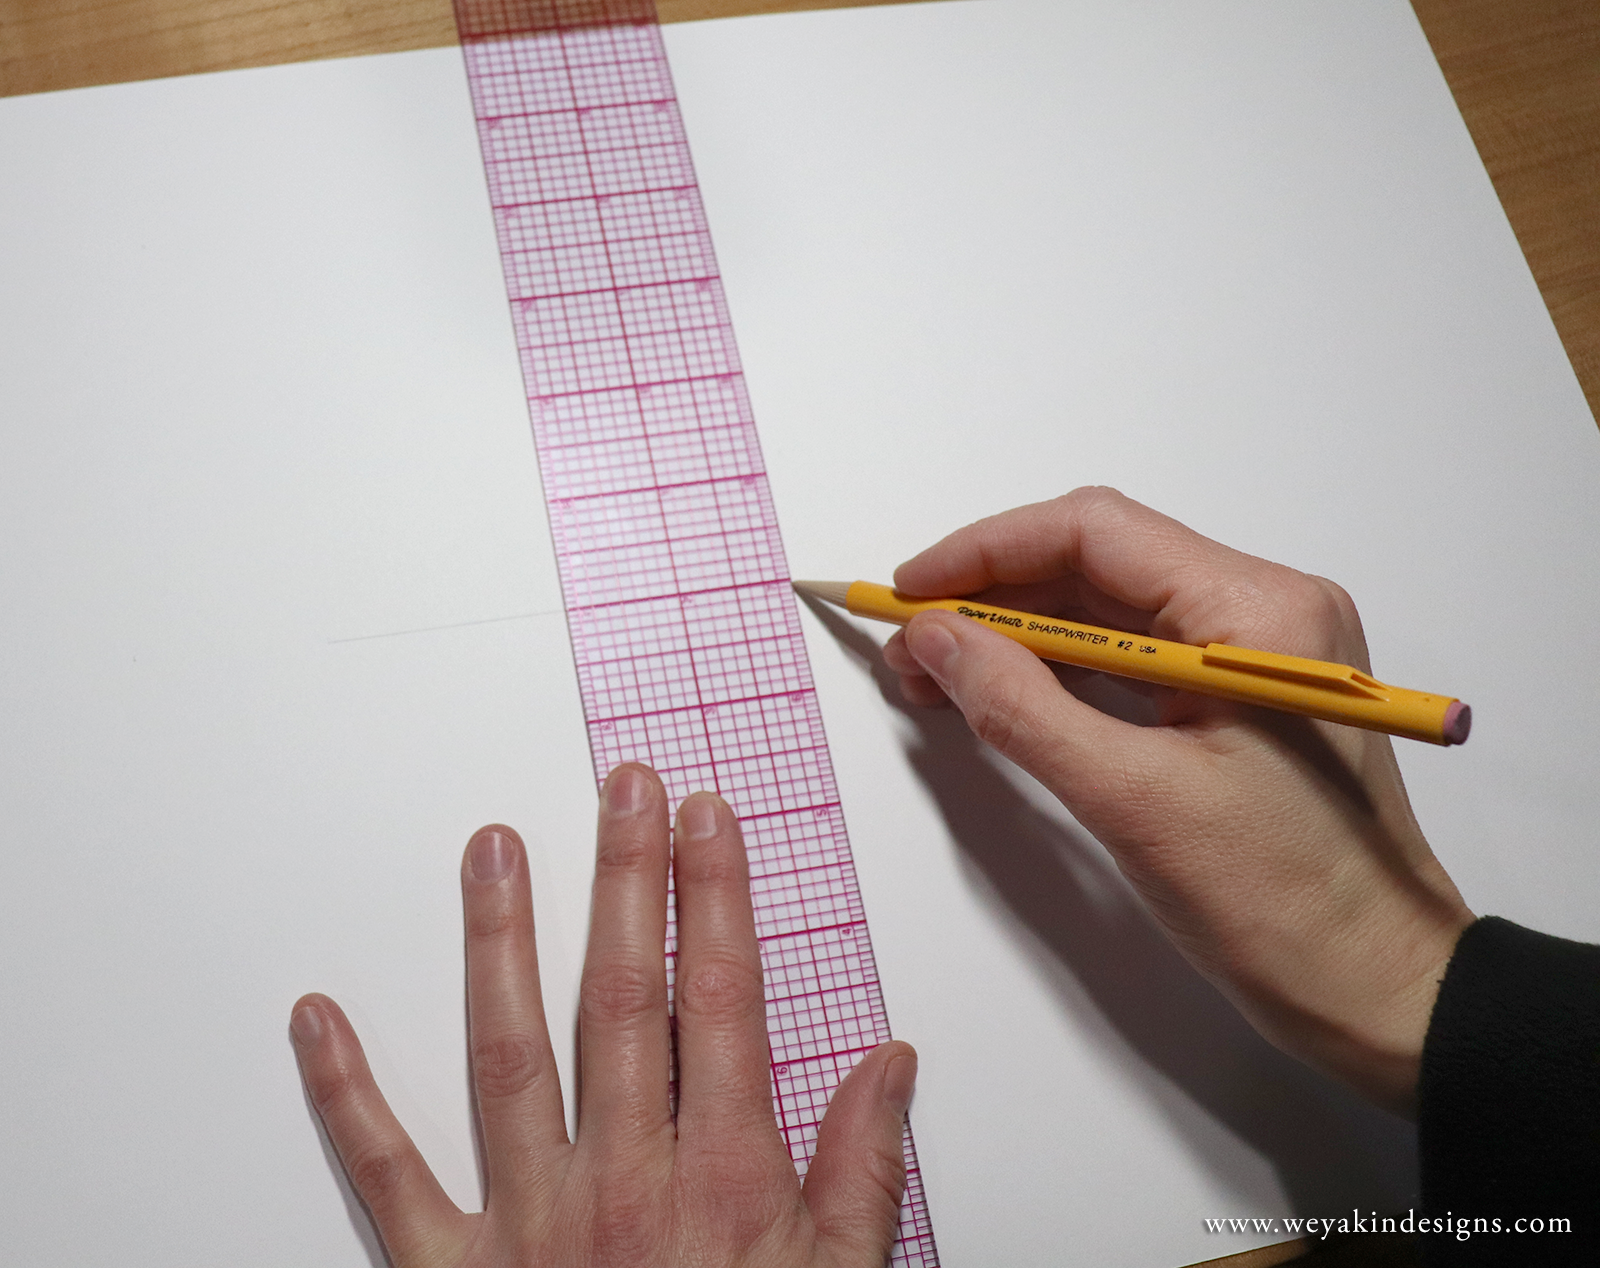
Clear Grid Ruler
Clear grid ruler made by Westcott to draw accurate lines.
The clear grid ruler has been one of my go-to rulers for many years. I find this variety of ruler more helpful than a standard solid-colored ruler. The see-through grid allows you to see your work beneath the ruler so you can more accurate place your lines and line up with previously drawn lines. I find it especially helpful for illustrations that involve a lot of linear shapes, such as houses, windows, and tables. They’re also helpful for creating the horizon lines when dealing with tricky perspective pieces.
I have an 18” long and 2” wide clear grid ruler made by Westcott. Check with your local art stores or order one online. I bought my very first one from the school co-op at my alma mater, the University of Connecticut and got many great years of use out of it before needing to purchase a new one.
Benefits of the Clear Grid Ruler:
See-through grid makes it easier to see your existing piece below the ruler
The grid allows you to line up with previously drawn lines
Helpful and faster for drawing linear objects such as houses, windows, doors, and furniture
Helpful and faster for drawing horizon lines for tricky perspective pieces
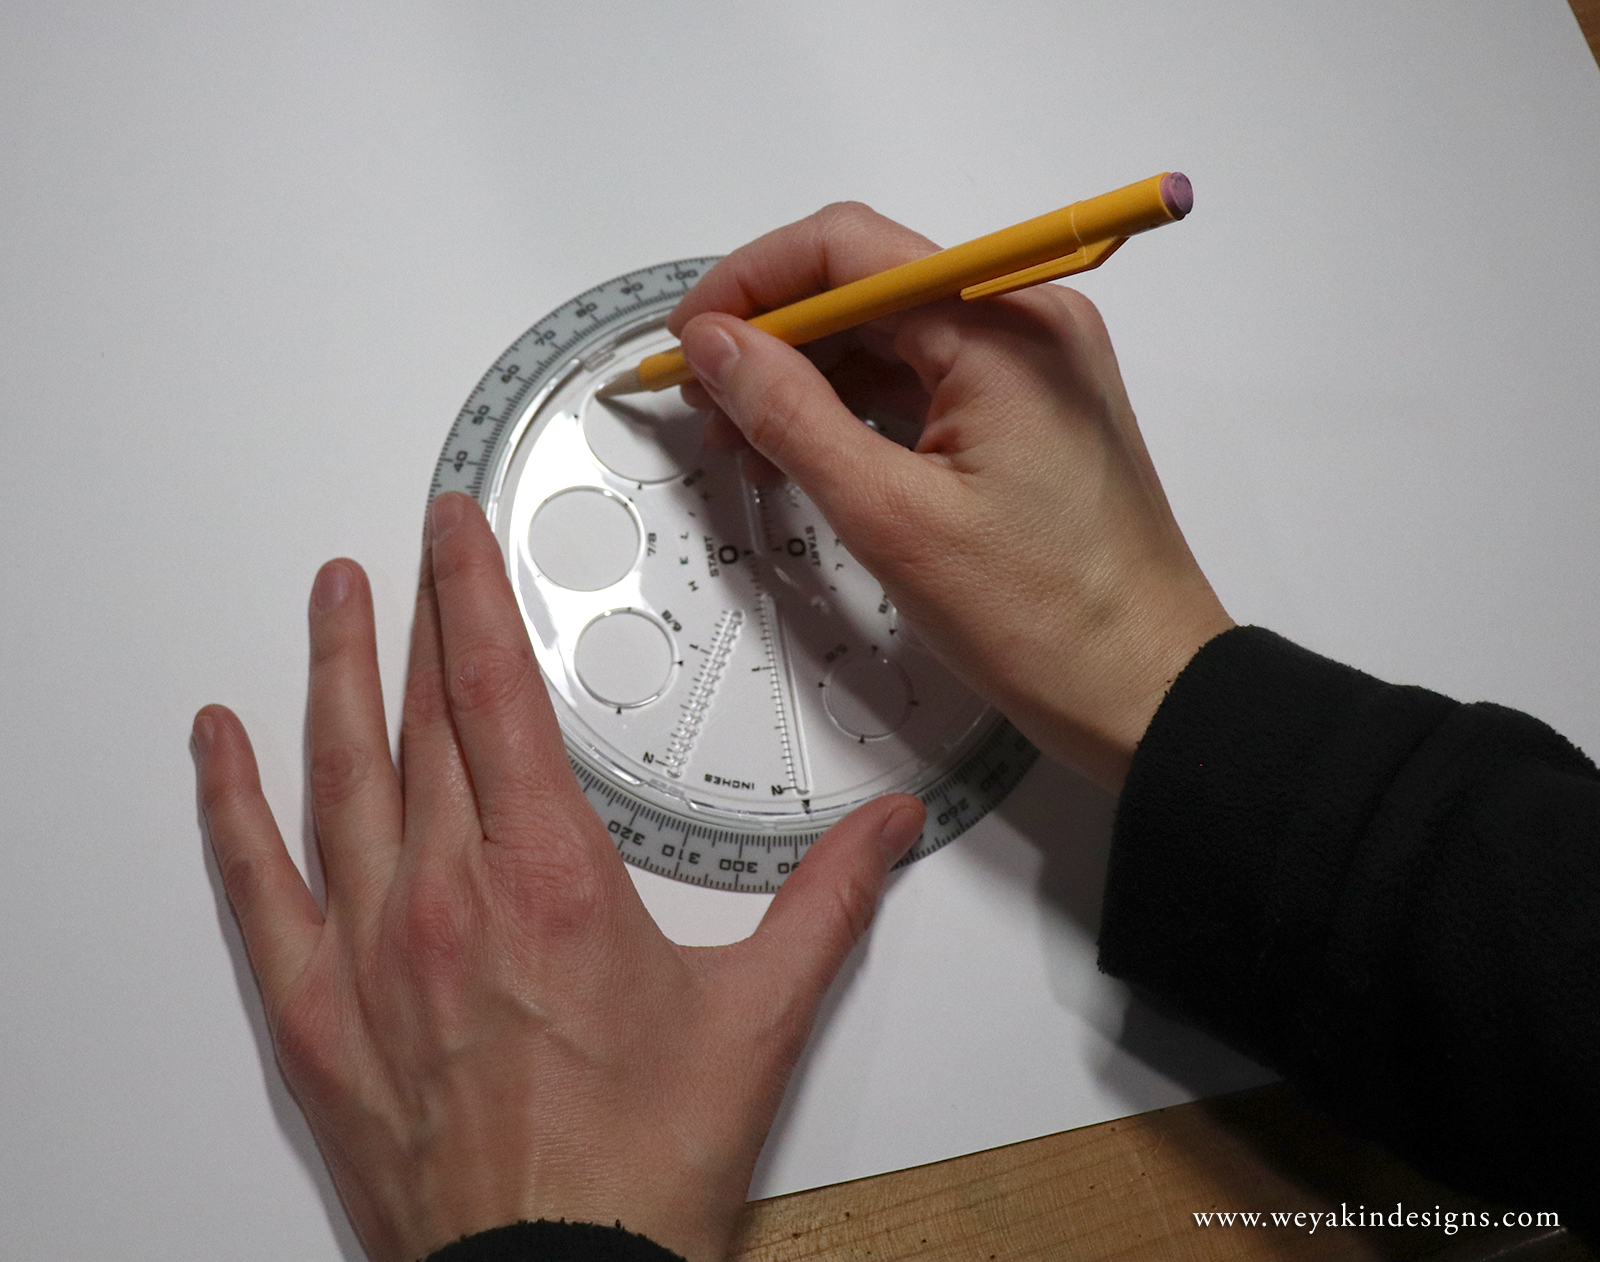
Circle Maker Tool
A circle maker tool made by Helix.
The circle maker tool is something I more recently discovered as a handy all-in-one circle templating device. It serves as a protractor, compass, and circle template so you can make accurate circles of many sizes, up to about 5.75” in diameter. I’ve found it helpful for drawing things like moons, balls, circles for containing a smaller drawing on the page, and other round objects. It’s especially nice when you need to make multiple circles that are all the same size.
I have the Angle and Circle Maker by Helix. Ask your local art store if they carry this sort of tool or you can order it from an online art store.
Benefits of the Circle Maker Tool:
Make many sizes of circles with one tool
Works as a protractor, compass, and template
Easy to make many circles that are the same size
Makes circle-drawing faster and more accurate
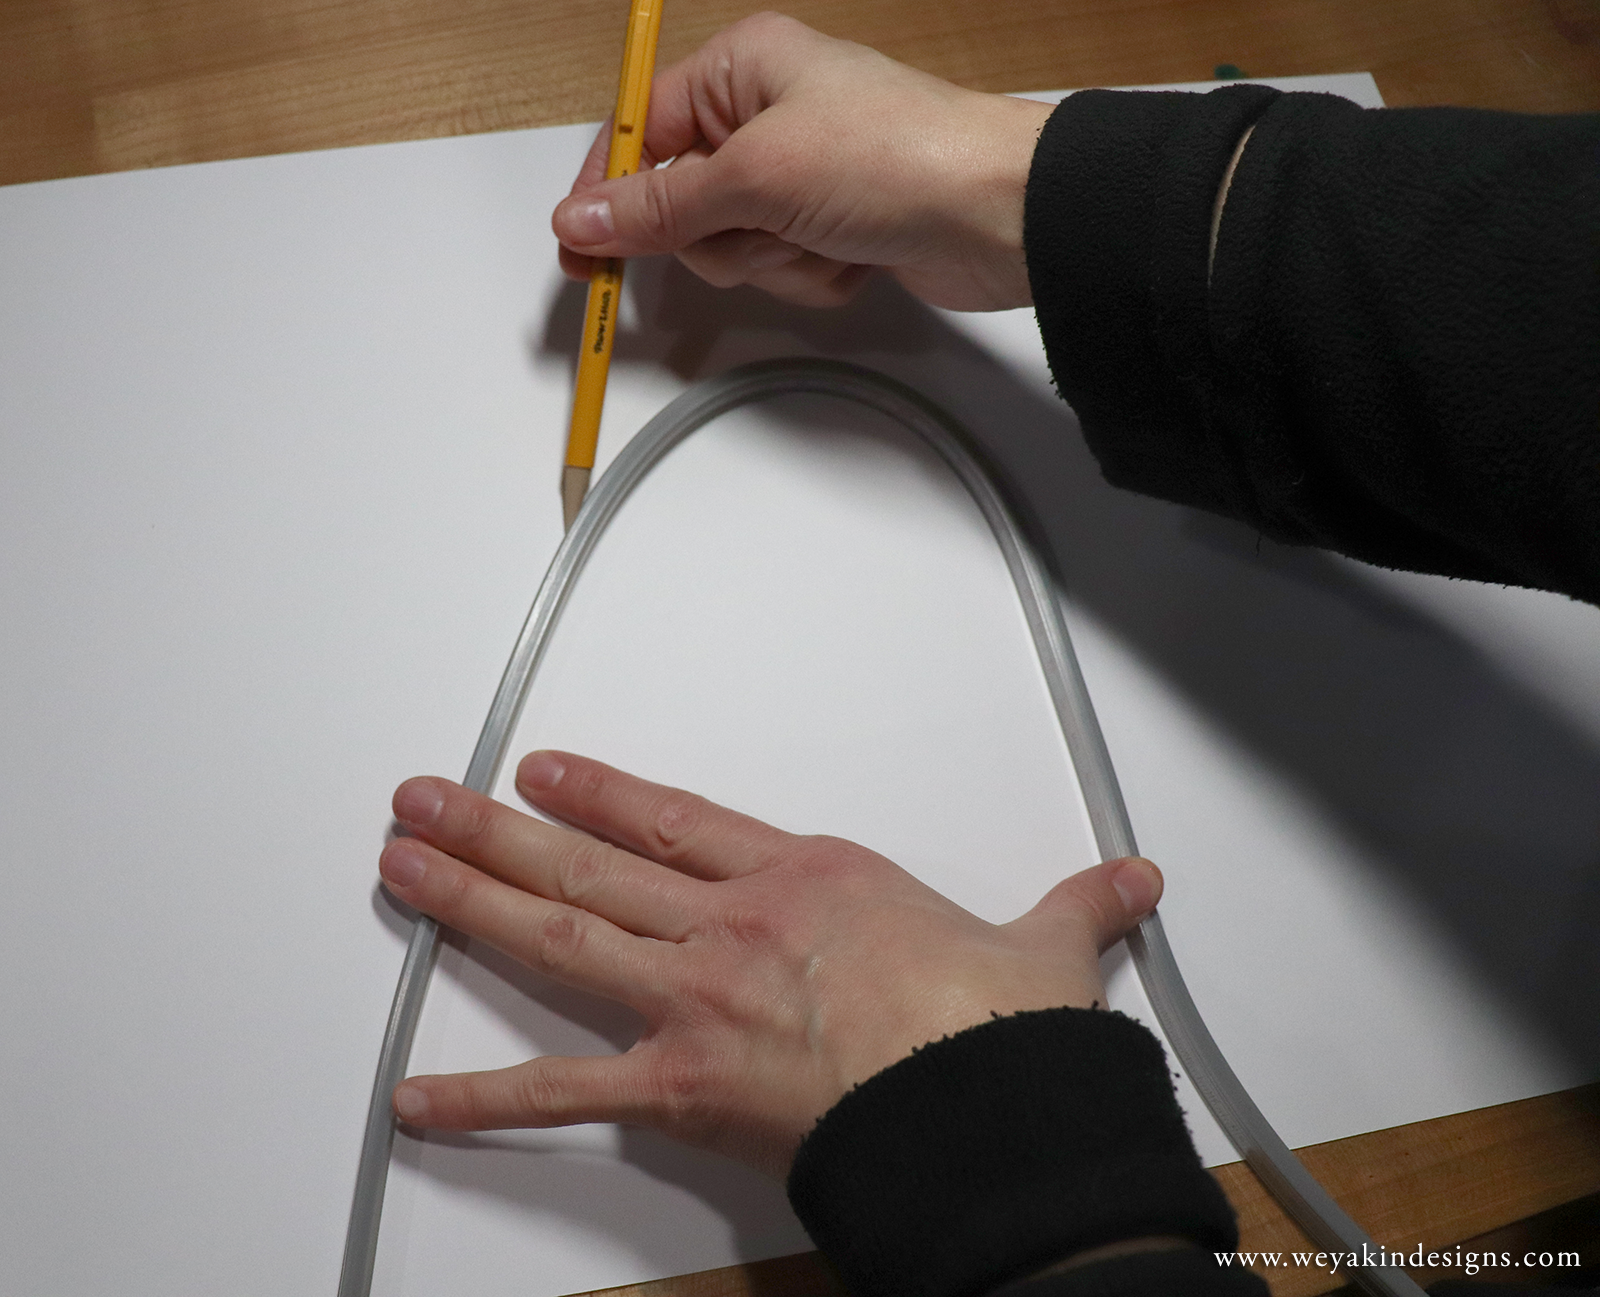
Flexible Curve
A flexible curve ruler to make organic shapes.
The flexible curve is like the handy snake friend of illustration that you never knew you needed. This bendy ruler allows you to make your own custom curvy shapes and trace that shape onto your page. This allows you to create more organic shapes, but also draw it more smoothly. You can also more easily draw that shape multiple times once you’ve formed it—the flexible curve keeps its shape until you change it! One other benefit of the flexible curve is that because it has a ruler on each side, you can also measure shapes that aren’t straight.
I have a 32” long flexible curve made by Alvin, but they come in several sizes ranging from 12” to 40”. You can ask your local art store if they carry them, or if they can order one for you, or you can order one online.
Benefits of the flexible curve:
Make custom organic shapes
Create a smoother curved line than free-hand drawing
Use the shape as a template for creating repeated shapes—the curve keeps its shape until you change it!
Measure lines that aren’t straight.
Homemade Templates with Card Stock
Homemade template made from cut card stock paper.
Sometimes I find there’s a shape I need to make that isn’t available with any of my other template tools. I love keeping card stock on hand to make my own custom templates, similar to the templates elementary school teachers make for class art projects. You can free-hand draw your shape and then cut it out so you can repeat that shape by tracing it. Or you can use the computer.
If you want a more precise shape, you can draw your shape on the computer using a program such as Adobe Illustrator or even Microsoft Paint. There are a lot of programs that allow you to make basic shapes. From there, you can print your shape out and then carefully cut it out by hand. Then, you have a handy template you can trace.
Benefits of homemade templates with card stock:
You can make nearly any shape you want
Makes it easy to draw repeated and consistent shapes
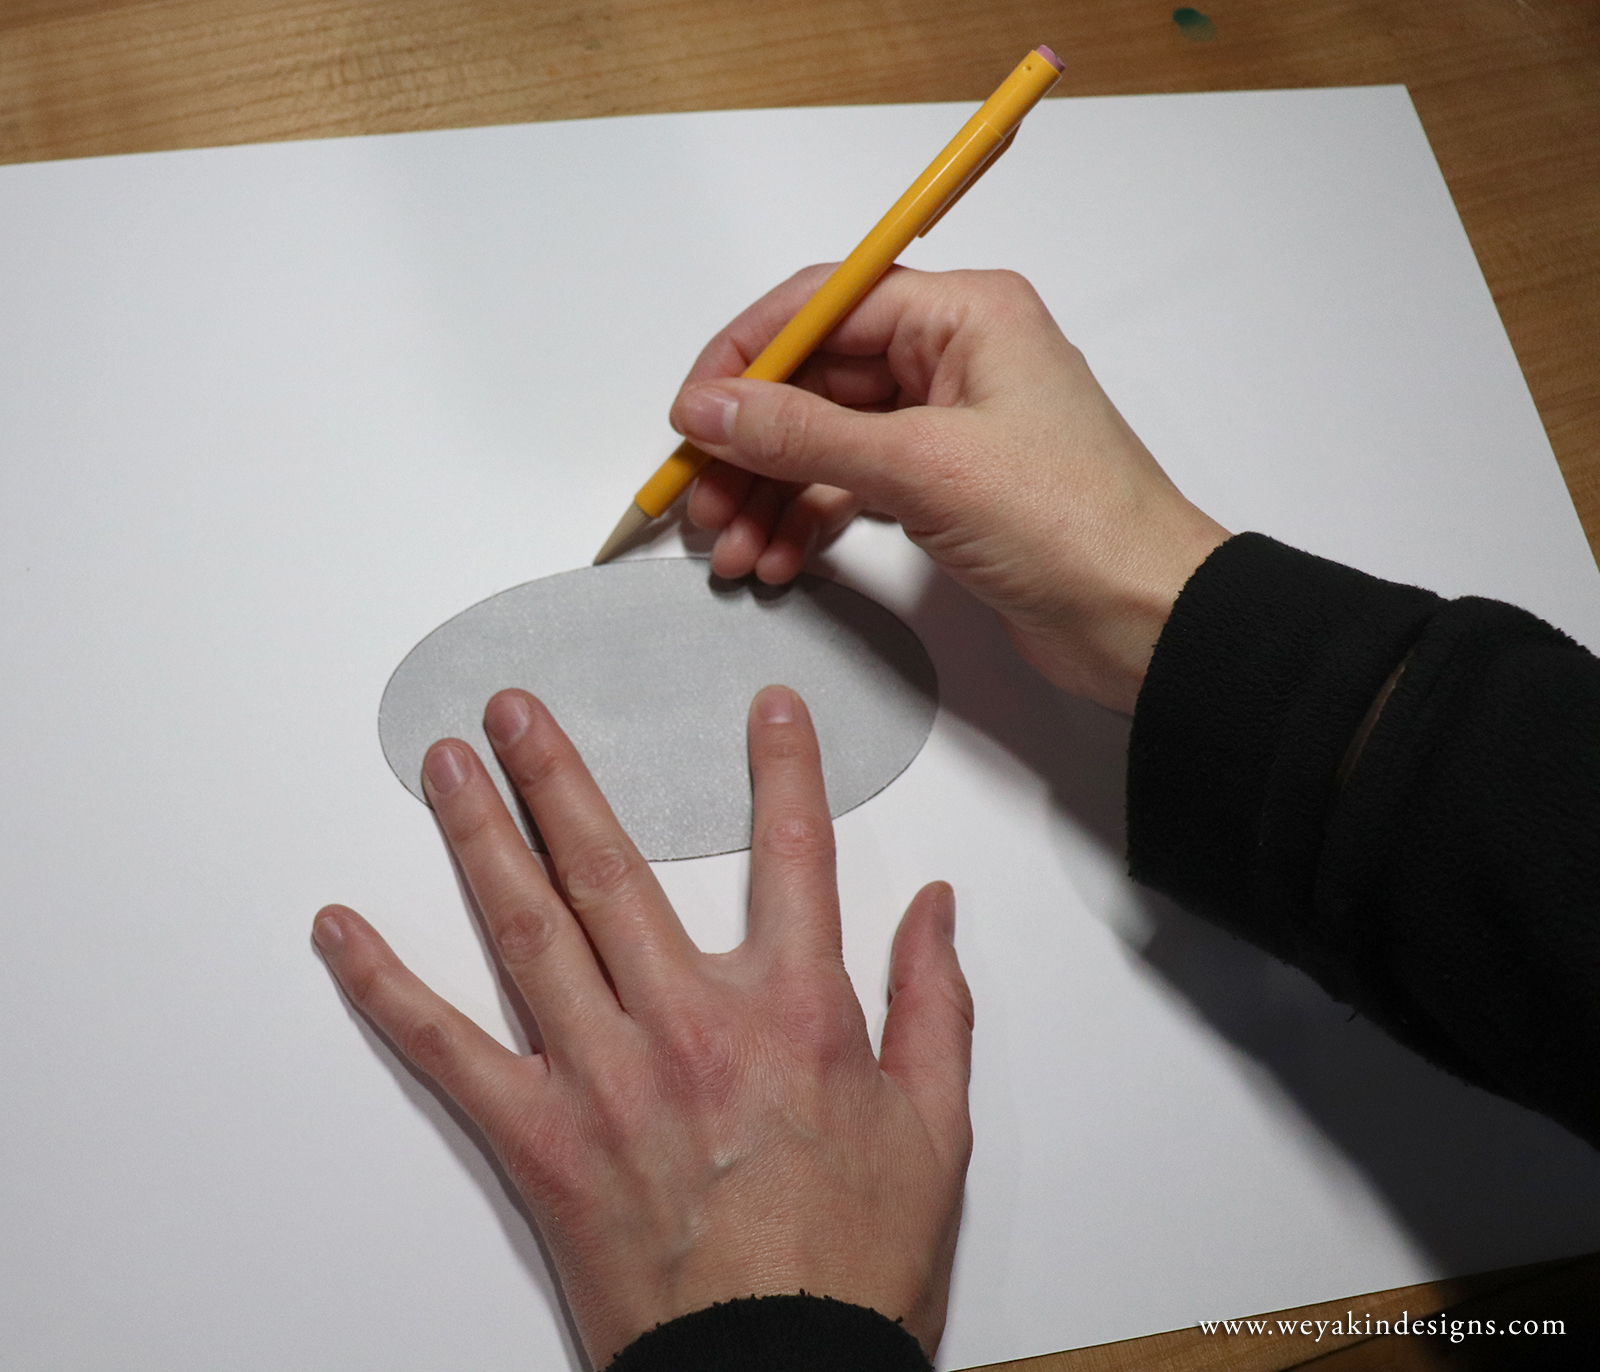
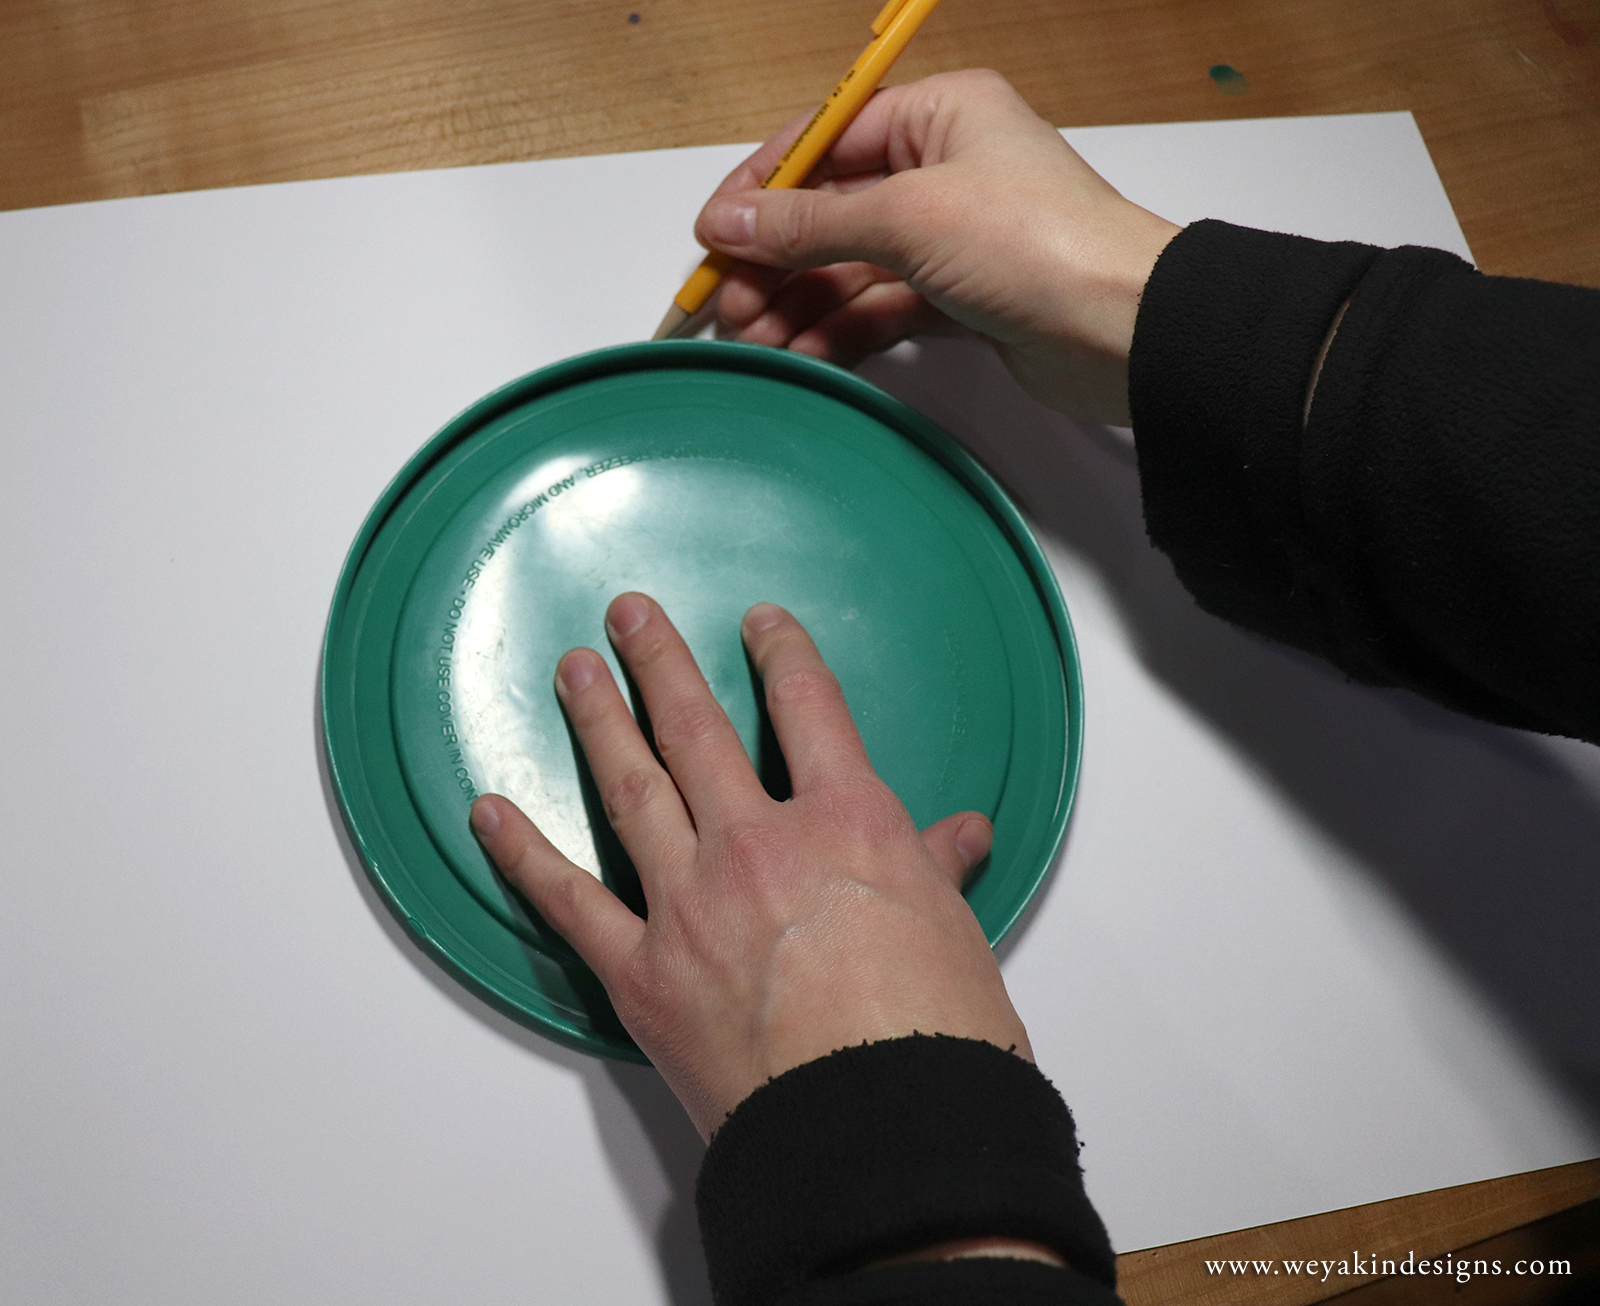
Container Lids
A container lid from the kitchen as a template.
Yes, you read that right. Container lids are one of my templating tools. When I need a shape that I don’t have another tool for, I go to my kitchen and see what I have. I have a lovely set of Pyrex glass dishes in various sizes with lids. Those lids are the perfect circle templating tools when I need a circle larger than my circle maker tool. It’s also something you don’t need to buy and probably already have in your house!
Benefits of container lids:
Cheap and already in your house
Different shapes and sizes that other tools might not provide
Measuring and templating tools are helpful pieces of equipment that can make our lives easier as artists and illustrators. The six tools mentioned above are just some of the many measuring and templating tools available to artists. These are the ones I find myself using the most and I hope you find some of them helpful too. Do you have some other measuring and templating tools you love? I’d love to hear about it! Leave a comment below to share your favorite tools.
There’s something that artists and creative people talk about, sometimes calling it the “creative bank account” or the “creative well”. The idea is that creative people can’t always be outputting something creative—they also need to be able to take it in. In order to create new work, creative people need sources of inspiration, energy, and fuel for their new work. As much as we’d like to believe everything comes from within, it’s not actually the case. Like everyone, artists rely on outside sources, activities, and changes of scenery to keep fueling ideas and the creative drive. And like everyone, artists also need rest periods. The illustration podcast, Three Point Perspective even had an episode all about this.
This past summer, I suffered a frustrating injury that I feared would destroy my ability to create my illustrations. After weeks of pain in my right thumb and wrist, I finally consulted with a doctor and was diagnosed with De Quervain’s Tenosynovitis. It’s an inflammation of the tendon sheath between the thumb and wrist. It’s also fairly common in parents of babies and toddlers from picking them up so frequently. Between my drawing, writing, picking up my toddler son (and my toddler niece), and some gardening work I had been doing, I had simply over-done it. It hurt to draw. It hurt to hold a pencil or paint brush at all. I couldn’t open jars or easily pick up my son. I was so frustrated I often found myself in tears.
As I waited for my hand and wrist to heal, I reminded myself that there are other creative things I could be doing that don’t involve actually drawing and painting—things that could spark new ideas and give new life to my work. This mindset helped me a lot. And summer was a great time to be having this problem.
I went for hikes and spent time in nature. I did garden activities I was capable of doing, like watering the plants and picking vegetables (with my left hand). I wandered around our local botanic garden, Tower Hill and took in the beautiful flora (and even some fauna). I spent time looking at other people’s work and watched educational workshop videos. It was wonderful to give my body the break and let my mind take in something new.
But, eventually I really did want to get back to actually making art. After a while, when you take enough in, you really need to get something out. It’s like breathing.
After many weeks of icing my wrist, keeping it in a brace, and generally resting, I still didn’t see enough improvement to resume my normal activities. So, I decided to give acupuncture a try. At the very least, it wouldn’t hurt. I found an excellent acupuncturist near me who also happened to be a physical therapist in his previous career and had a lot of experience with my particular injury. I had treatments twice-a-week and he gave me advice on how to care for my injury at home.
To my surprise, within a few short weeks, I was able to use my right hand to start drawing again! And then, I had a lot of new fuel for my creative fire. I even found inspiration from being on the acupuncture table with my eyes closed, resting and meditating. Those quiet times where I had nowhere else to be and nothing else to do lead to some of my best ideas. Sometimes you just have to let your mind be free in order to open the window for new ideas to come in.
While my struggle with having an injured hand and wrist was a huge hinderance to my ability to do my work, it did give me an opportunity to take in some new creative inspiration. Sometimes, our bodies force us to change direction for a while. I was frustrated at first, but I found in some ways, my body was doing me a favor. It told me to slow down, take in something new, and sometimes, take the time to do nothing. It opened up my mind to new ideas and new ways of seeing my creative self. I was able to re-fill my creative well and feel the water flow again.
Watercolors are a lovely medium and it’s one of my favorites to work in. You can get some interesting layers of textures and colors because of its transparency. It has a great ability for being light and washy, and also deep and detailed. But, as many beginner artists find, working with watercolors can be challenging when your page gets wavy and warps while working on it. There are a few methods for holding your watercolor paper flat on your work surface. In this tutorial, I’ll show you my favorite way to keep watercolor paper flat while I’m working.
Tutorial I: How to Stretch Watercolor Paper
Here is the list of materials you’ll need for this method of stretching watercolor paper:
Preferred watecolor paper (sheets instead of blocks/pads preferred—I am using Fabriano 300lb Hot Pressed)
Welcome to the refreshed Weyakin Designs blog! This space is to share educational resources, fun information, and general updates with friends and followers to utilize and enjoy. Among the types of posts I plan to share are art tutorials and tutorial videos, tell you about some other cool artists I know, or show demonstrations of how I make my art.
I’m excited to share with you in the magic of art and nature! Thanks for joining me.