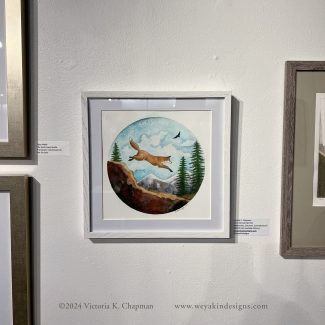
The art from the video framed and up on the gallery wall at the WSU Dolphin Gallery
A friend asked me for help on how to frame illustrations for a show. Since I thought it would be helpful for others as well, I put together this video to share how I frame and wire my illustrations. While illustrators aren’t always gallery artists, we do sometimes have the opportunity to show our work in galleries and other exhibitions. It’s important to know how to frame up your pieces for shows and how to wire it properly for hanging.
You’ll often find gallery shows and other events have specific instructions for framing that include “framed and wired for hanging”. It’s important you follow their instructions and make everyone’s lives easier.
This post outlines how to create a hinge mat, frame your piece, and wire the frame to be hung. It applies specifically to flat work on paper, such as watercolors, pen art on paper, digital art printed on paper, etc. If you’re framing pieces painted or printed on canvases or boards, you’ll need to find another framing method.
Watch the Video:
The Steps for Matting, Framing, and Wiring Art for Hanging:
Gather all of your materials
Create a hinge mat
Line up top of cut mat and backing board
Measure out hinging tape and cut
Place hinging tape across top inside of backing board and cut mat board
Flatten tape so it’s smooth
Fold mat board over onto backing board
Place art under mat board
Center art in your cut mat board
Carefully place photo corners on each corner of the art
Put art into frame
Open up frame back
Clean inside of frame glass (and let dry)
Place art inside from, face down onto glass
Be sure your art looks good from the front before closing it up
Place frame back back into frame and latch into place securely
Wire the frame for hanging
Find your desired placement of wire hanging brackets (mark with pencil if needed)
Hold bracket in place while screwing in screw to secure it
Repeat on the opposite side
Measure and cut your wire (leave extra on each end for securing)
Thread wire through bracket loops
Secure wire either with crimp tubes (squeeze into place with pliers) or by wrapping around itself until secure
Clean front of glass
Label back of your art as necessary according to gallery instructions
Materials List:
Your art
A frame appropriately sized for your art
A pre-cut mat board sized for your art
Backing board
Linen hinging tape (archival)
Photo corners (archival)
Framing wire, brackets, screws, and optional crimp tubes
The art being framed in this video is Sierra Nevada Red Fox and is available for purchase. Contact Me to purchase the original (including this frame). You can also buy prints and stickers of this piece in the online art shop.
Feel free to leave your questions or comments in the comment box below. Thanks for watching!
Right now, so many of us here in the United States and across the world are sad, heartbroken, angry, scared, worried, and so many other emotions. I know I am, especially worrying for my children. It’s easy to get lost in the sea of what is and what might come to be. Now, more than ever, it’s important that we stick together and keep shining our light. Let’s mobilize together to fight the good fight. For our children. For our planet. For our friends and family. For our communities.
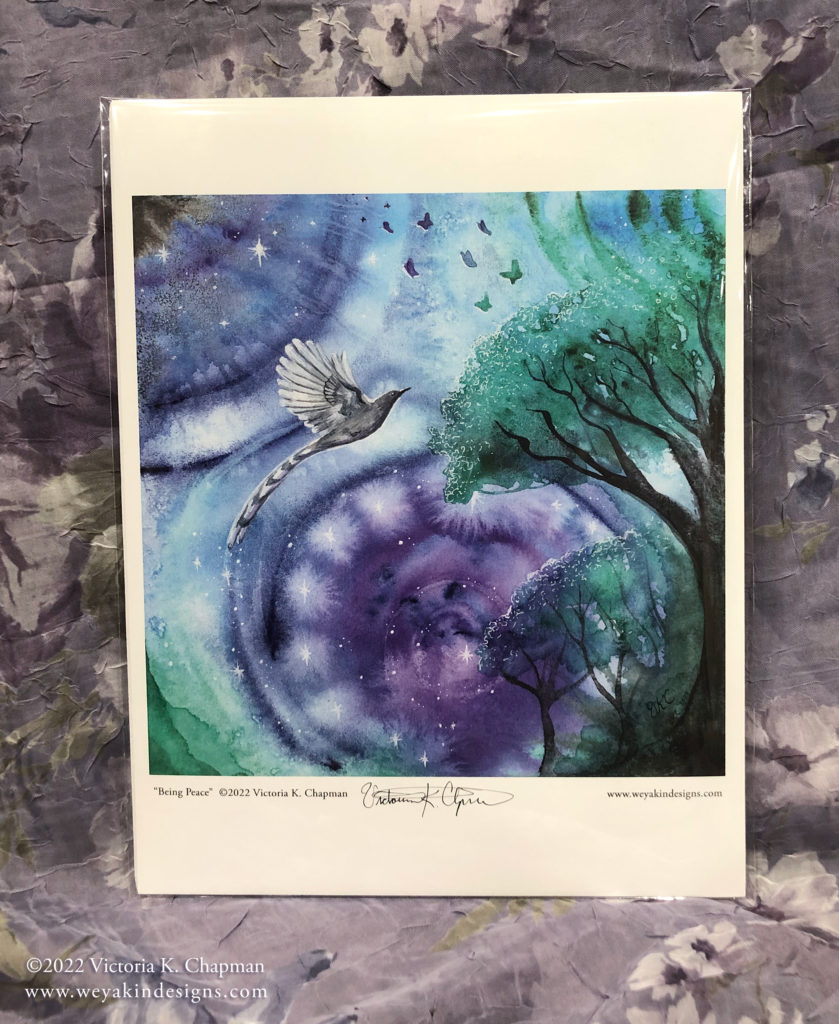
Originally this November, I was going to hold a holiday sale on my art. But, I’ve decided instead to hold a donation sale. For every sale I receive on my art and art products, both online or in-person during the whole month of November, I will donate 30% of the entire sale. The three organizations I’ve chosen for this sale represent areas that are going to need our help in the coming times. These organizations are:
First, pick the art you’d like to buy in my online shop. When you go to check out online, use the “Comments” section at the end of your order to type in which of these three organizations you’d like me to donate to. If nothing is indicated, I’ll donate some to all three. I will total up and make all donations after the month of November, once all sales have come in.
**If there is something you’ve seen me have before that’s not on my website, or there’s an original you’d like that’s not currently listed, please let me know! I’m happy to work with you to get you what you want. I can even put together custom packs of cards.**
I wish I could donate more than just 30%. But, part of caring for others, is also caring for myself and my family. This is my livelihood and as a small business artist, it’s hard to keep things afloat. I’m doing what I can.
Though, I recognize there are so many more places that can also use the help, I chose to focus on these three for this moment. I’m sure I will be holding other donation sales in the future. I also encourage you to donate direct to these or any other organizations dedicated to helping the environment, fighting climate change, helping marginalized communities, disability rights, and fighting for bodily autonomy and women’s rights.
And if you can’t afford to donate, please don’t feel guilty. You must take care of yourself first. You can always share these causes with others, which is free. There is so much to fight for. And we are all in this fight together. Let’s shine our light together, take care of each other, and march forward.
The Trevor Project is a leading organization in suicide prevention and crisis intervention for LGBTQ+ young people. They provide 24/7 crisis help and information. During these trying times, queer youth are negatively impacted more than most. Your donation will help provide counseling, peer support, crisis hotlines, and educating allies and families of LGBTQ+ young people.
Earth Justice is an impactful legal organization fighting for the rights of our planet. They provide top-tier legal representation for many clients fighting for land protections, clean water, wild spaces, and more. I believe they will help make a big impact for fighting climate change, pollution, and protecting vulnerable land in this country. Your donation will help support their lawyers who fight every day for the Earth.
The National Women’s Law Center has spent more than 50 years fighting for gender rights around the country, with special focus on women of color, LGBTQ+ communities, and low income women and families. A donation to NWLC will support advocacy for marginalized communities, legal cases for abortion rights, fighting sex discrimination in the workplace and beyond, and advocating for bodily autonomy.
Please, leave a comment to let me know of other international, national, regional, or local organizations that you believe are worth supporting. And if you donated directly, comment and let me know!
In early March I’ll have taken another turn around the sun, which means it’s time for my annual birthday fundraiser! This year, I’m asking you to help me celebrate my birthday by donating to an organization close to my heart—The Highlights Foundation. The Highlights Foundation’s mission is to “to positively impact children by amplifying the voices of storytellers who inform, educate, and inspire children to become their best selves”. They help creators of stories and art for kids get to the next level and grow.
How the Fundraiser Works
I’ve set up three ways to donate—use whatever works best for you!
For everyone who donates at least $10, you can be entered into a raffle to win one of my art prints and an art greeting card! I’ll pick 2 winners once the fundraiser ends.
Here’s how to get entered:
Make your donation of $10 or more
Save or take a screenshot of your donation receipt
Share this fundraiser with friends and family through email or social media for an extra entry!
Fill out this Google form to let me know you donated, share your receipt, and let me know if you shared this fundraiser
NOTE: The fundraiser ends after March 16, 2024!
Once the fundraiser has ended, I’ll pick two winners and reach out via email to let you know if you’re a winner! You can pick your choice of certain prints. I’ll ask for your address so I can mail you your print and card.
NOTE: You don’t have to enter the raffle. You can just donate too. But, if you’d like to enter the raffle, please follow the steps above so I can include you.
More About My Experience with Highlights and Why I Want to Support Them
You all know Highlights for Children magazine, right? Well, the Highlights Foundation is those same amazing people, but from the side of working with the people who actually make stories for kids. Highlights has been an inspiring and life-changing place for me. I first visited the Highlights Foundation retreat center in Pennsylvania in 2022 for their illustration summer camp. If I can, I plan to return every year. The experience was that great!
At Highlights, I was able to connect with other authors and illustrators and industry professionals, work on improving my craft through critiques and workshops, and find the encouragement and inspiration I needed to keep going. Creating books for children isn’t just sunshine and rainbows. It’s a long, grueling process, with a lot of rejection and work before your stories even make it out into the world. Having a supportive community at a place like Highlights has been so transformational for me.
I would love to raise money for Highlights to give other creators the opportunity to go there. Highlights has some amazing scholarship opportunities for those who can’t afford to go on their own, and for those from underrepresented groups. Helping storytellers from all sorts of backgrounds get their stories into the world is so important for our children and families. And being able to go to Highlights is an amazing way to help make that happen for these creators.
Whatever you can donate, I appreciate it! And if you can’t, sharing is amazing too! Thanks for making my birthday awesome by donating and sharing this fundraiser!
Scenes from my first trip to The Highlights Foundation in 2023.
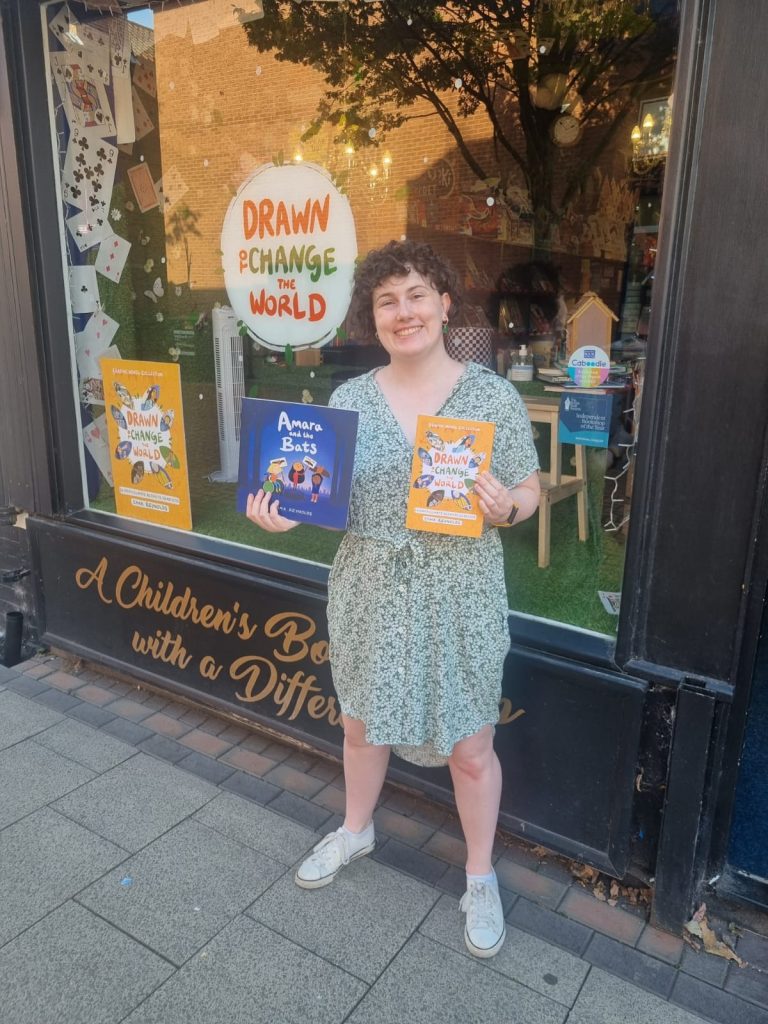
Emma Outside Wonderland Independent Children’s Bookshop in Retford, UK.
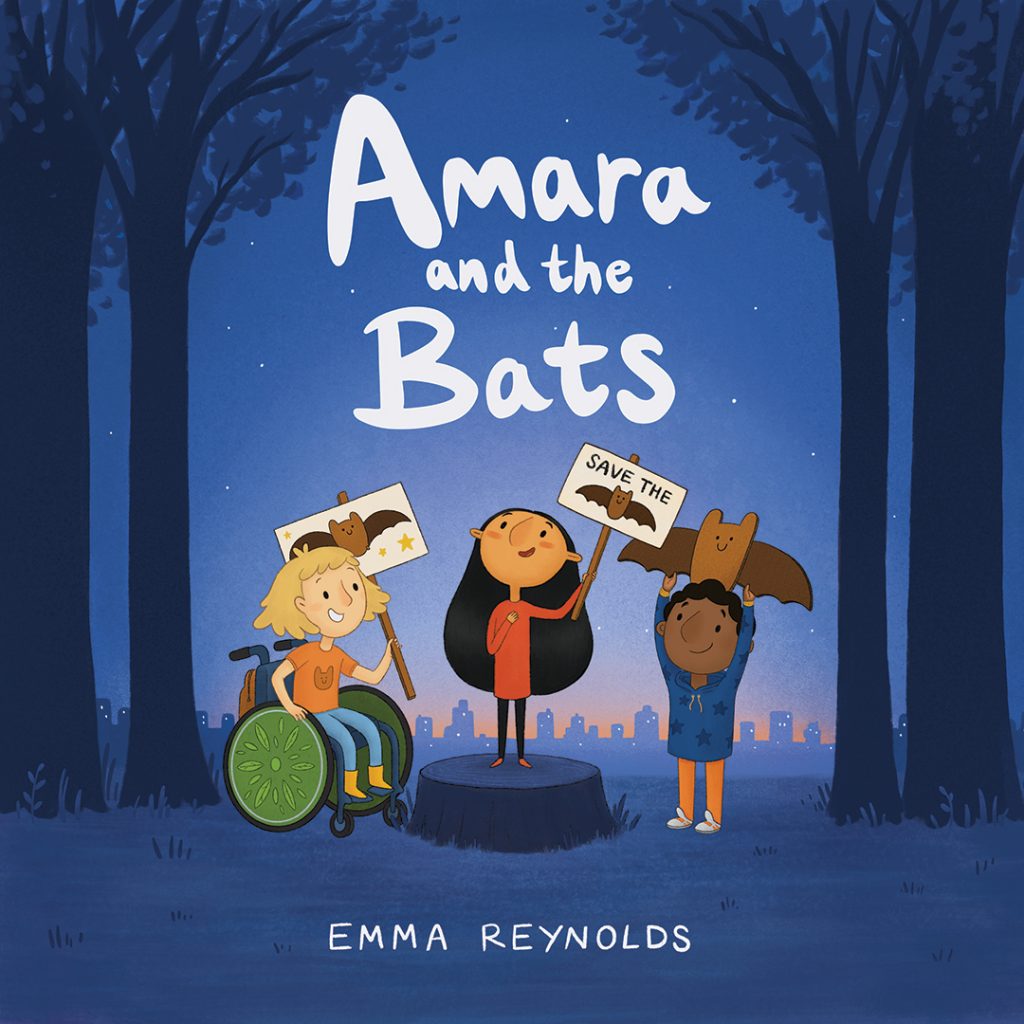
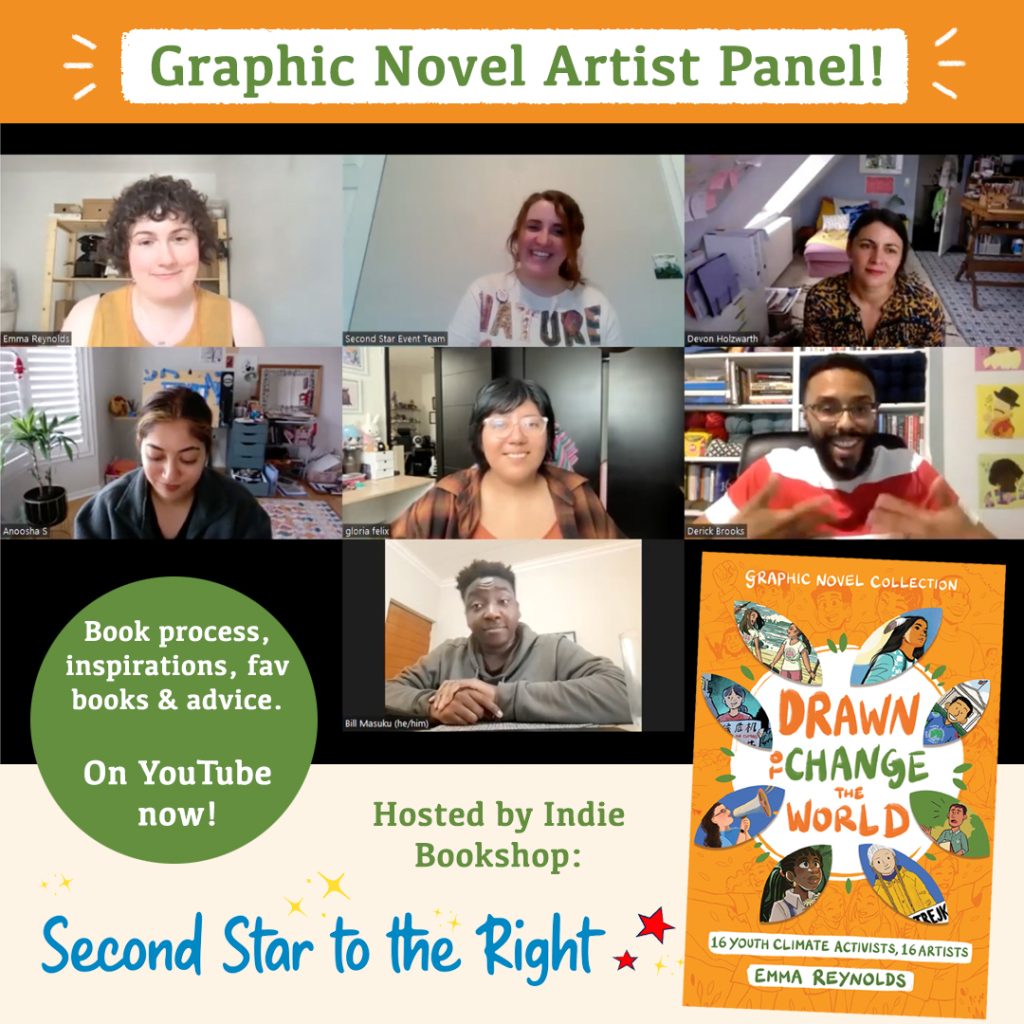
It’s the end of 2023 and time for the final KidLit Connection interview of the year! I’m so thrilled to share this conversation with author and illustrator Emma Reynolds. Emma is a talented creator who advocates for environmental conservation through art and stories. Her debut author-illustrated picture book AMARA AND THE BATS (Atheneum) is an award-winning story that shows children how they can make a difference to creatures big and small through peaceful protest. And her latest book DRAWN TO CHANGE THE WORLD(HarperAlley) is a collaboration with other artists who illustrate powerful stories of climate justice from around the world. Emma also founded #KidLit4Climate, bringing authors and illustrators from around the globe together in solidarity with youth climate strikes.
Outside of her work as an author and illustrator, Emma volunteers for her local bat conservation group and loves spending time outdoors. She lives and works in Manchester, UK. Emma can sometimes be seen running interactive workshops for kids and families, speaking at events, and sharing her work at conventions and conferences. In this interview, Emma shares more about her books, her process and inspiration, and what it takes to be a creator in the KidLit industry. I hope you enjoy hearing from Emma as much as I did!
An Interview with Children’s Book Creator, Emma Reynolds
First, we’d love to hear more about you as an illustrator and author. Can you tell us more about you and your work as a creator of books for kids?
Hello! I’m a children’s illustrator-author from Manchester, UK. I make books about nature, activism, and hope through action—showing readers the powerful tangible things we can all do to make a difference in our communities.
I love creating characters and imagining their worlds, how they think and feel, and showing empathy as they navigate the challenges and emotions they experience throughout their journeys. I’ve always loved books with pictures in them most, and after thinking ‘Oh no I should be reading long adult books but I don’t enjoy them’ in my teens and stopping reading for a little while, I discovered graphic novels in my school library and this re-invigorated my love of reading. Now I’m a huge advocate for visual literacy and that picture books and illustrated books are for all ages, not just for children. I even wrote my University dissertation on the power of visual literacy in increasing student’s confidence and abilities, and how this should be taught from primary age all the way to adulthood.
How did you get your start creating children’s books? Was there anything in particular that lead you to pursue it?
I’ve always loved drawing and making art my whole life—in school my favourite subjects I loved were English, Media Studies and Film Studies. I found art classes too prescriptive and uninspiring in secondary school but I still continued to draw in my free time, and I pursued Illustration with Animation at university—and while there I learnt about the picture book process, and this re-invigorated my childhood dream of being a picture book illustrator and author!
Your work is very focused on advocating for the Earth and shedding light on climate change through the eyes of children. I love this! Can you tell us more about what inspired you down this path?
Yes! This wasn’t an intentional path I set for myself but it has happened naturally relating to my interests and the stories that were inside me ready to be told. When I was in primary school I was really interested in science (but felt I wasn’t good enough at maths to pursue it, and the lessons in secondary school were so dry), and I love that I’ve managed to honour that interest in my dream job as an author-illustrator by making accessible science communication books.
I have other stories inside me waiting, and I’ll know when they’re ready to be told.
Spread from ‘Amara and the Bats’ by Emma Reynolds, Published by Atheneum/Simon & Schuster
Your most recent book, DRAWN TO CHANGE THE WORLD, is an amazing collaborative project with other illustrators, bringing to light the stories of young climate activists from around the world. Can you tell us more about this really important book?
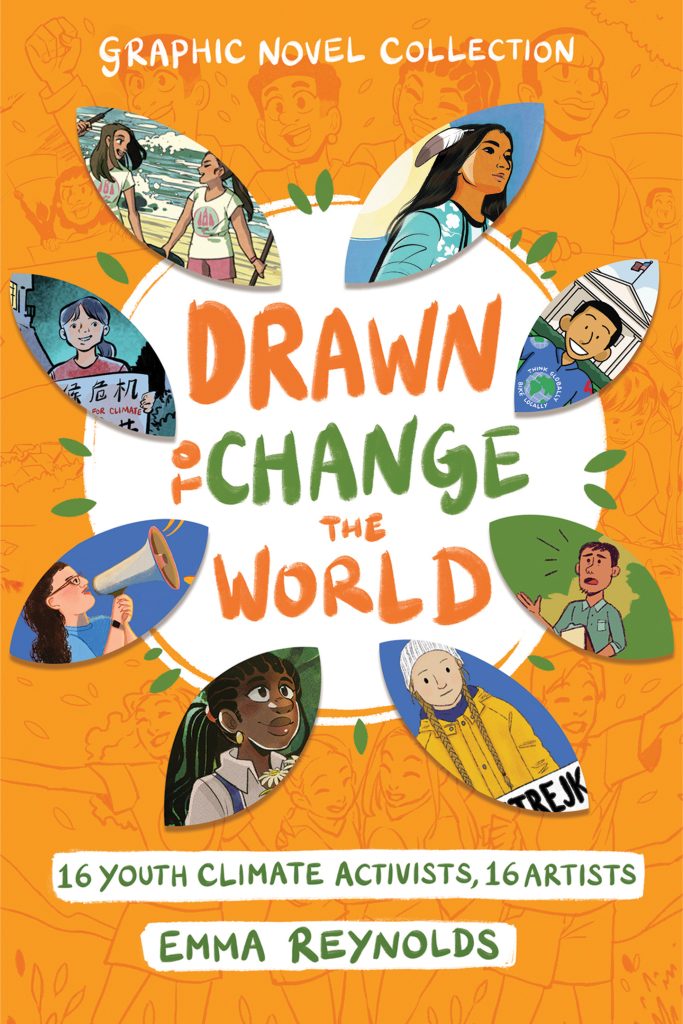
We worked on Drawn for three years, after I pitched it in 2020. Drawn to Change The World: 16 Youth Climate Activists, 16 Artists is a middle grade graphic novel with each activist biography illustrated by a different acclaimed artist from around the world. It has extensive backmatter including activist interviews on the power of community, and illustrations to explain the science. Drawn focuses on the need to centre Indigenous solutions and intersectional climate justice, and also speaks on how we need more artists to transform society and tell new stories about our future—allowing us to manifest them into reality. Drawn features Indigenous, Black, Latina, Asian, LGBTQ+, disabled and neurodivergent climate activists, illustrated by incredible artists from all over the world, it was such an honour to work with them.
‘Drawn to Change The World: 16 Youth Climate Activists, 16 Artists’ Published by HarperAlley.
Creating DRAWN TO CHANGE THE WORLD obviously involved working with lots of other people. Can you tell us more about that process and what it was like compared to other books you’ve done?
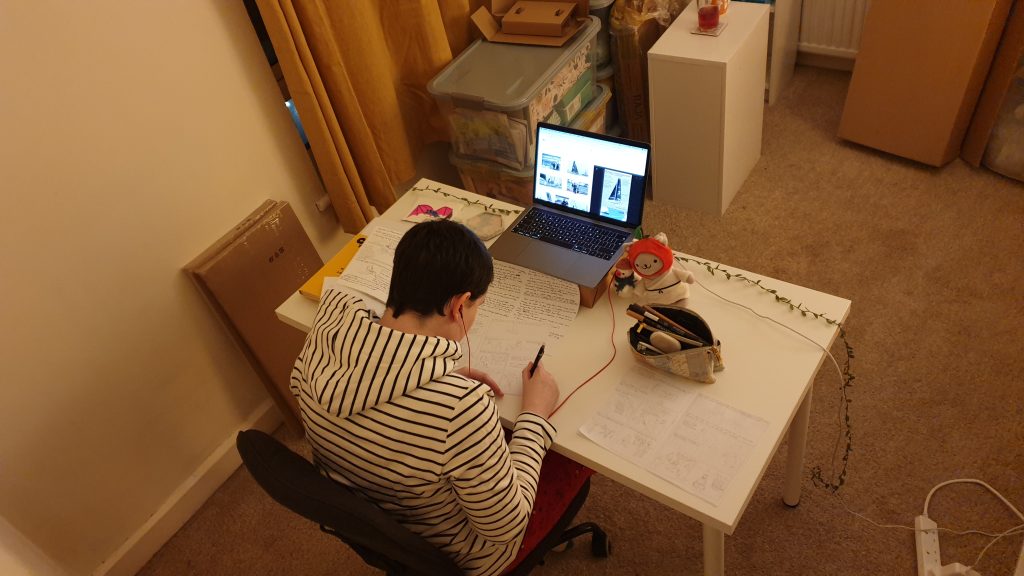
Yes so it was very different from how I would create a book normally, as I plan everything visually and work on the illustrations and text in tandem when I’m the author-illustrator. But as I was writing the script for other artists to illustrate, I had to prepare the script in advance. As each artist only had 4 pages (2 double page spreads) per activist, I actually thumbnailed them out to scale to check everything would physically fit, and then reverse engineered this into a script for the artists. I didn’t share my rough thumbnails with them though, as I wanted them to be able to freely express themselves in the panels and lay it out as they see fit.
The process as a whole involved a lot A LOT of admin and emails and back and forth haha. I absolutely could not have done it without my editor Megan Ilnitzki and publishing team taking on the lion’s share of that labour as my advance only goes so far, and I still spent an enormous amount of time checking everything and going through PDFs to check every line, speech bubble and word was right.
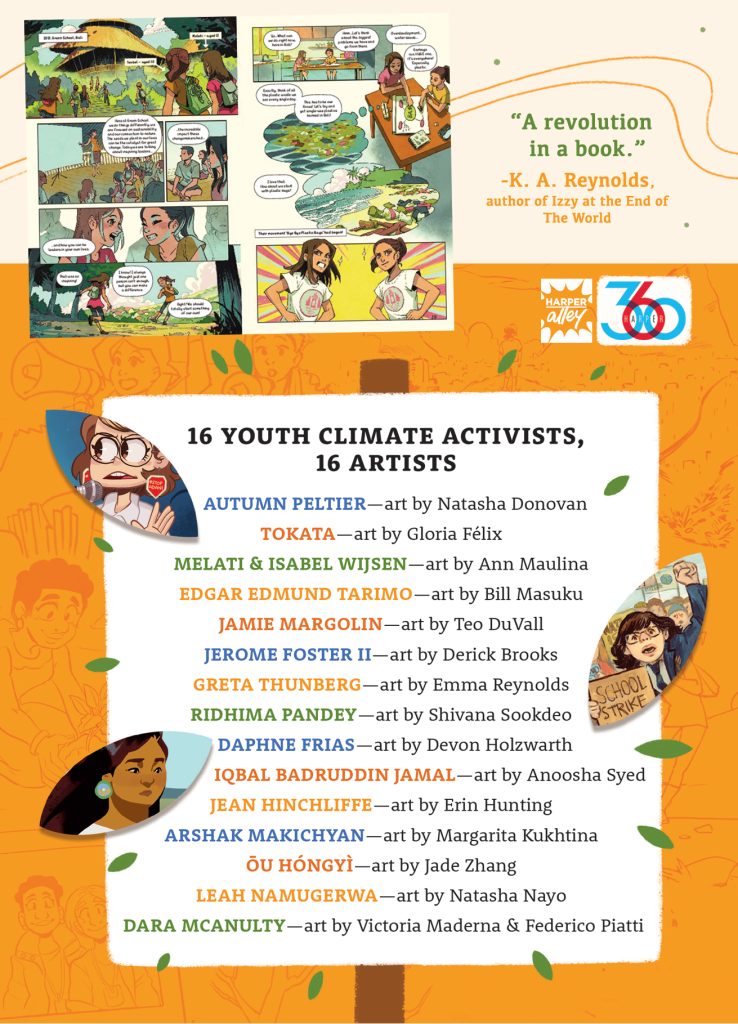
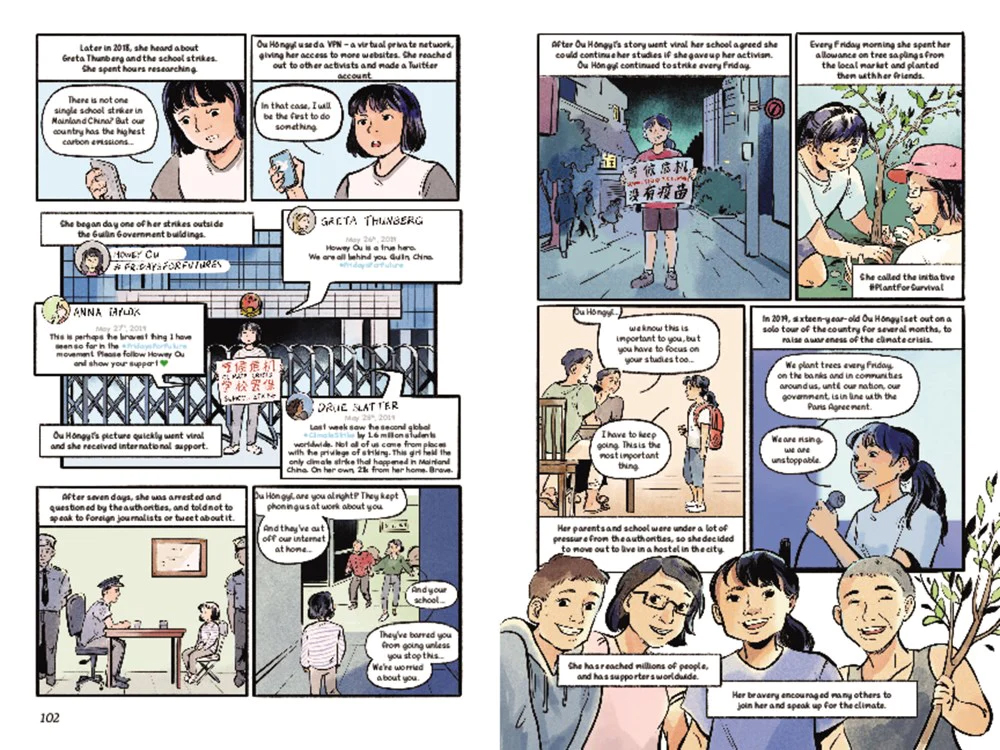
From left to right and top to bottom: 1. Photo of Emma Reynolds in 2021 working on thumbnails and research for ‘Drawn to Change The World’. 2. Melati and Isabel Wijsen comic biography, written by Emma Reynolds and illustrated by Ann Maulina. 3. Ou Hóngyì comic biography, written by Emma Reynolds and illustrated by Jade Zhang. 4. Dara McAnulty comic biography, written by Emma Reynolds and illustrated by Victoria Maderna and Federico Piatti. 5. Science front-matter from ‘Drawn to Change The World’. 6. Greta Thunberg comic biography – Global Week for Future spread, written and illustrated by Emma Reynolds.
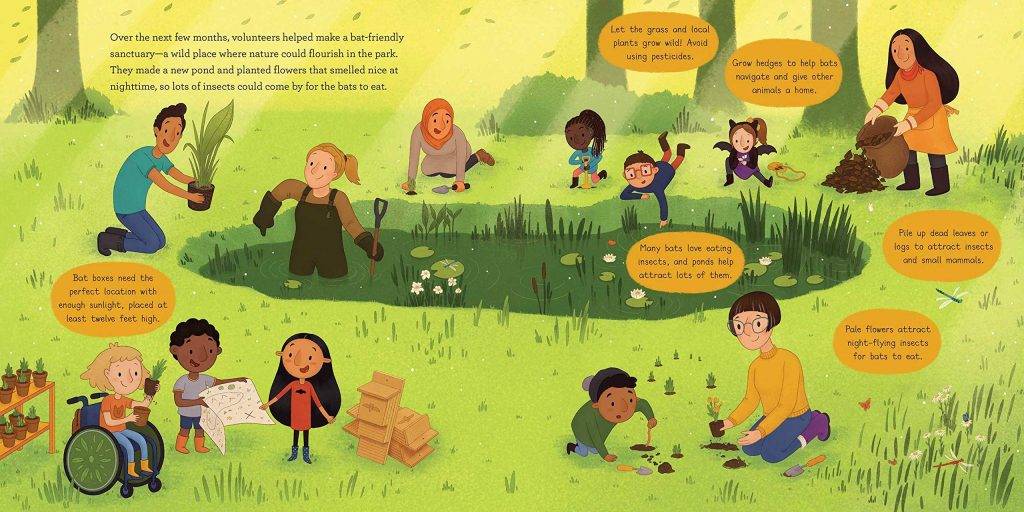
Your debut author/illustrator picture book, AMARA AND THE BATS, which came out in 2021 is another great story about a child activist who speaks out for bats in her community. Can you tell us more about what inspired this story?
The book cover for ‘Amara and the Bats’ by Emma Reynolds
Yes! So I’ve always loved bats, and I drew this character Amara back in 2016, and I knew I wanted to tell her story! I thought she looked like she was looking up curiously at something, and I decided it would be a bat. And through researching more about bats throughout the book, I became even more fascinated with these amazing creatures. I joined my local bat group, and my bat group leader Steve Parker kindly fact checked my book for me, and I’ve been involved with the group and with Bat Conservation Trust and other bat charities and organisations around the world ever since. Amara and the Bats holds a special place in my heart, and I’m so, so happy I was able to make my dream come true and it wouldn’t have been possible without my agent Thao Le and my wonderful editor Julia McCarthy. Amara’s character is inspired by me and my best friend as kids, we were passionate about saving and advocating for overlooked and misunderstood animals.
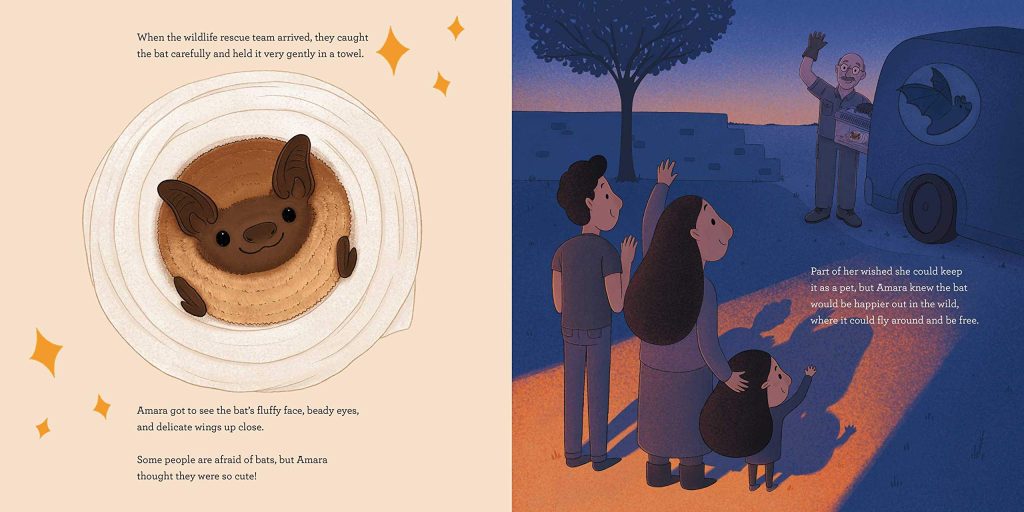
Two pages from the interior of ‘Amara and the Bats’ by Emma Reynolds
On the shop-talk end of things, we’d love to hear more about your process when you create illustrations for your books. Can you tell us more about your tools and the steps you take to go from an idea to a finished book?
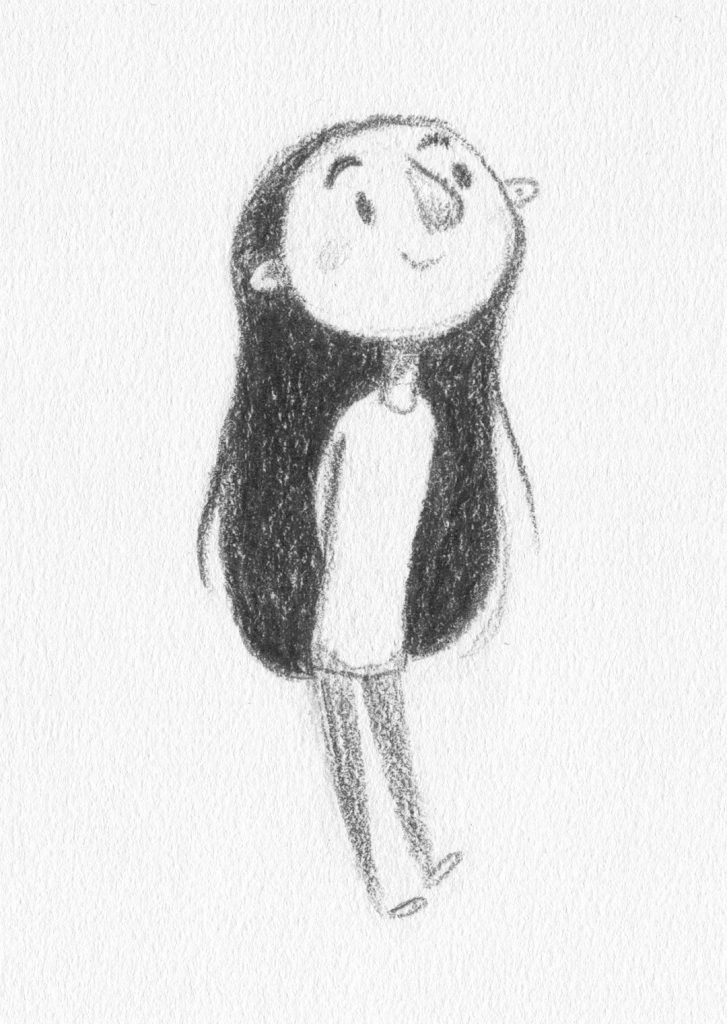
A pencil sketch of Amara by Emma Reynolds
That’s a great question, I’d love to tell you more about it.
So I usually start by sketching, whether that be in an actual sketchbook (I go for non fancy covered ones as the pressure it too great! But the paper is good) or around my puzzle books while I’m relaxing and unwinding. I like sketching with polychromos colouring pencils in my sketchbook, and in my puzzle book it’s whatever I happen to be filling in the puzzle with – sometimes a ballpoint pen, sometimes a biro.
For final art, I do my outlines in Procreate on the iPad, using the 4B brush that comes with Procreate, and then I use Photoshop to colour my books as I need a large canvas and high layer count, plus muscle memory makes this a quicker process for me at this stage.
If there is one wish you could have for your work as a KidLit author/illustrator, what would it be?
Stable money (preferably universal basic income! *stares at governments who know it would cost them less than the benefits system in place now*), so I have more time to spend thinking, dreaming and creating books, rather than worrying about money all the time.
What is something you would like to share with aspiring illustrators and author/illustrators who have hopes to be published someday?
The biggest thing is not giving up, and I don’t say this lightly. Publishing is extreeeemley slow, because of the nature of the business. This was really odd to me at first as I came from a very fast-paced animation job, and this takes getting used to. And this advice of not giving up applies to all stages of the process—from submitting to agents, having your book out on sub when your agent is pitching, to waiting for feedback from your editor once you have a book deal. Patience is key—fill your time with either rest, re-filling your creative well, or cracking on with your next project. And of course, part-time work if you need to, as this industry is very hard to make a living—but it is possible. It just takes time and planting the seeds to build up.
If you write and illustrate, I recommend getting a literary agent, rather than an illustration agent. Literary agents take around 15% instead of 30% like an illustration agent, and they are experts on the book industry and pitching your work to editors. They more than pay for their cut in their expertise, access, support and negotiation in getting you a good and fair book deal.
Most of all—create work that you enjoy! I am guilty of this sometimes, but sometimes I forget that art is supposed to be fun, and that we create our best work when we are enjoying it, and that always, always shines through to others. I wish you all the very best on your journey! It’s a marathon not a race.
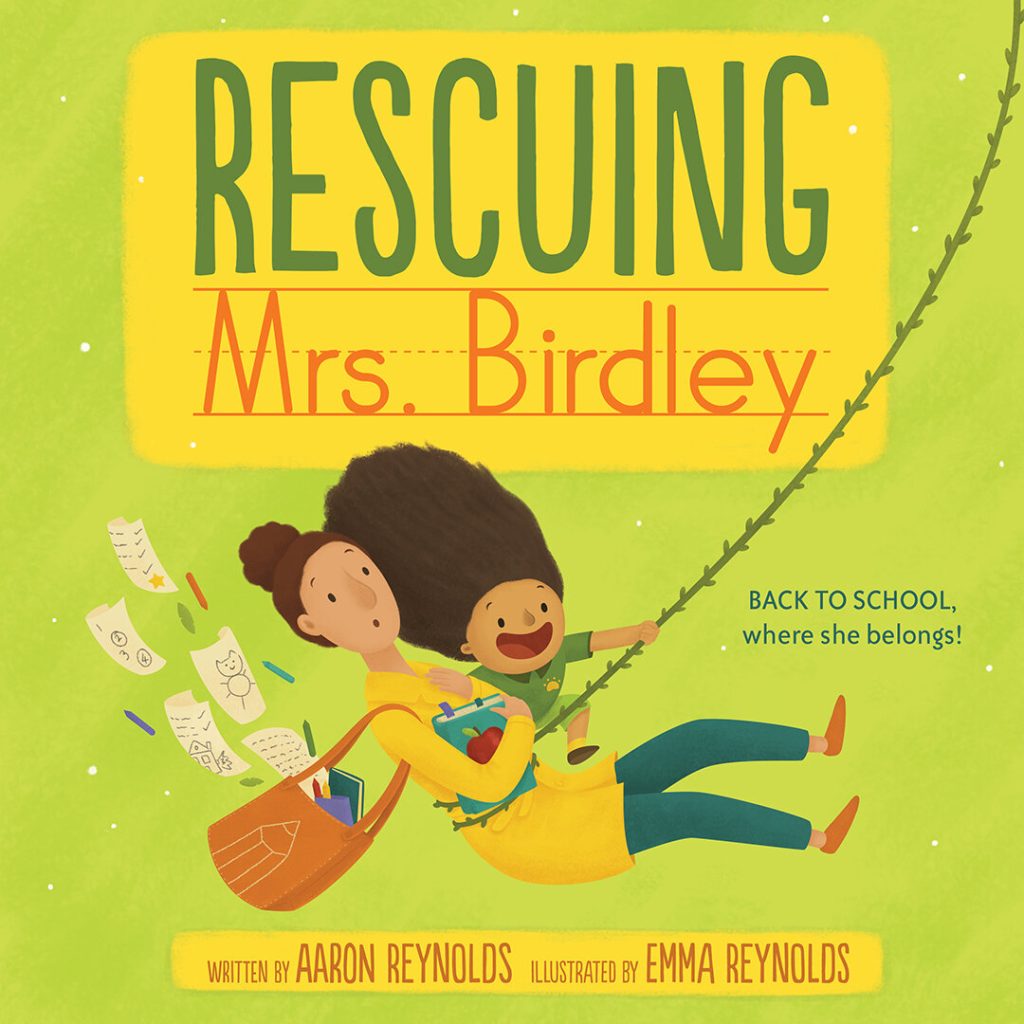
Check Out All of Emma Reynolds’ Books
Emma has three published books that she’s illustrated, two of which she also wrote. Check them all out on her website and follow the links to purchase your own copies!
From left to right: Amara and the Bats, Drawn to Change the World, Rescuing Mrs. Birdley
See More from Emma Reynolds:
To learn more about Emma Reynolds, her books, art, and latest projects, be sure to visit her website, social media pages, and join her newsletter. Plus, more fun information below:
Are you a published or soon-to-be published illustrator or author/illustrator who loves creating books about nature, animals, the environment, or mindfulness? I’d love to chat with you for a KidLit Connection interview! Send me a message.
Many times through my life, I’ve heard this myth about artists: A true artist doesn’t need to look at pictures to help them draw—they can draw anything right from their own imagination. But, contrary to this tall-tale, reference images and research are wonderful assets for most artists, especially illustrators. And really, how many people actually have a photographic memory? Very few, if any.
Think about art schools. Life drawing is a basic foundation class most artists take. And what do they draw from? A live model—not just their imaginations. Artists don’t draw or paint in a void. Reference images and research are key tools to keep in your artist’s toolbox.
Collecting Reference Photos
Like many artists, you may first have an idea about something you want to draw or paint, and perhaps you’ll scribble a few rough sketches and jot down some notes to flesh it out. But, once you’ve got an idea, you need to develop it into a cohesive composition, whether it’s a one-off piece of art or part of a larger project, like a picture book or gallery series. This is when I turn to reference photos.
Reference photos are images you may find or take yourself to help you with accuracy in your drawing or painting. I usually use a mix of images found and images I’ve taken myself, depending on what I’m able to find and what my specific subject is. Once I have an idea of what the elements of my piece will be, I’ll start collecting reference images that help me accurately portray those elements.
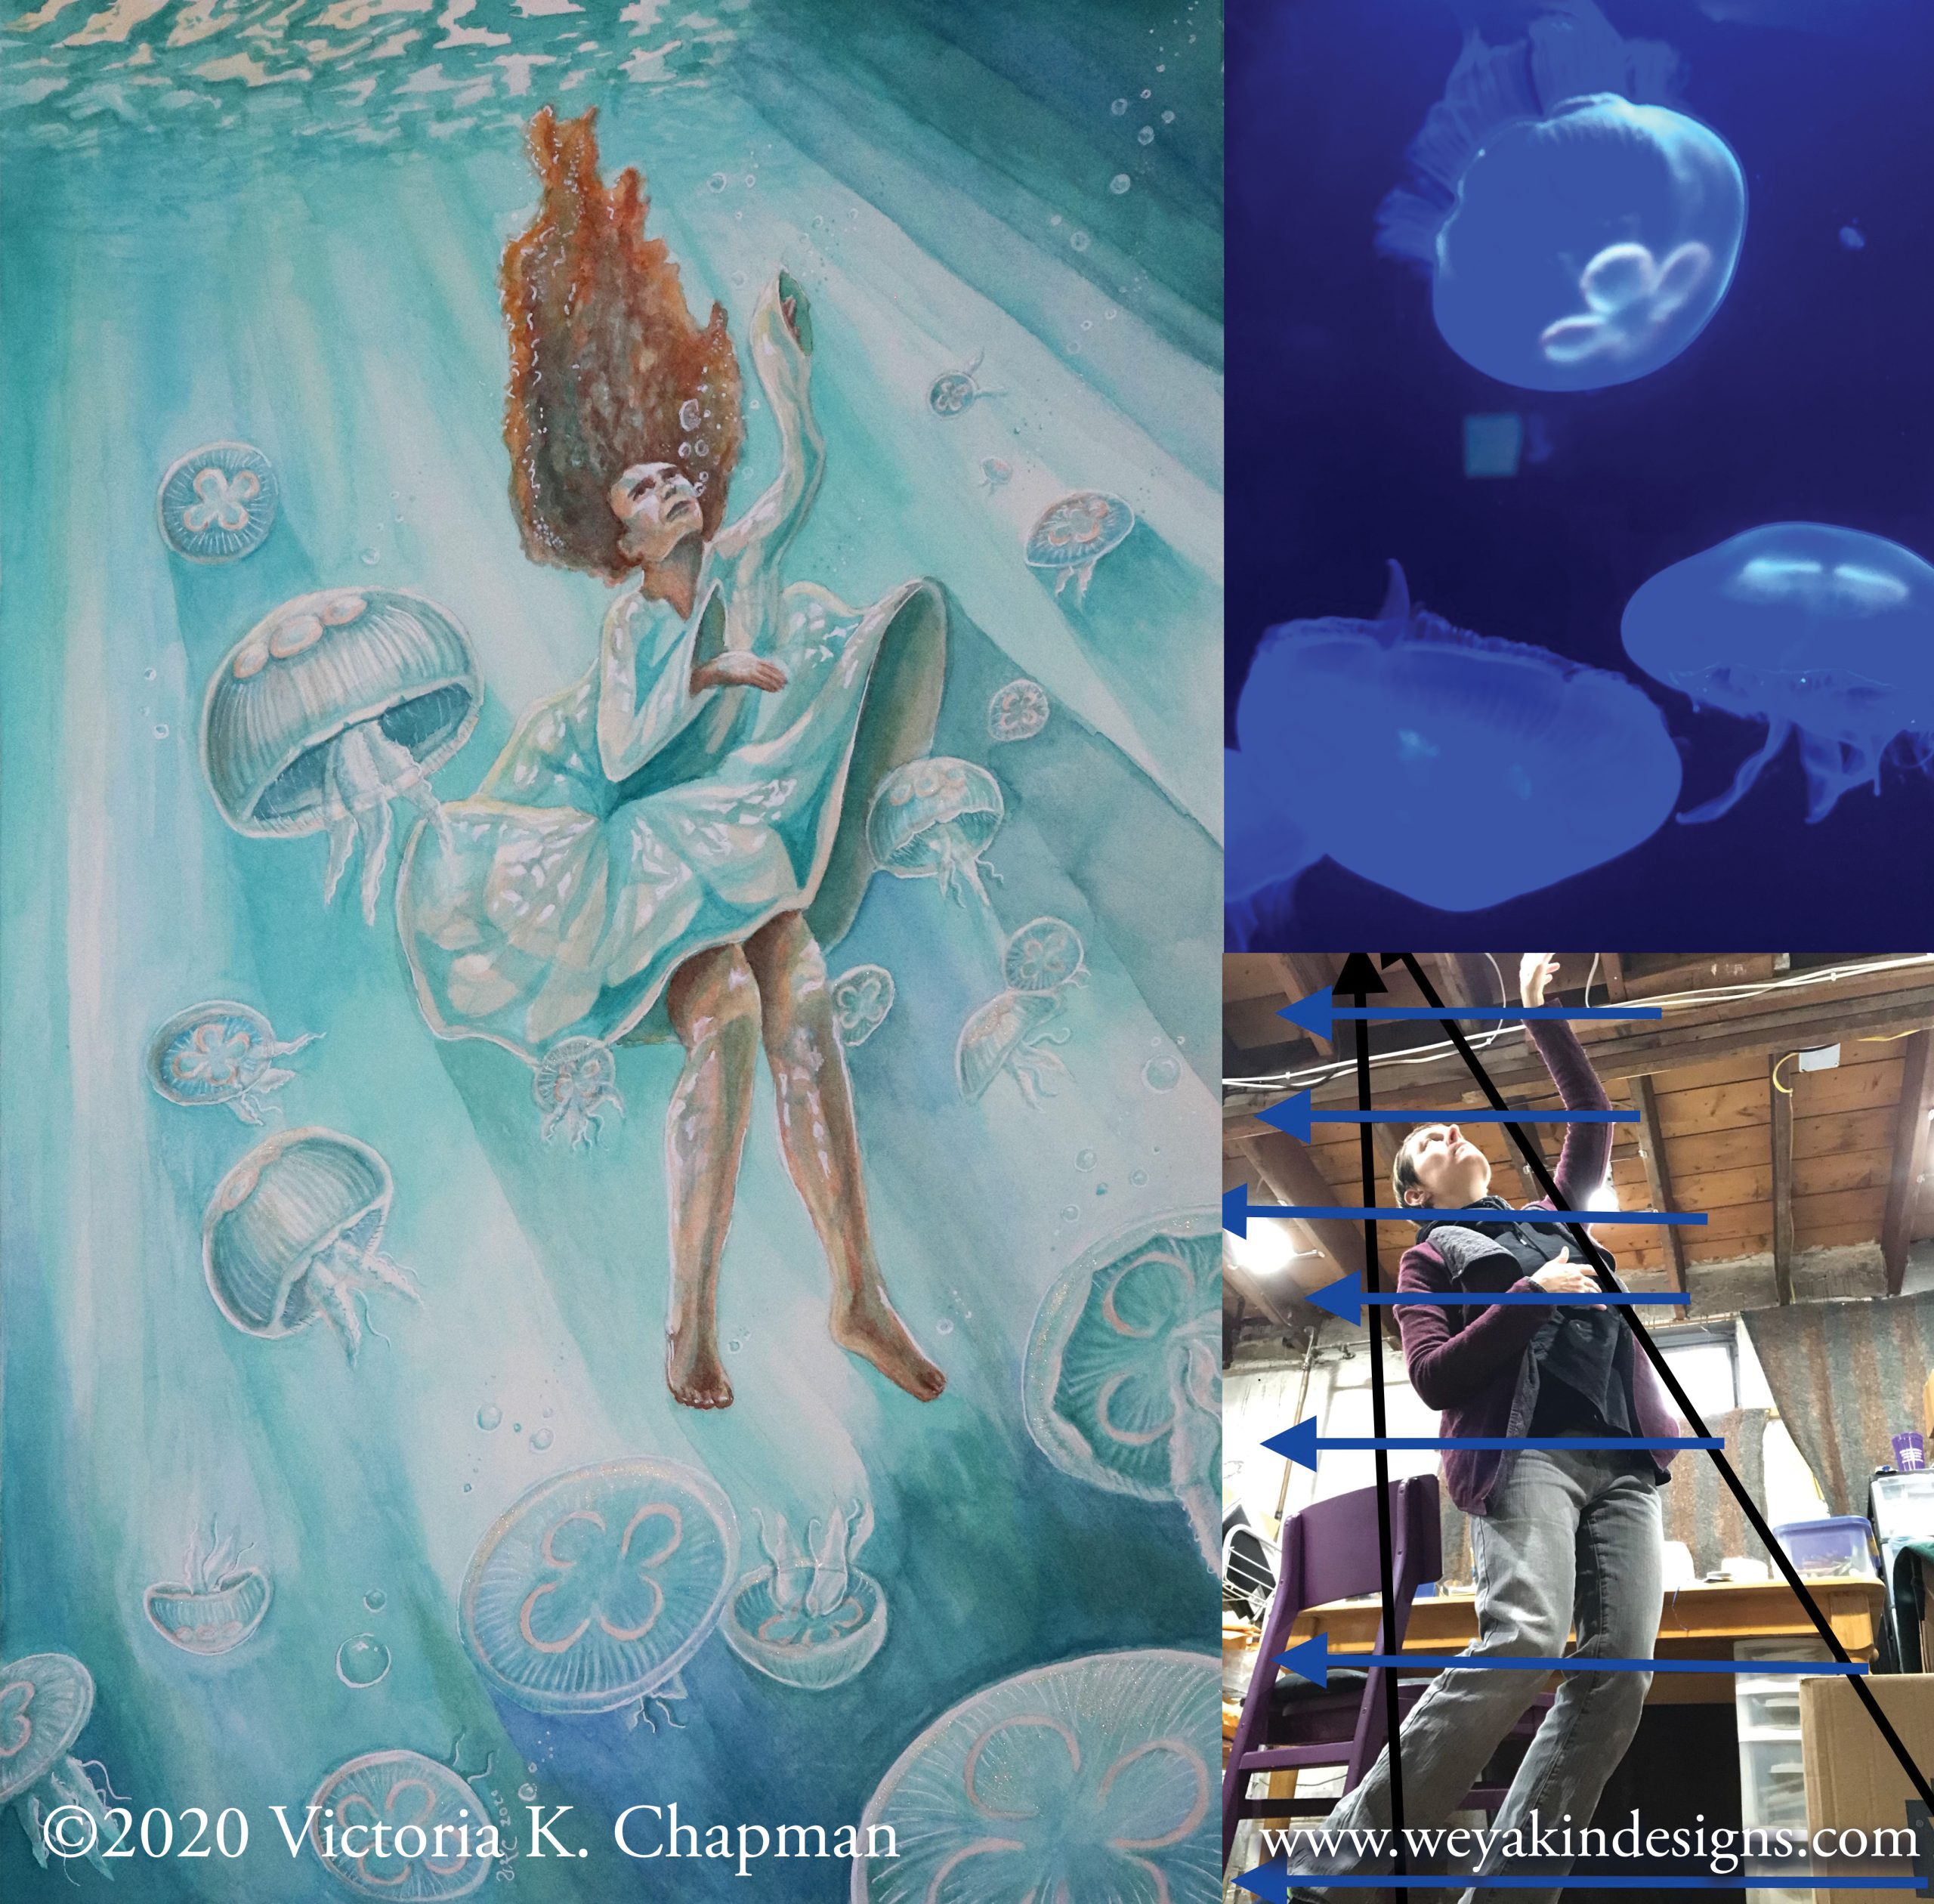
Final art of “Falling, Floating, Free”, next to two reference photos taken by me. Moon jellies at the Mystic Aquarium and me posing myself with lines to help me figure out perspective.
Taking Your Own Reference Photos
If part of my piece includes something I know I can find locally, I’ll go out and take some photos myself. Or if it involves a person in a specific pose, I’ll often pose myself or one of my family members to make sure I’m drawing that pose accurately. Sometimes, I’ll even use my dog as a reference (dogs are some of my favorite characters to add to a visual story). If a stranger were to look through some of the photos on my phone, they’d either think I’m a very interesting person, or downright crazy. Don’t worry though—it’s just reference photos.
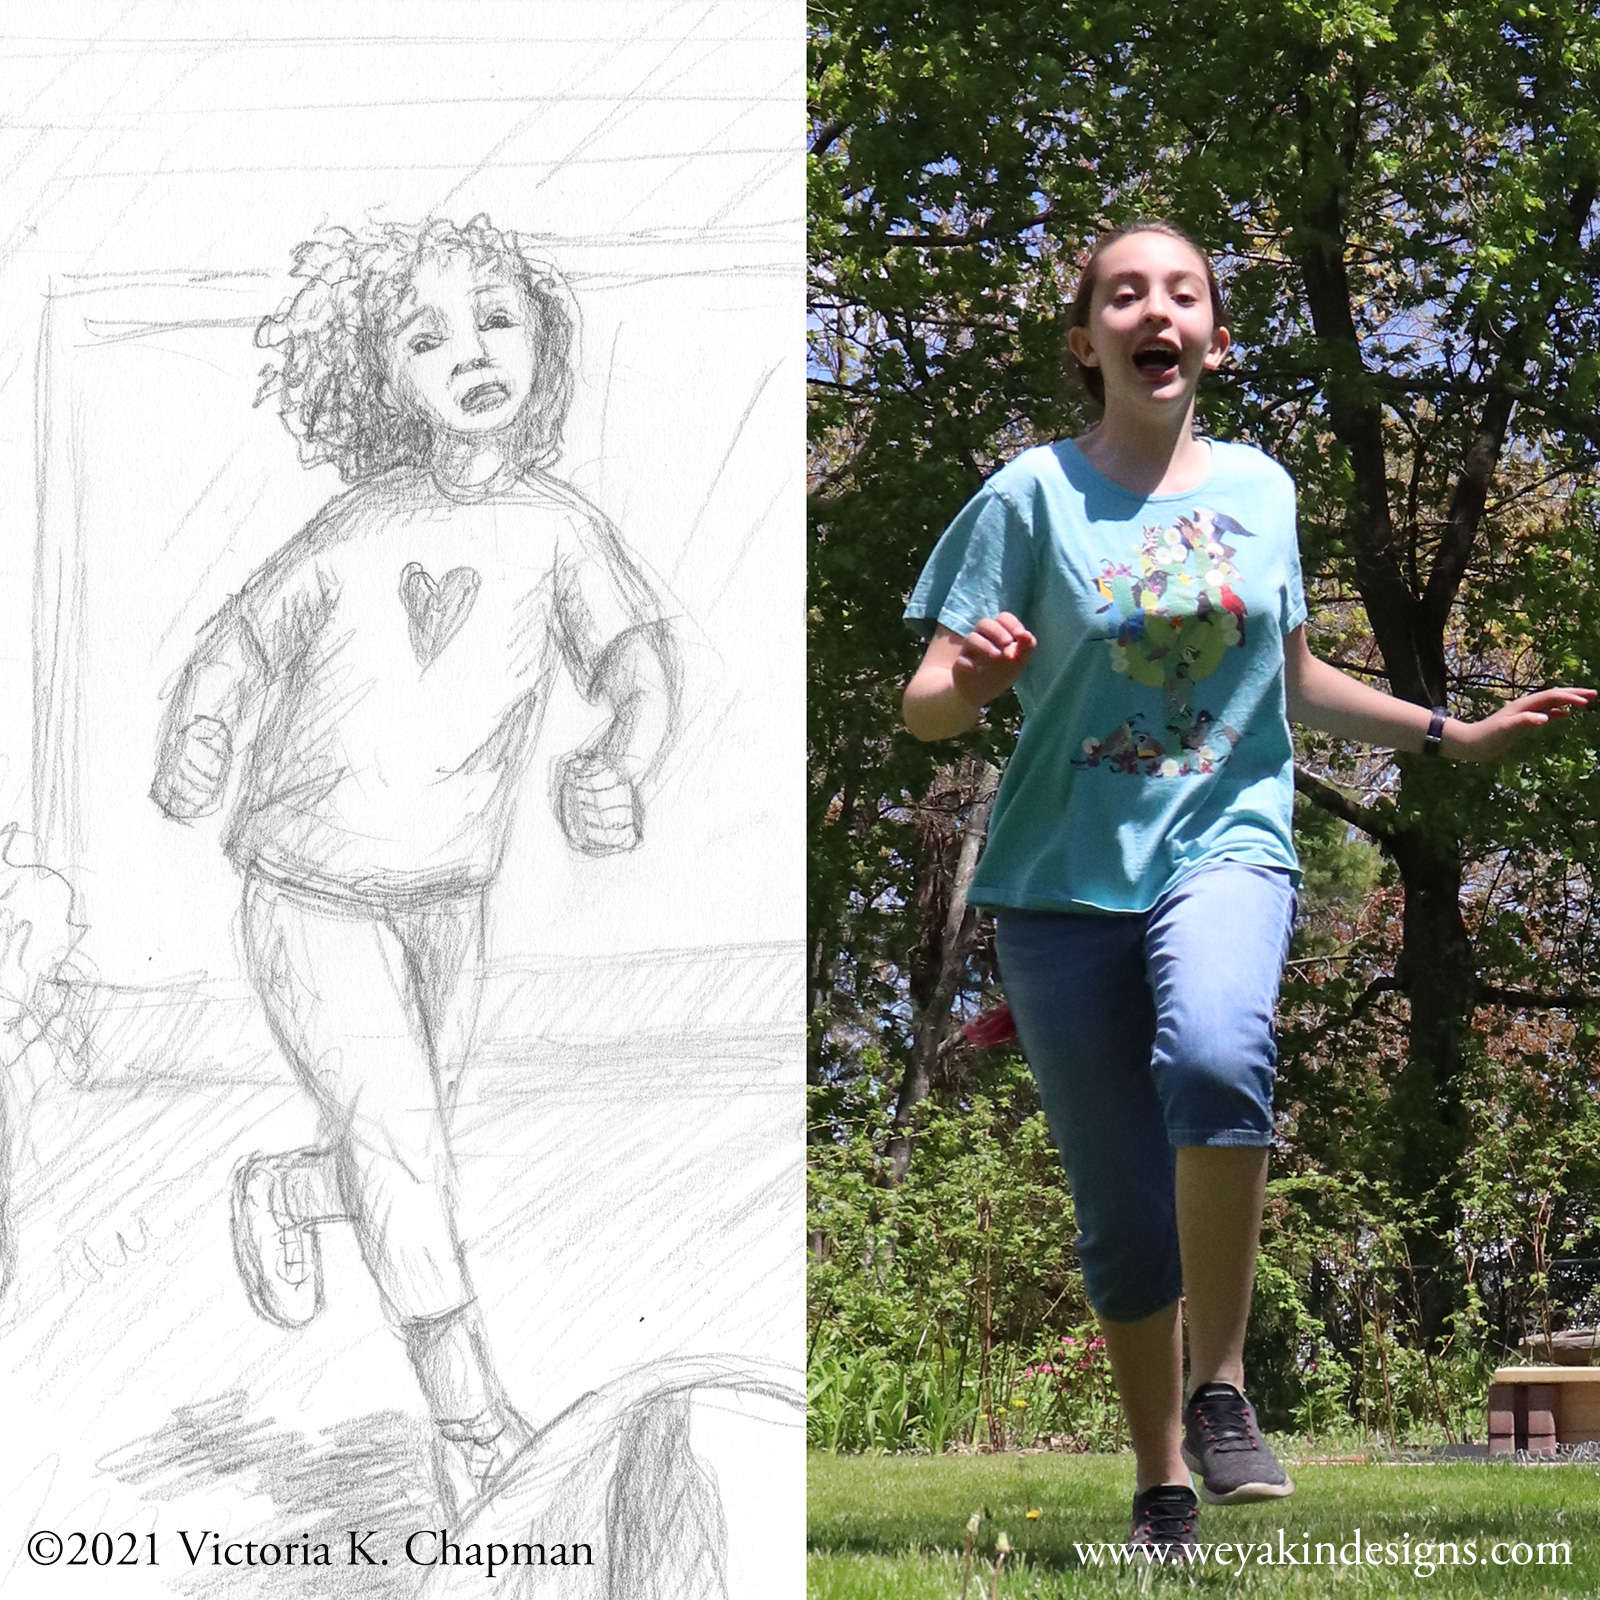
A pencil drawing for a picture book dummy and one of several reference photos of my daughter running taken from the ground.
Drawing From Live Reference
Another option for reference images is drawing from a live reference. You can have a friend or family member hold a pose for you while you draw. Or, go to a zoo to draw the animals you’re hoping to capture. You could even sit in your back yard to observe the birds or flowers.
Often it’s easiest for most artists to take photos of live references, so you still have that image to use back in the studio. But, sitting and enjoying the slow-down time of drawing a live reference can be a lovely experience in itself. I’m lucky to have places like the EcoTarium and New England Botanic Gardens at Tower Hill near me which I visit to find inspiration and references.
I recommend exploring local opportunities near you that can provide some surprisingly wonderful reference opportunities. Here are some resources to help you find great places near you.
You can search for zoos and aquariums near you using AZA.org
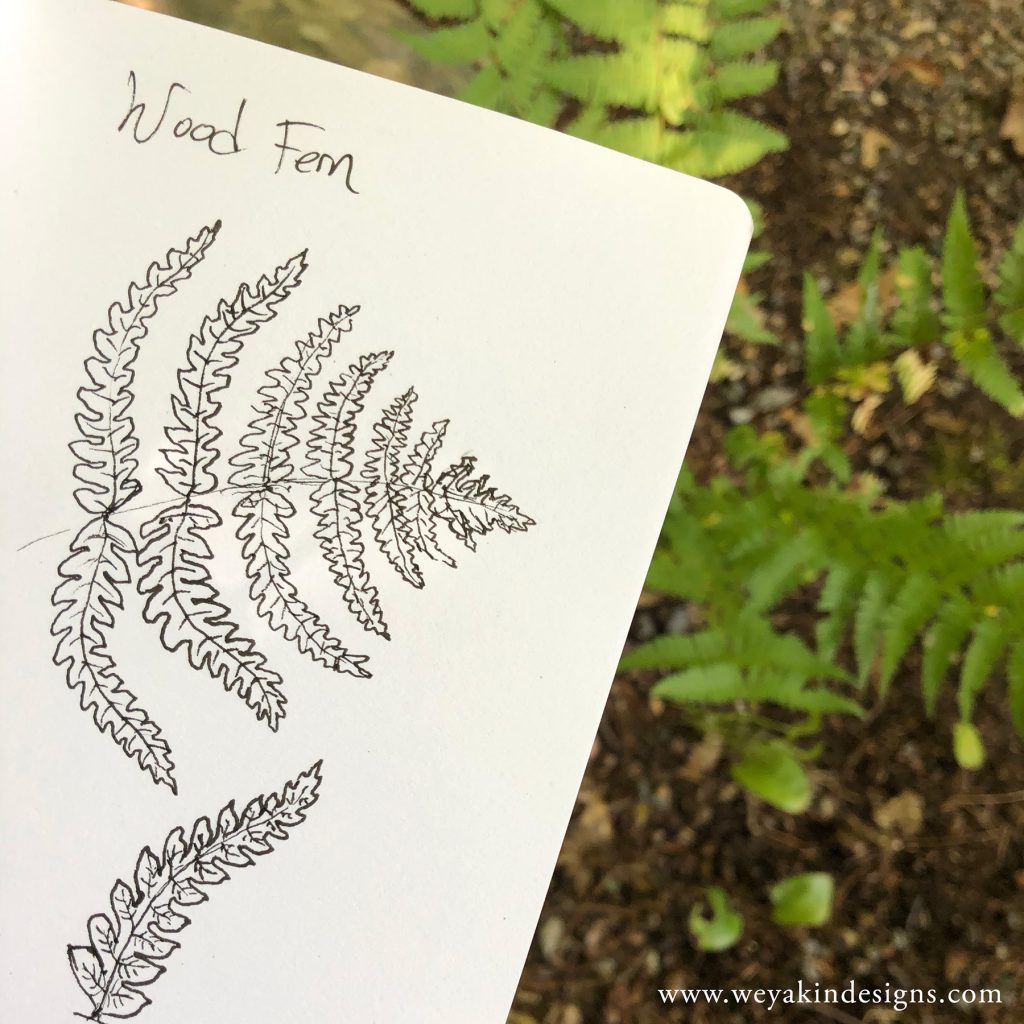
A sketchbook drawing done from live reference in the woods of a species of wood fern while at New England Botanic Garden at Tower Hill
Collecting Found Images
For some subjects, it’s not always easy to go out and take or draw from live references. As nice as it would be to hop on a plane and travel to Hawaii to take reference photos of volcanoes, it’s usually not realistic, unless you live there. That’s when the internet comes in handy.
I don’t condone the stealing of other people’s images by any means, but looking at photos and other images for inspiration and to get a sense of what something looks like can be very helpful. As long as, in the end, your final piece of art isn’t a direct copy of somebody else’s work. Found reference photos are a means of practicing and finding inspiration, not plagiarism. Don’t steal the images—practice and learn from them, but then create your own composition from what you’ve found in your own style.
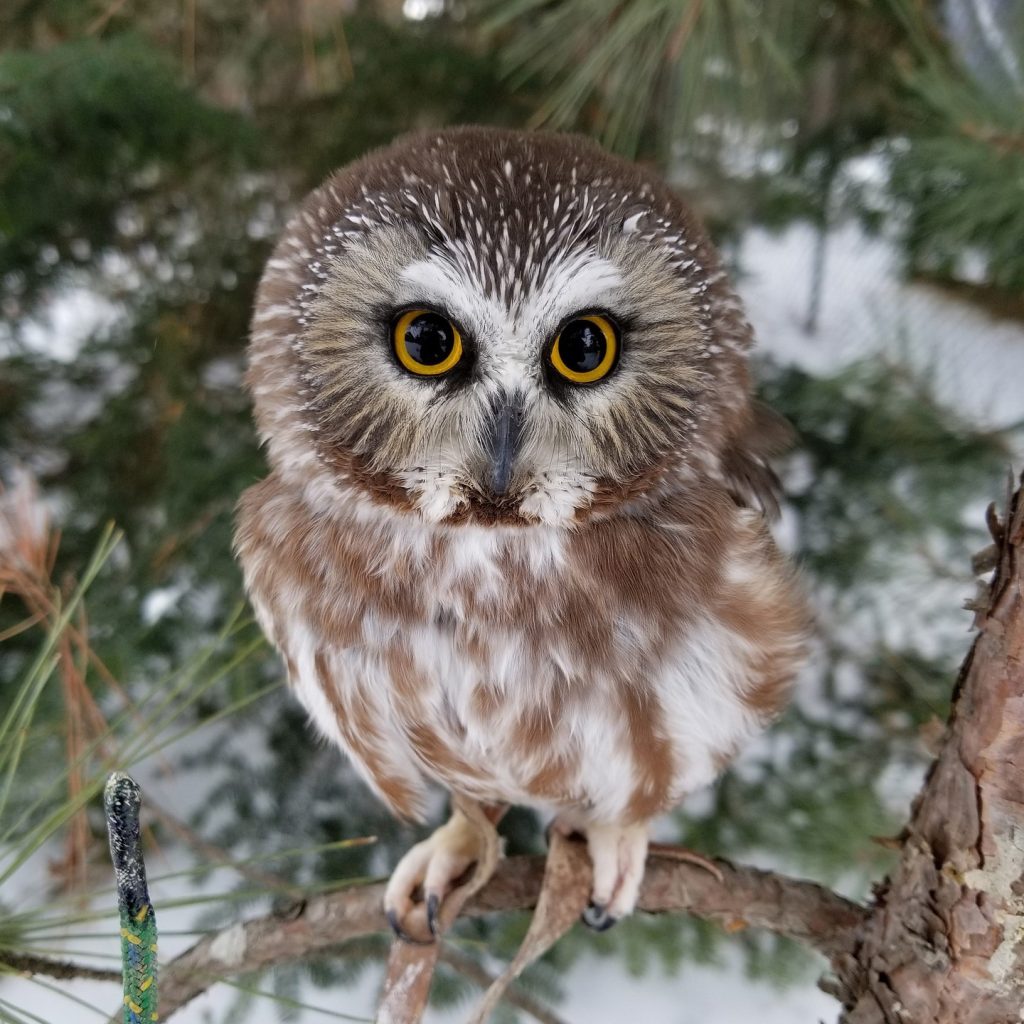
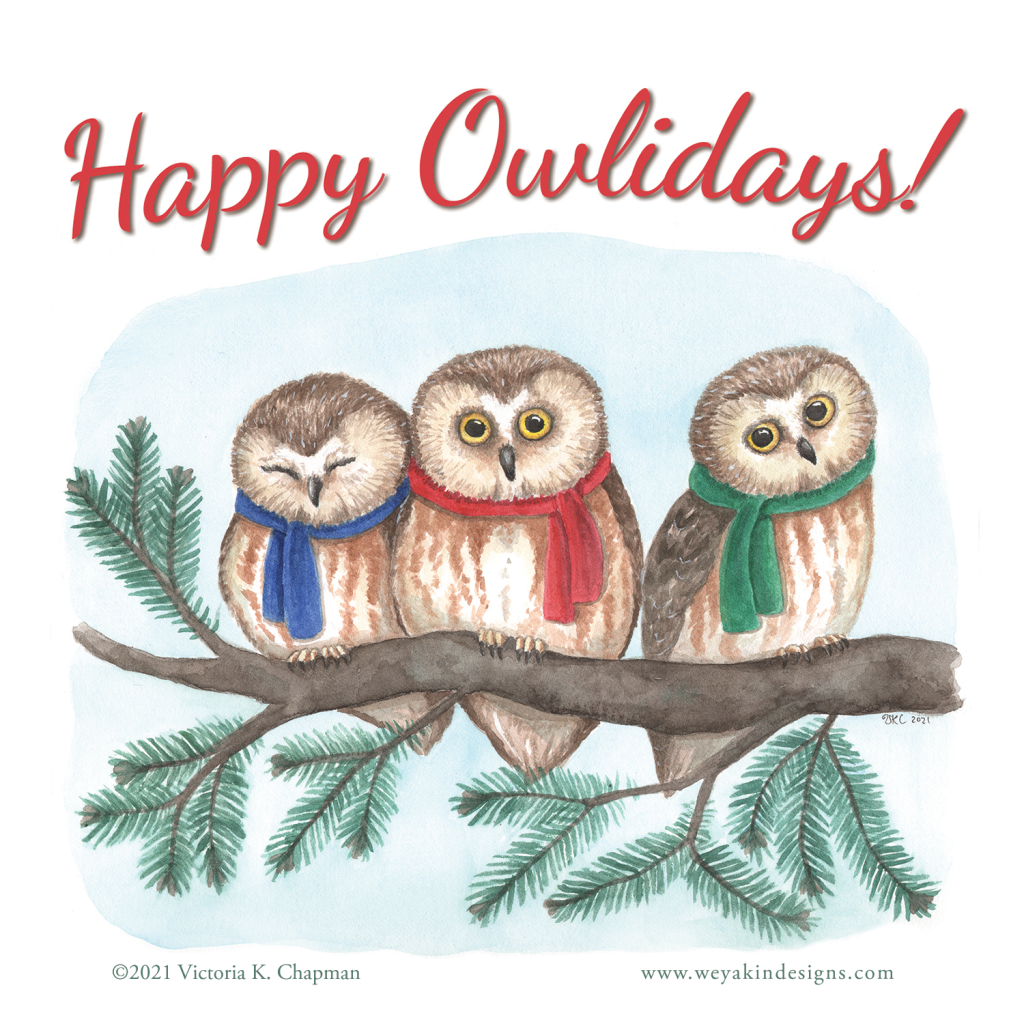
An example of a reference photo used to help me learn what northern saw-whet owls look like, next to the final piece of original art. This photo is a royalty-free photo from Pixaby taken by Chris Tolman.
Keep it Legal!
If you love a particular pose or way of lighting a figure that you want to borrow to use in your art, there are ways you can legally do so without violating copyright laws. There are a number of royalty-free reference photo websites out there that won’t step on any photographer’s toes, and can also support them and their art. Some are completely free, but it may be harder to search those and they may not always have what you want. Others have a nominal fee to give you access and you support photographers and their art through that. Artists supporting artists. Its’ a win-win.
Alternately, you can also reach out directly to a photographer and ask them for permission. Just make sure you get a clear “yes” and what their terms and restrictions are.
IMPORTANT: Always be sure to check out the terms for use. Some photographers require attribution if you directly use their work. Others require you pay an additional fee if it’s something you’ll be selling commercially.
Lisa Clough from Lachri Fine Art also has this great video about using reference photos legally that you can check out:
Doing the Research
Often times, I’ll realize I simply need more information before I can finalize part of my composition. I started to draw a child lying in a field of flowers, but realized I wasn’t sure which flowers actually bloom at the same time. Sure, many people wouldn’t notice if you drew a spring daffodil blooming at the same time as fall mums (unless they’re like me), but you might feel better knowing that your piece doesn’t contain gross inaccuracies.
Places to do the research
There are a lot of ways to research your subject matter, a classic place to do so being your local library. Books are an excellent resource if you can find a book about your subject. Libraries also have access to newspapers, magazines, and sometimes videos, microfiche, and photo slides. Libraries are an important local resource for so many reasons.
There is also, of course, the internet. But, you also need to be careful that your searches make use of reliable resources. Here are some of my favorite reliable sources of information for my nature research:
A lot of reputable newspapers, magazines, and education organizations have websites with free information. Just be careful of where you find your information and double-check it against other sources.
For this image, I did some research to make sure dandelions, white clovers, and asters all bloom around the same time.
An example of why to do the research:
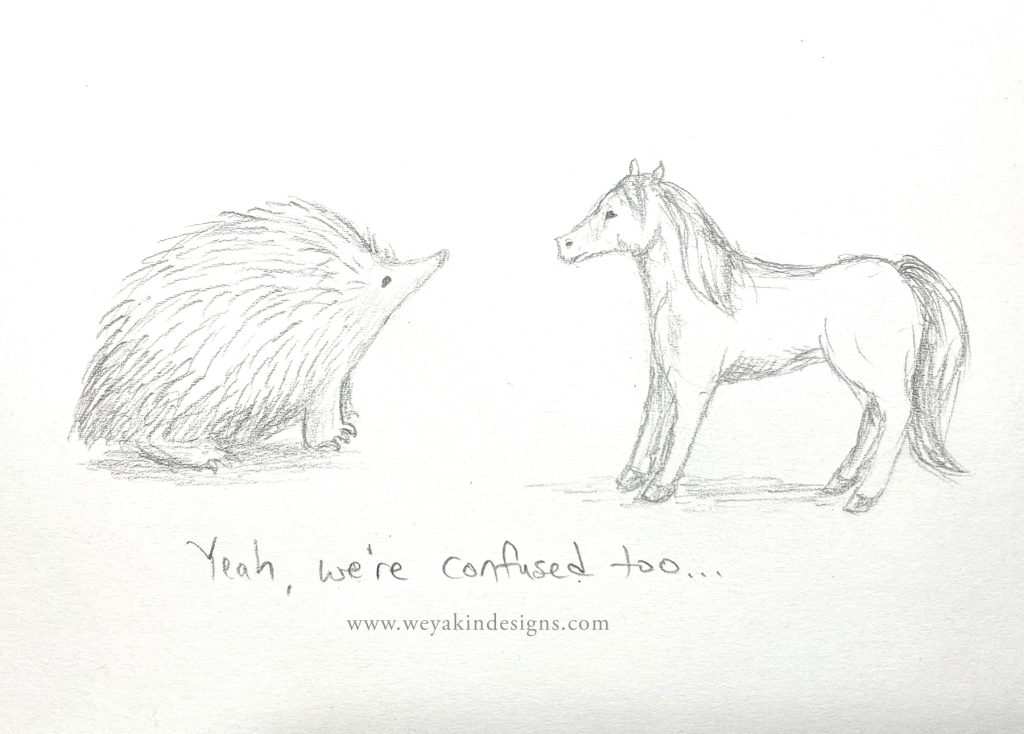
Perhaps you are drawing an echidna, a curious egg-laying mammal from down under as part of a non-fiction book you’re working on. It’s helpful to also find out where the echidna lives, its general size, its behavioral characteristics, and what its habitat looks like. If you draw an echidna in a New England forest, it’s going to seem awfully out of place. They’re actually from Australia, Tasmania, and New Guinea. Or if, for example, you draw an echidna next to a horse, but you draw them the same size, it’s also going to look rather odd. Echidnas are closer to the size of a large house cat.
A rough sketch of a horse-sized echidna next to a horse. Or…maybe it’s a tiny horse? We’re all confused here.
Doing the research will save you a lot of headache later when you find you included some innocent, but terribly inaccurate detail. It may be a little extra work, but I personally find it to be one of the most interesting parts of my job as an illustrator. And if you do have the opportunity to go on-location to do research for a piece of art, do it! That is, if you enjoy traveling and learning. I sure do.
Reference is Your Friend
Reference images and research are amazing tools that can help your art not only be more accurate, but more interesting as well. Research can help with precision, but it can also help with inspiration. And what artist doesn’t like feeling inspired? I love looking at photos, going out into the world to see new things, and spend time really looking at the amazing things around me. Plus, learning something new in the process can bring a whole other level of joy to your work.
Just remember that it’s okay to learn from other artist’ images, but stay away from plagiarism. Learn and practice, and then create something new and original that’s yours. If you want to copy another image, make sure to do so legally. And most of all, enjoy the time spent really looking at the world around you. This Earth is an amazing gift and there is so much to see!
Do you have other resources relevant to reference images and research that you’d like to share? Leave a comment here.
Do you have an art-related topic you’d like to hear about from me on this blog? Let me know!
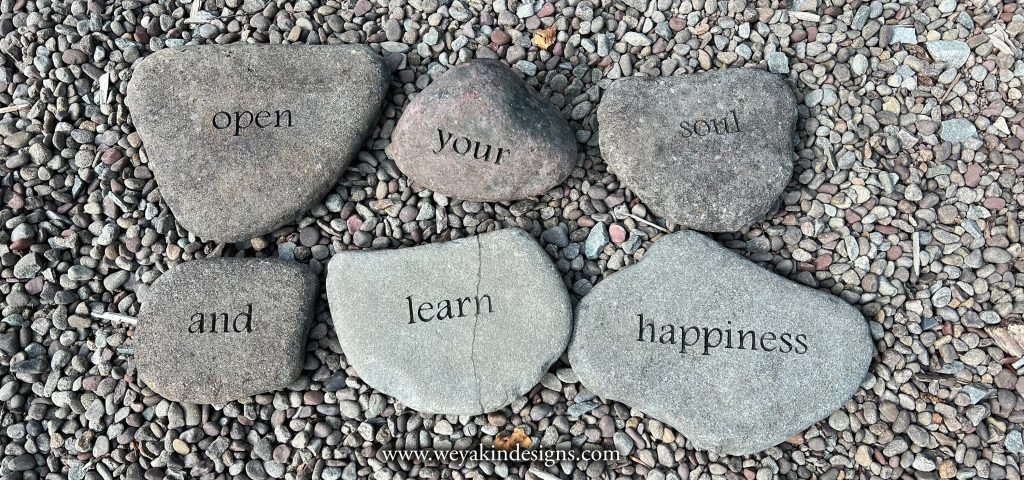
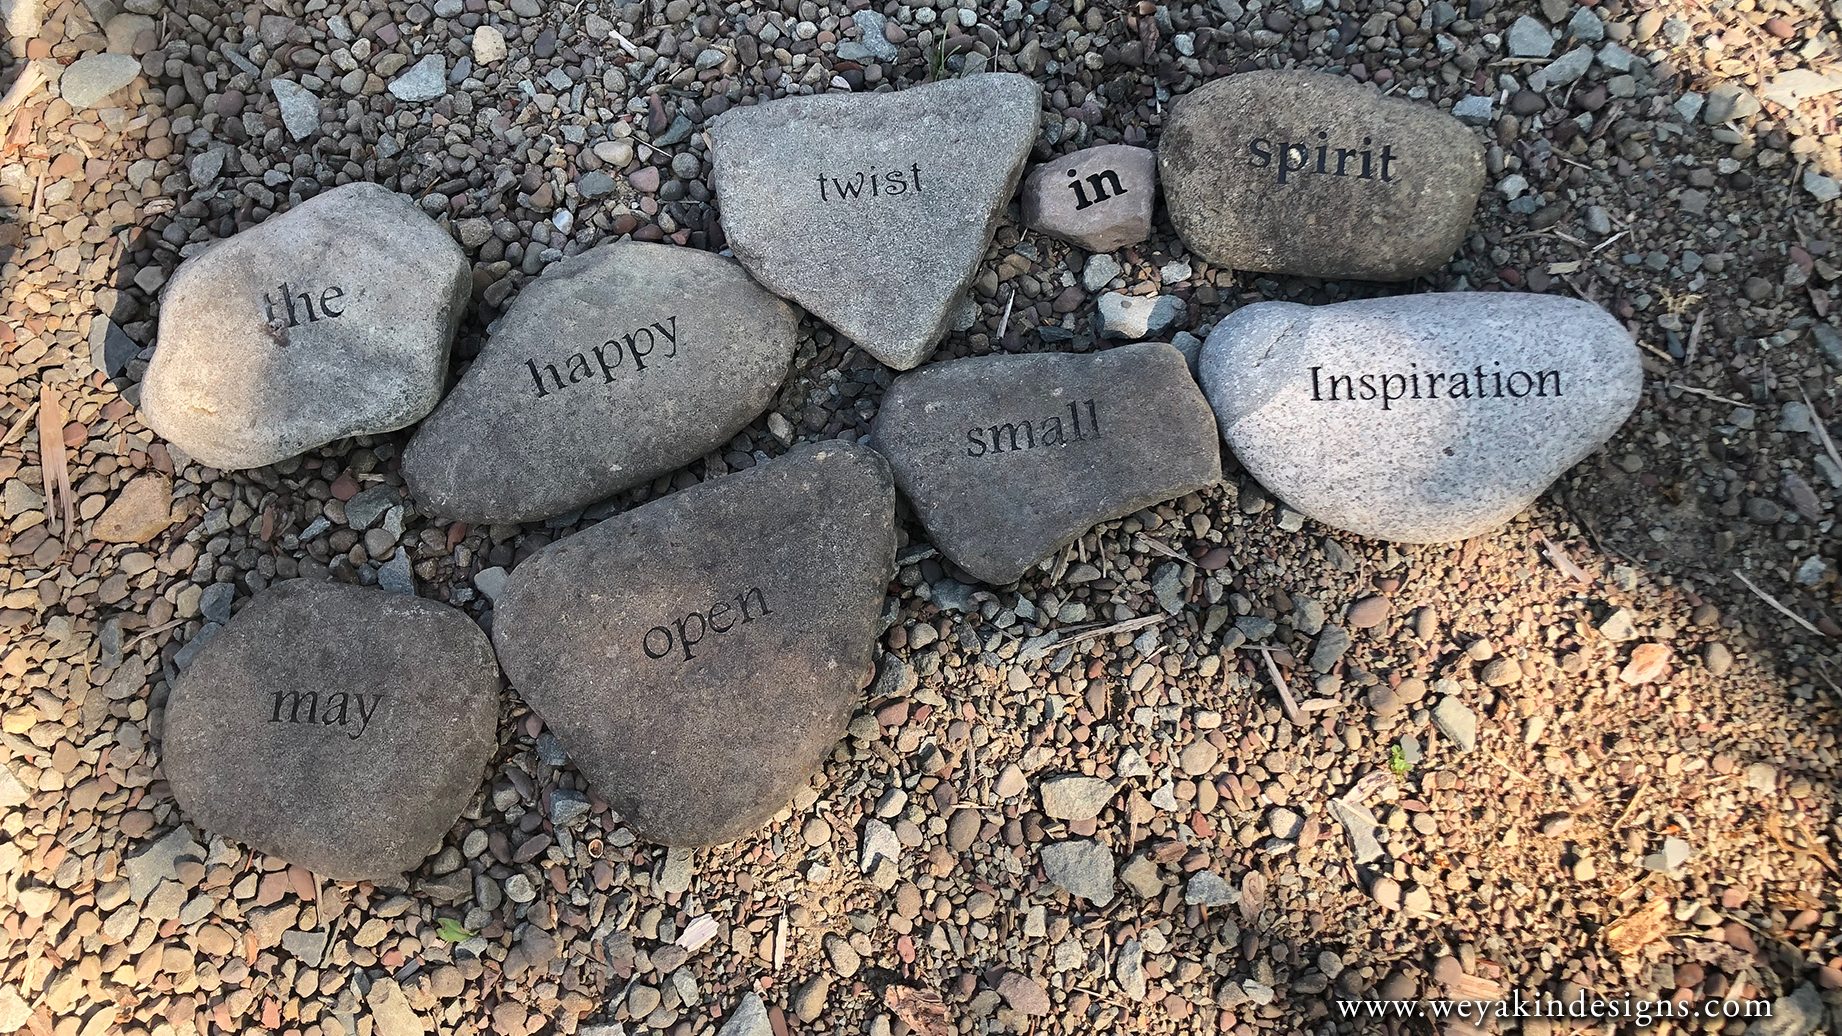
A short poem created in the “Word Garden” at The Highlights Foundation
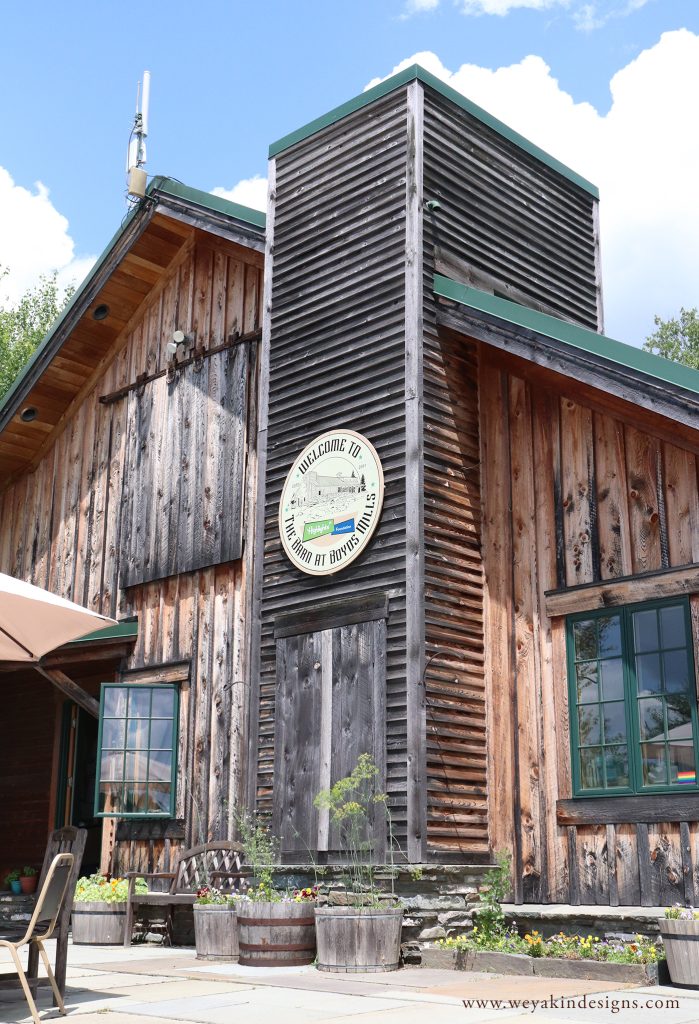
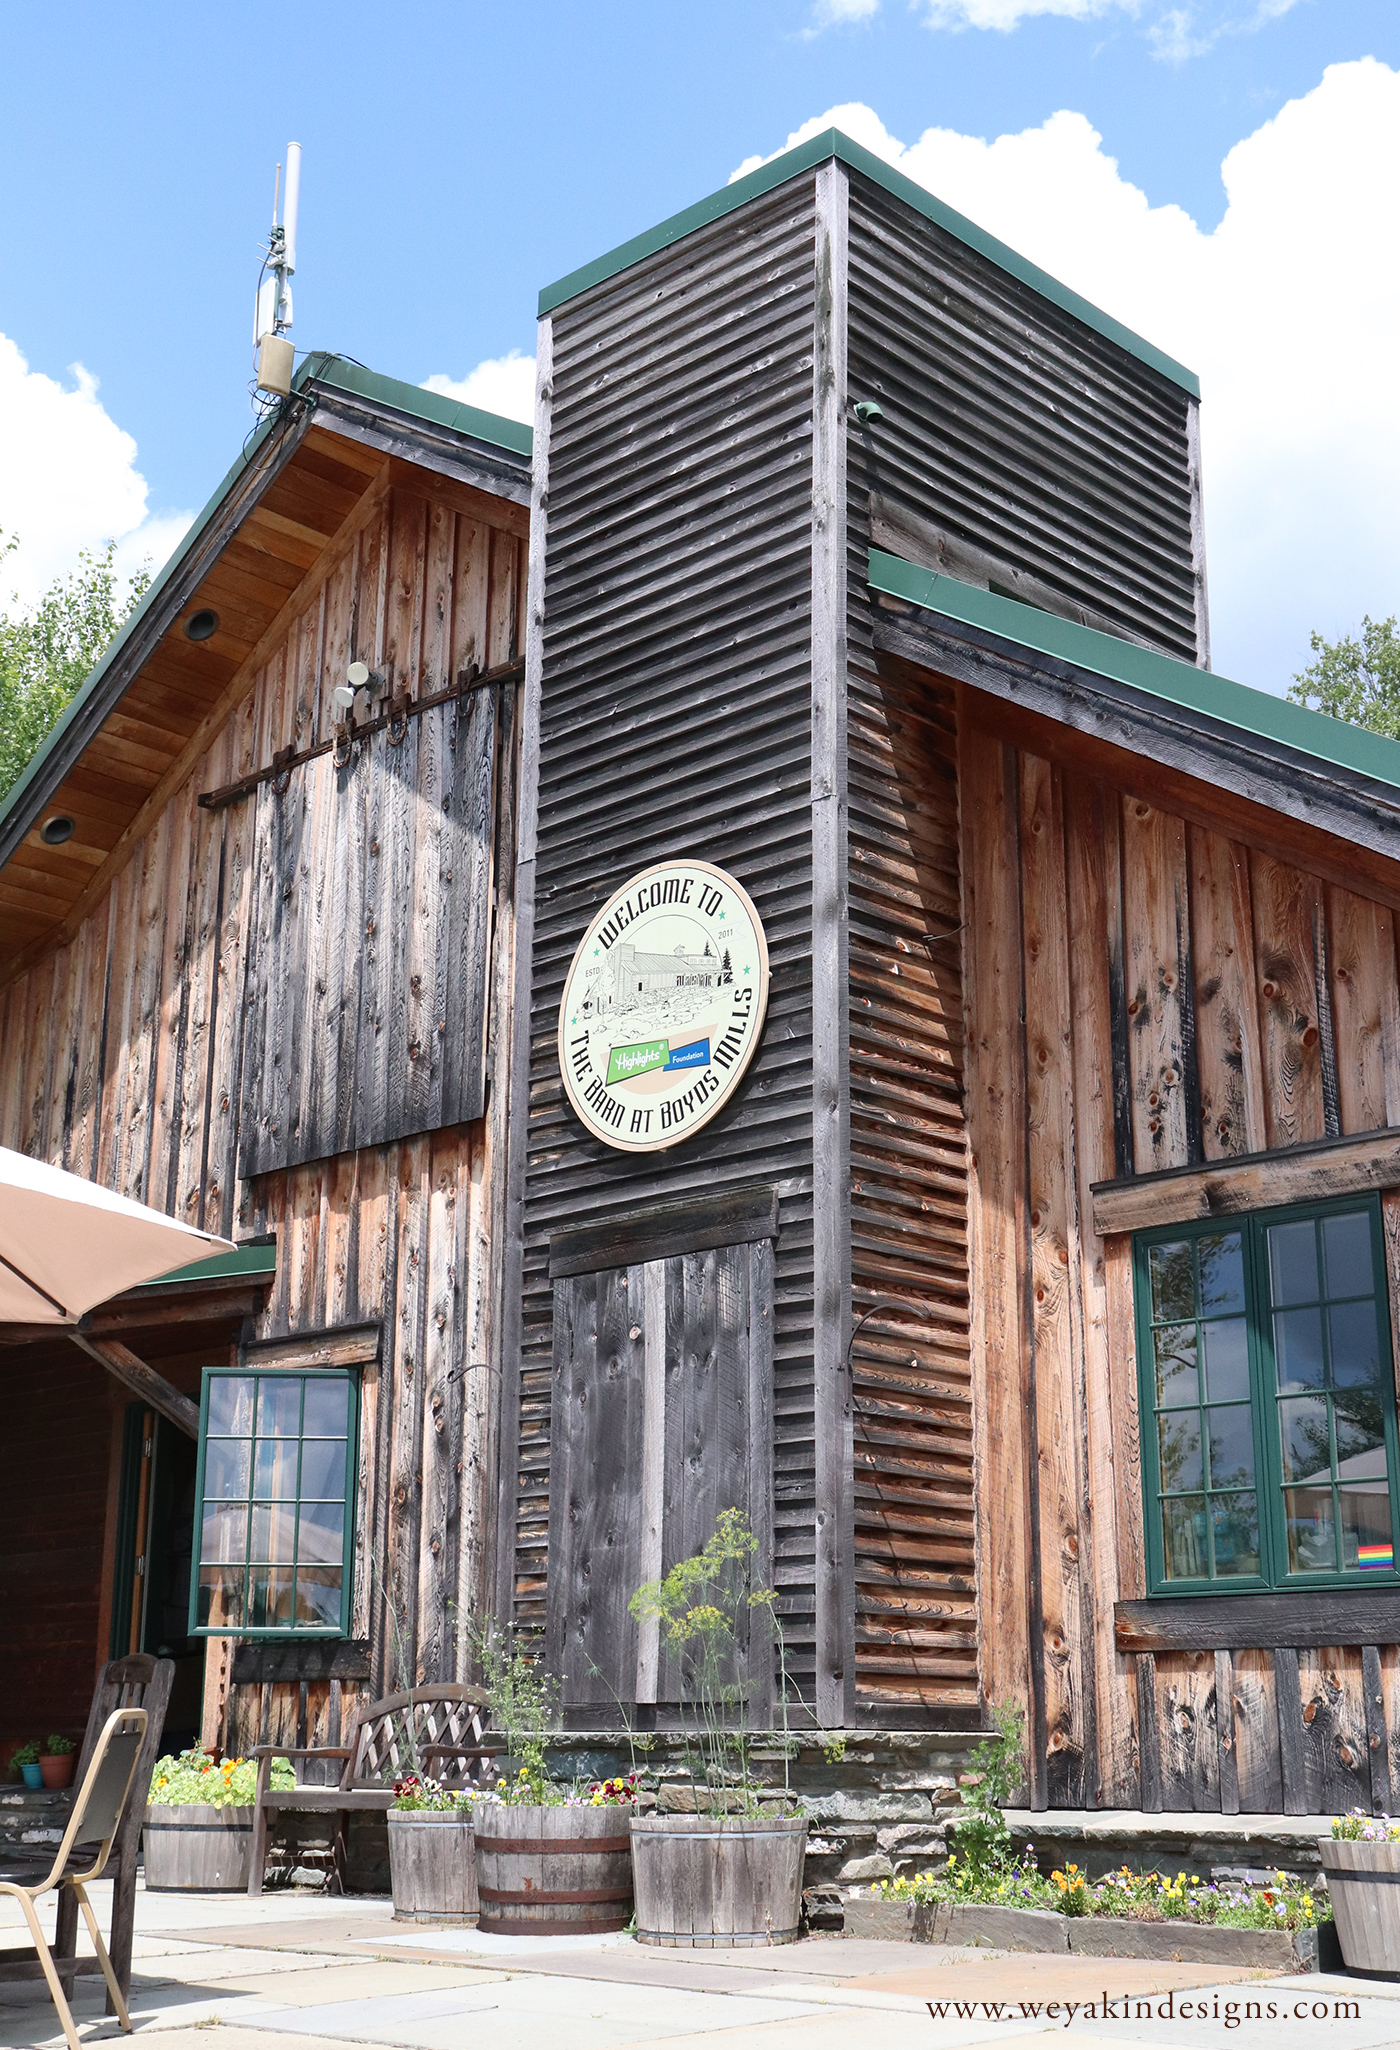
Earlier in July, I went away for almost a week to stay at The Highlights Foundation at The Barn at Boyds Mills in Pennsylvania. I attended the Summer Camp in Illustration intensive in order to grow my craft, learn from others, and make new connections in the children’s illustration field. Being there physically gave me the chance to really be immersed in the work and connect in a way I couldn’t if it was online from home. After two and a half years of everything online thanks to the pandemic, this was a welcomed change.
After my six days at The Highlights Foundation, I found myself struggling to succinctly and clearly describe my experience there. It was such a mind-opening and spirit-lifting time, it’s hard to put into words. Knowing that everyone’s experience is different, I’m speaking from my own perspective. And since my head is still buzzing with so many things I could say about my trip, I narrowed down to this list that I hope you find helpful.
Ten Things to Consider When Attending an In-Person Highlights Foundation Workshop:
Be open to experience. Don’t arrive with a specific expectation. Arrive with your mind and spirit open to receive whatever it is that happens. I couldn’t predict how my week would go. And it was so much better than I might have guessed.
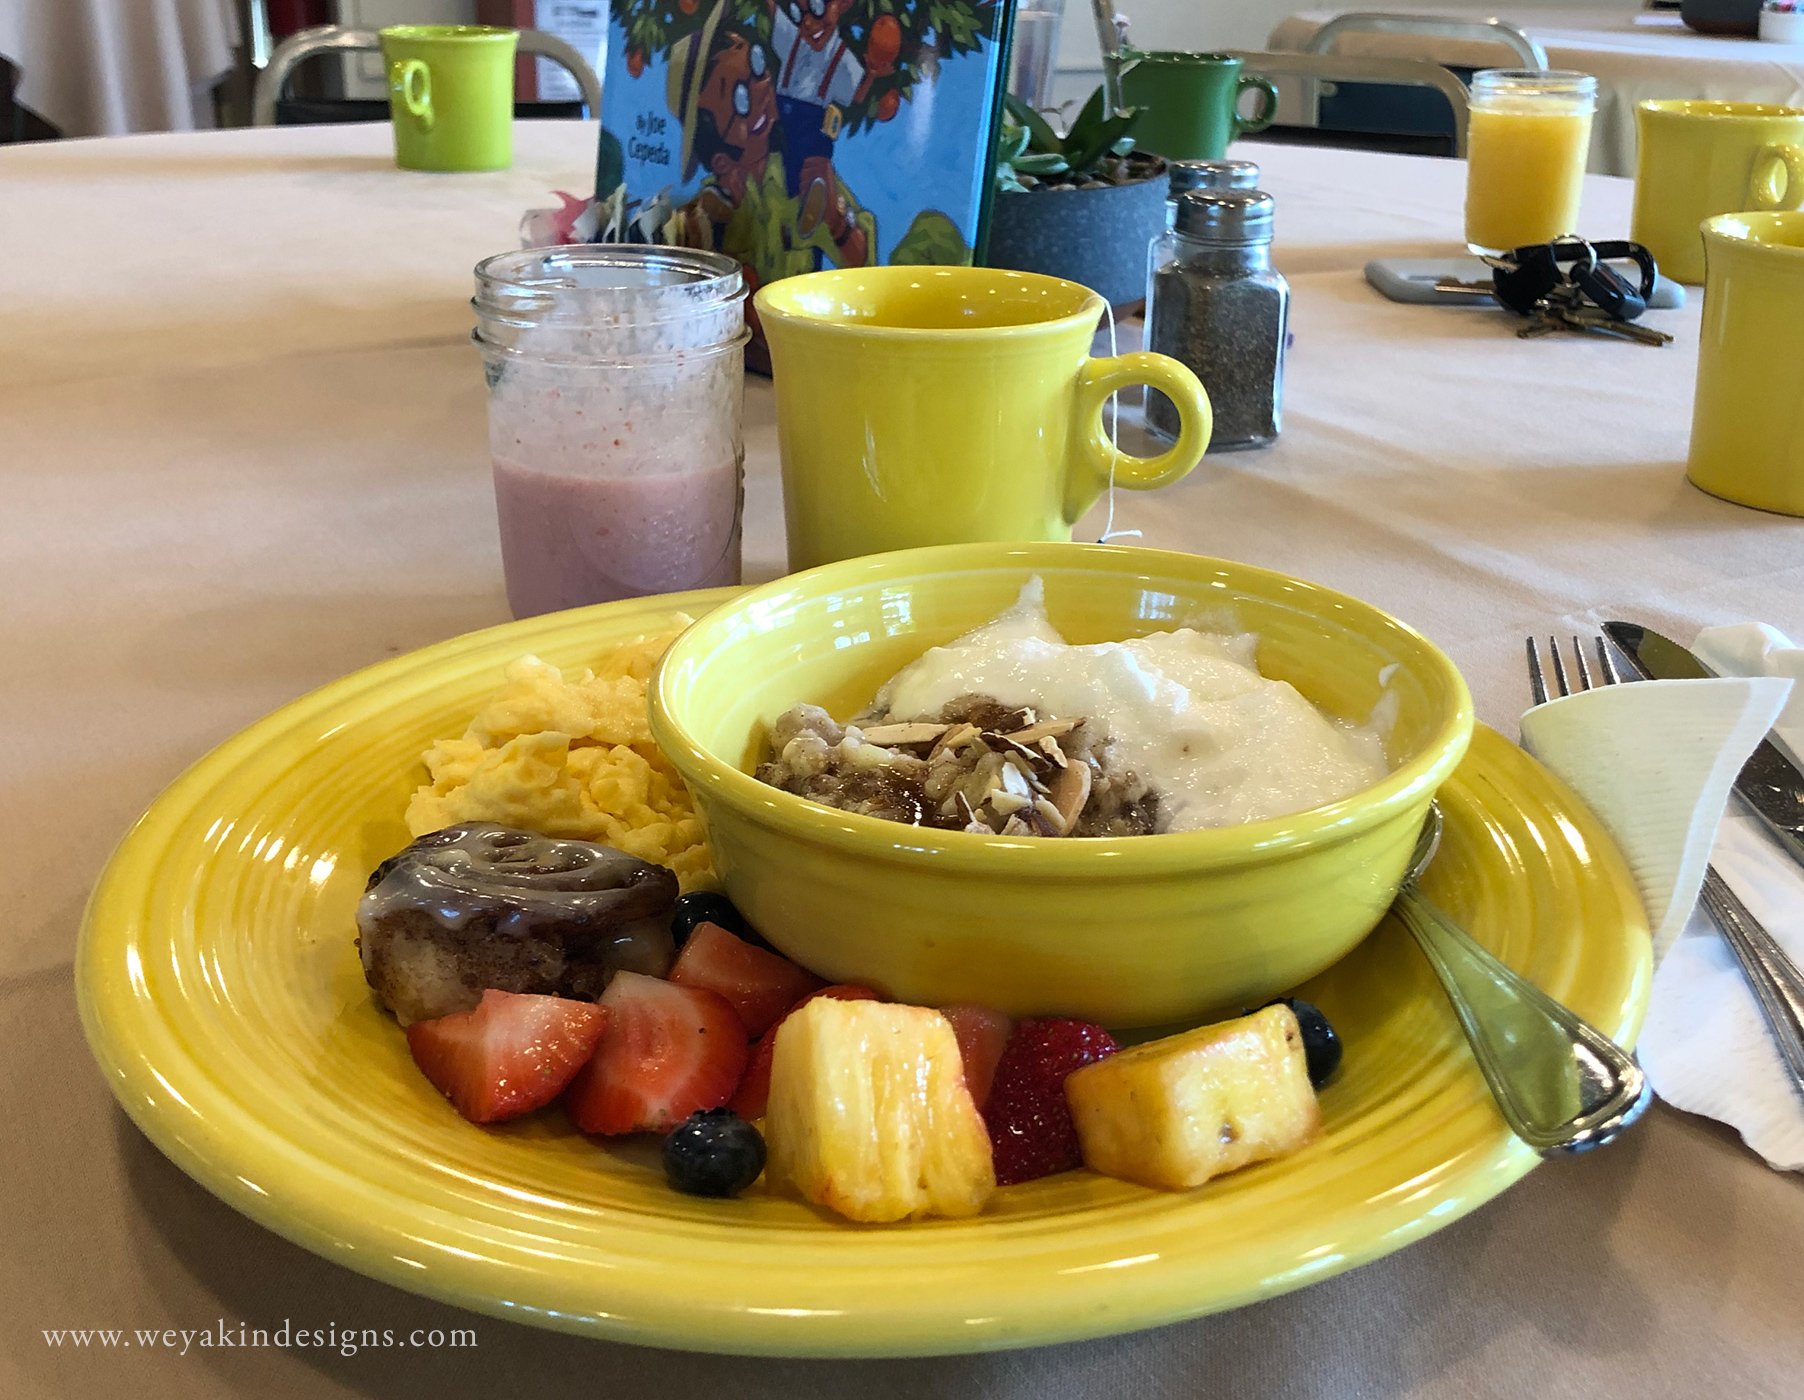
Arrive hungry. Because they feed you three meals a day and snacks in between. And it’s not just any old food. It’s amazing, local, fresh, and different every day. If you have a special diet, don’t worry—they’ve got you covered. I’m a vegetarian and I had one of the best culinary experiences I’ve had in a while.
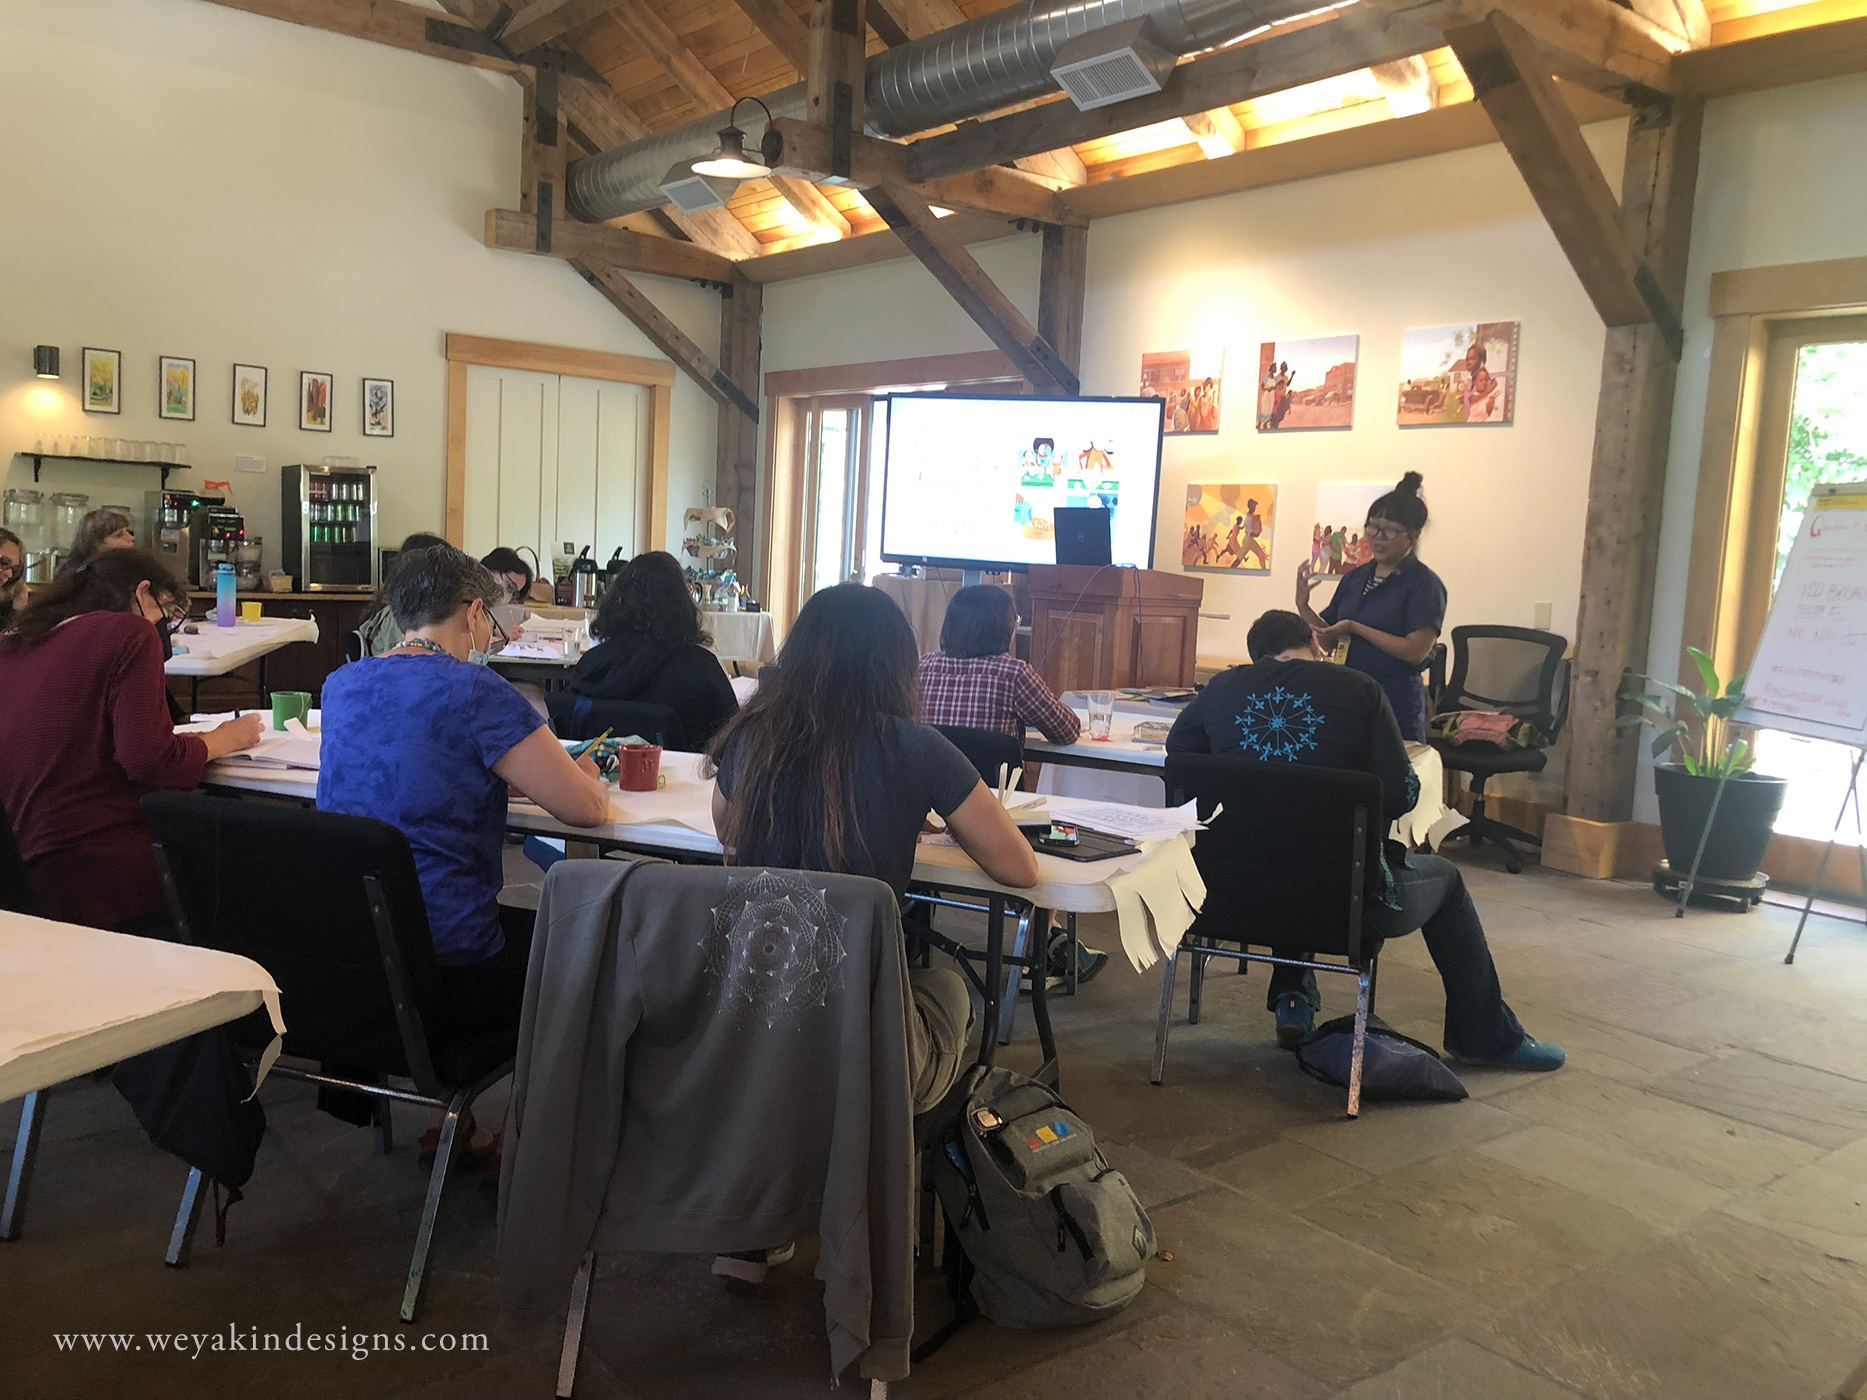
Be social. I know not everyone has an easy time with being social among strangers. But, believe me—people at Highlights who attend a workshop with you will not be strangers for long. Connecting with other kidlit illustrators and author/illustrators was one of the best parts of my trip. It made the experience so much more worthwhile. I had the pleasure of getting to know not only my fellow participants, but also the teaching faculty, and the staff. They were all amazing people and I’m so glad I got to spend time with them.
Give yourself time. Time to rest. Time to process. Time to be alone if you need it. I had the privilege of being able to add a personal retreat day to the beginning and end of my trip in order to let myself settle in and decompress. It was a great decision and if you have the ability to do so, I really recommend it. It allowed for some more quiet time, but also some more intimate time with the handful of others who stayed extra time. And if you can’t do that, make sure to give yourself time during the day or evening to take a break alone somewhere, especially if you’re an introvert like me. There are plenty of great places to do that.
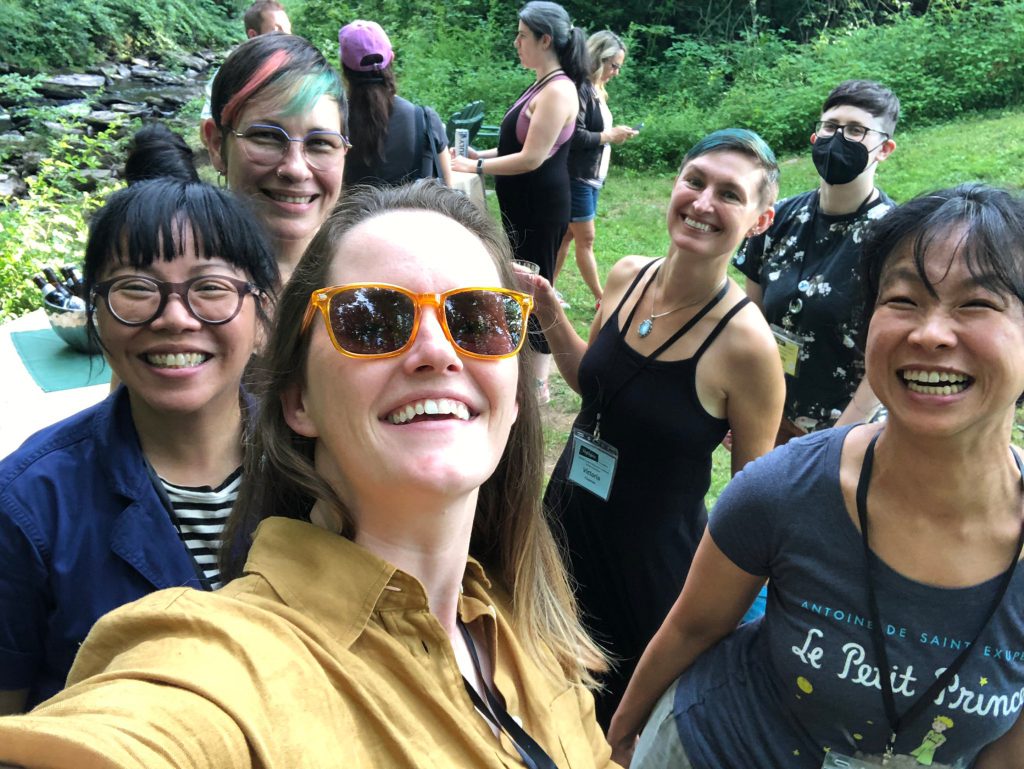
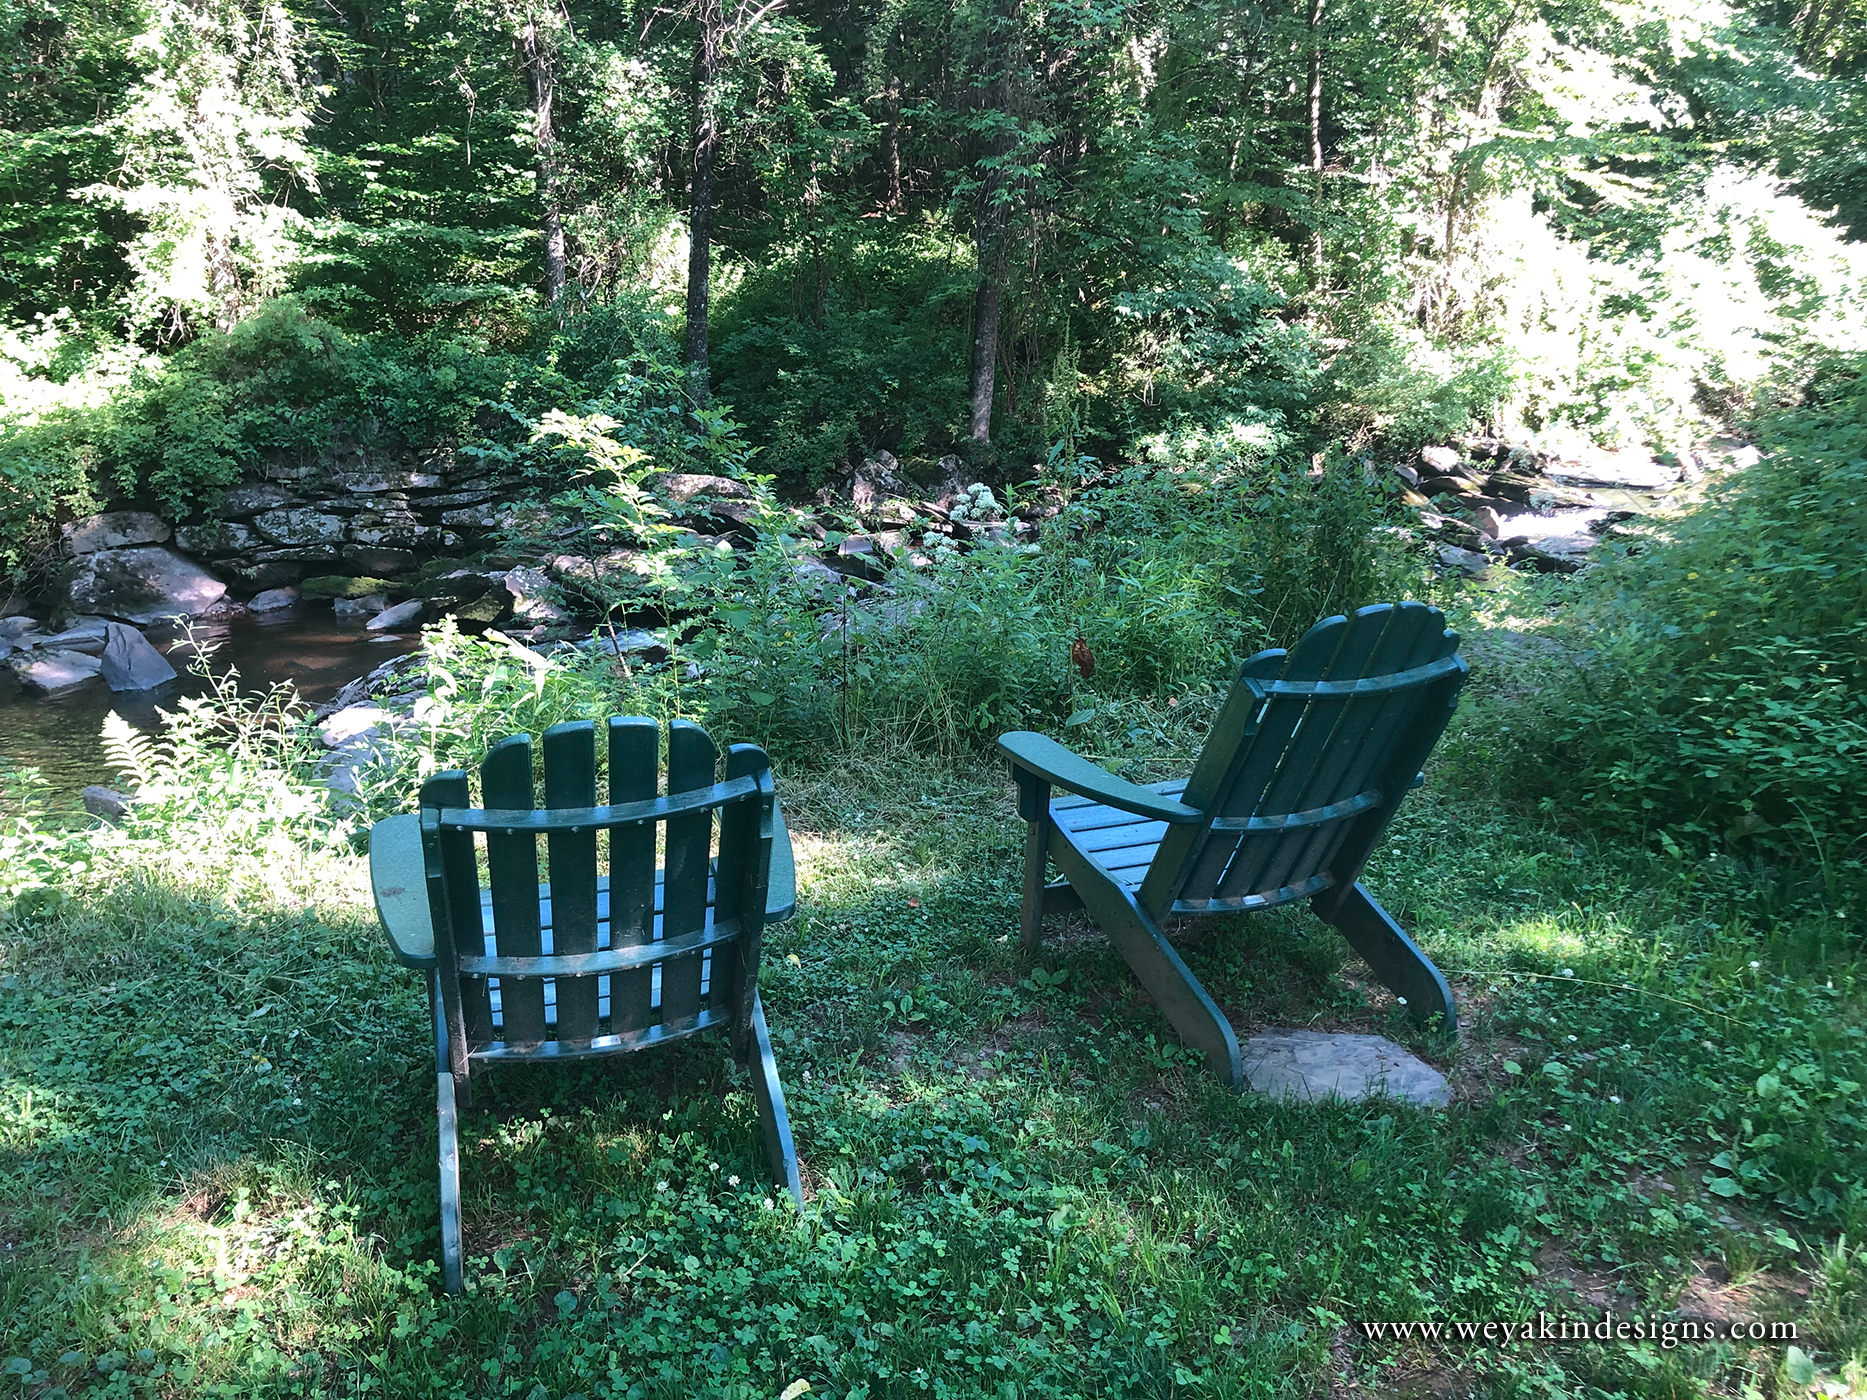
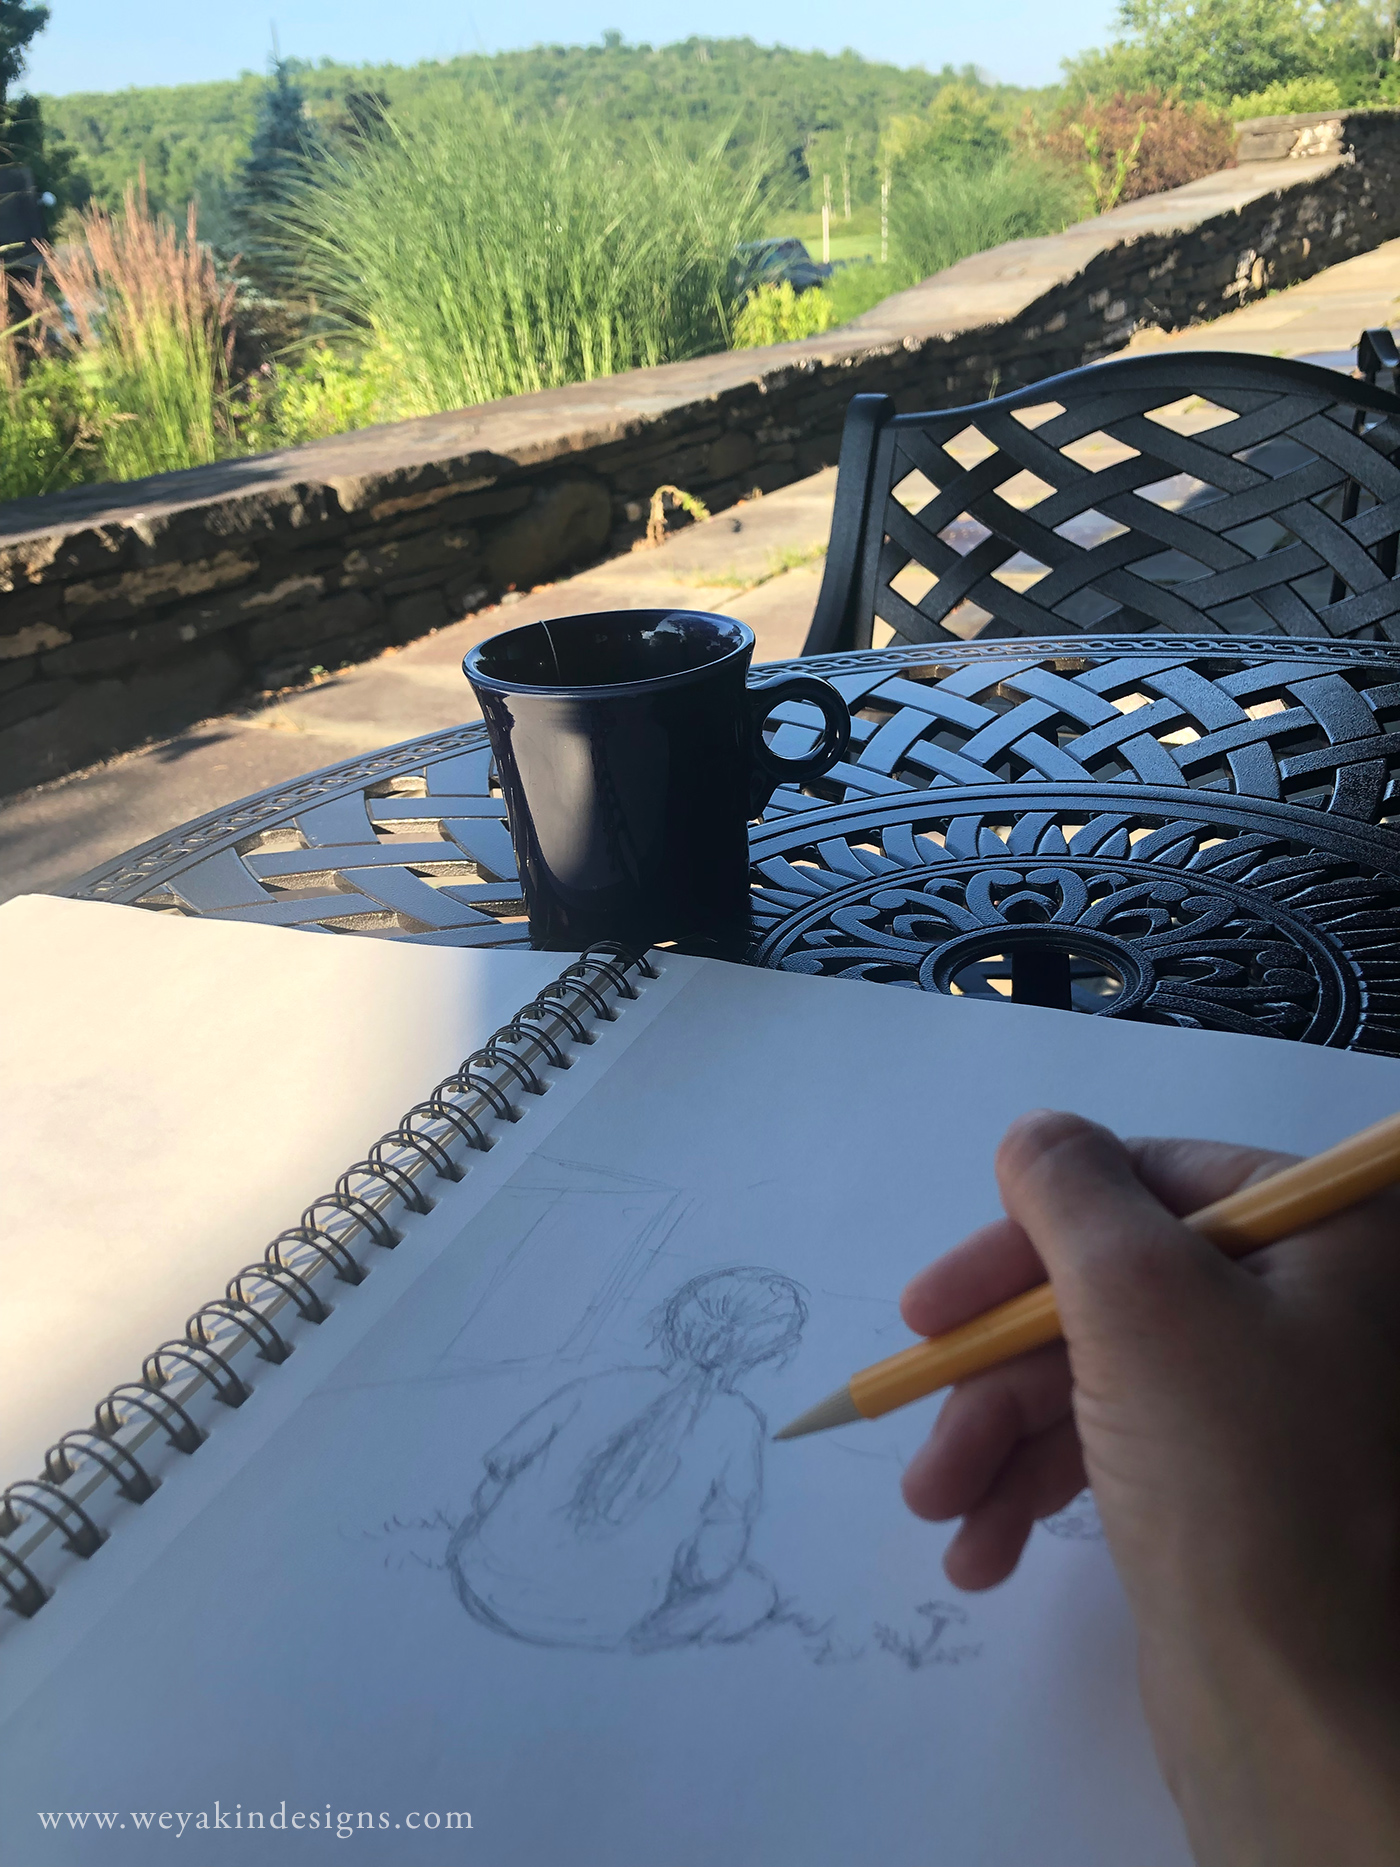
Take advantage of the outdoor spaces. The Barn at Boyds Mills is full of outdoor trails and places to sit. Be sure to visit the brook and sit down to enjoy the sound of the babbling water. Take a hike up one of the trails if you’re able to (but be sure to put on bug spray to avoid the ticks and flies). Or just enjoy time at one of the outdoor tables to quietly sketch or write. And if there’s a fire in the evening outside at the Barn, enjoy the time to sit by it and chat with others. Fireside times with fellow illustrators were some of my favorite moments.
Document your time there. You’ll want to take notes, you’ll want to draw, you’ll want to write. There’s a lot of information to take in. Make sure you have your favorite ways to take down and process information with you. I brought both a writing notebook and several sketchbooks and I ended up with notes and sketches in both. I’m glad I have them to refer back to. I also took photos to remember some of the spaces and people I spent time with. Looking back at them makes me smile.
Be present and in the moment. While you’re documenting your time there, also remember to be present and in-the-moment. It’s easy to jump ahead in your mind to what you’ll do when you get home. But, it’s also an experience you’ll really want to savor. It goes by quickly! Enjoy each moment while it’s happening.
Unplug and disconnect. From your regular life that is. It’s okay to check in with the family, especially when you have kids. But, be mindful of how often you’re checking your phone, email, or social media. Fortunately, the cellular service at Boyds Mills is pretty spotty and the wifi can be touch and go depending on where you’re standing. That can be frustrating if you’re doing research online. But, for the most part, it wasn’t a huge issue for me, and it allowed me to remember to unplug for a while and focus on the workshop and the people.
Be open to feedback. For many of these workshops, there is a critique or mentor component to it. One of the most helpful things you can do for yourself is to be open to the feedback you receive. It doesn’t mean you have to use all of the feedback if you don’t agree with it. But, at least listen. And thank the people who took the time to look at your work with you. They are there for the love of children’s books just like you are.
Exchange information with colleagues. You’re going to meet people there and you’re probably going to want to stay in touch. Be sure to ask others for their information, such as social media handles and email addresses. To make it easy to share your information, you could bring business cards or postcards with the info you want to share. I was so glad I brought my business cards with me so people could find me later.
And the biggest piece of advice I can give for a Highlights Foundation workshop trip is that the experience will be what you make it. People I know who have gone before have told me there’s a magic to the space that they haven’t found in other places. I found that to be true myself. But, being open to experience and present in the moment made the trip even more pleasant and remarkable. I hope you’ll find the same is true for you.
One of the amazing breakfasts I had at Highlights.A quiet place to sit by the brook.Appetizers by the brook with friends. Selfie by Mallory Grigg.Isabel Roxas presenting at the Illustration IntensiveThe front of The Barn where much of the action takes place.I enjoyed sketching in the morning with a cup of tea outdoors.
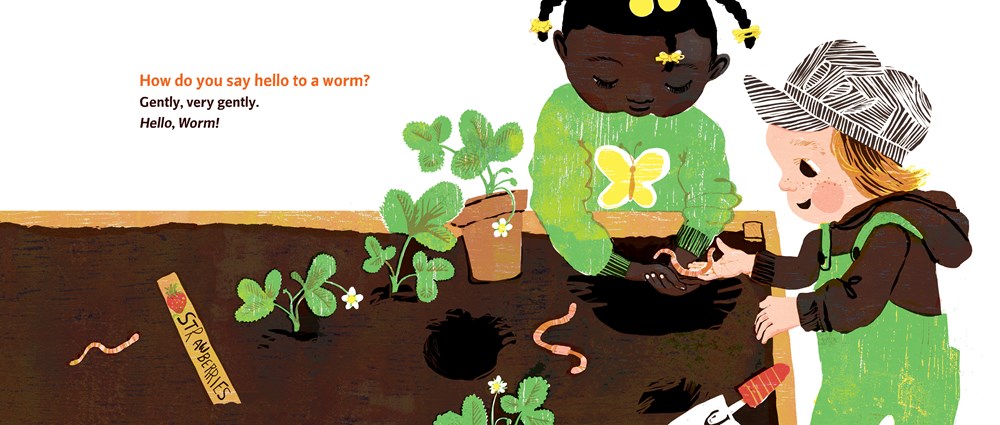
A spread from Kari Percival’s picture book HOW TO SAY HELLO TO A WORK: A FIRST GUIDE TO OUTSIDE
In the second of the KidLit Connection blog series, I interviewed illustrator, writer, and environmental educator, Kari Percival. Kari has studied art, environmental science, and teaching. Her education combined with her work as a science teacher, running a local preschool gardening program, and experience as a parent has helped shape her unique perspective when creating books for children.
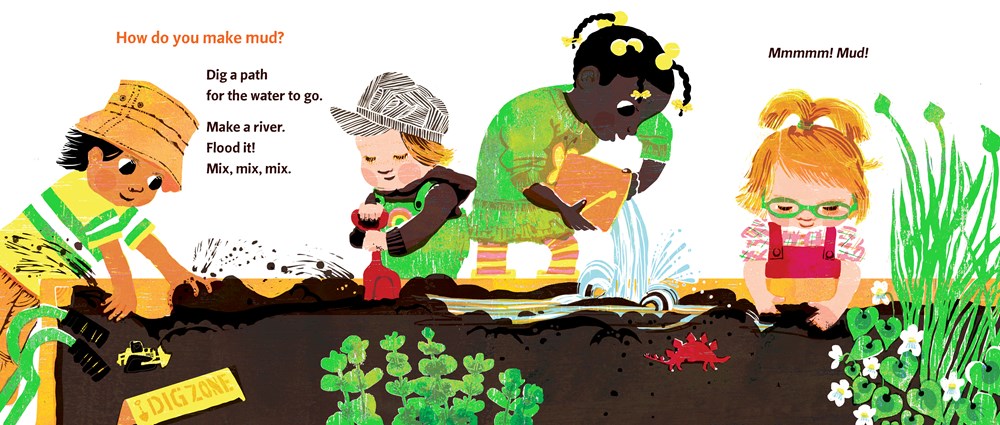
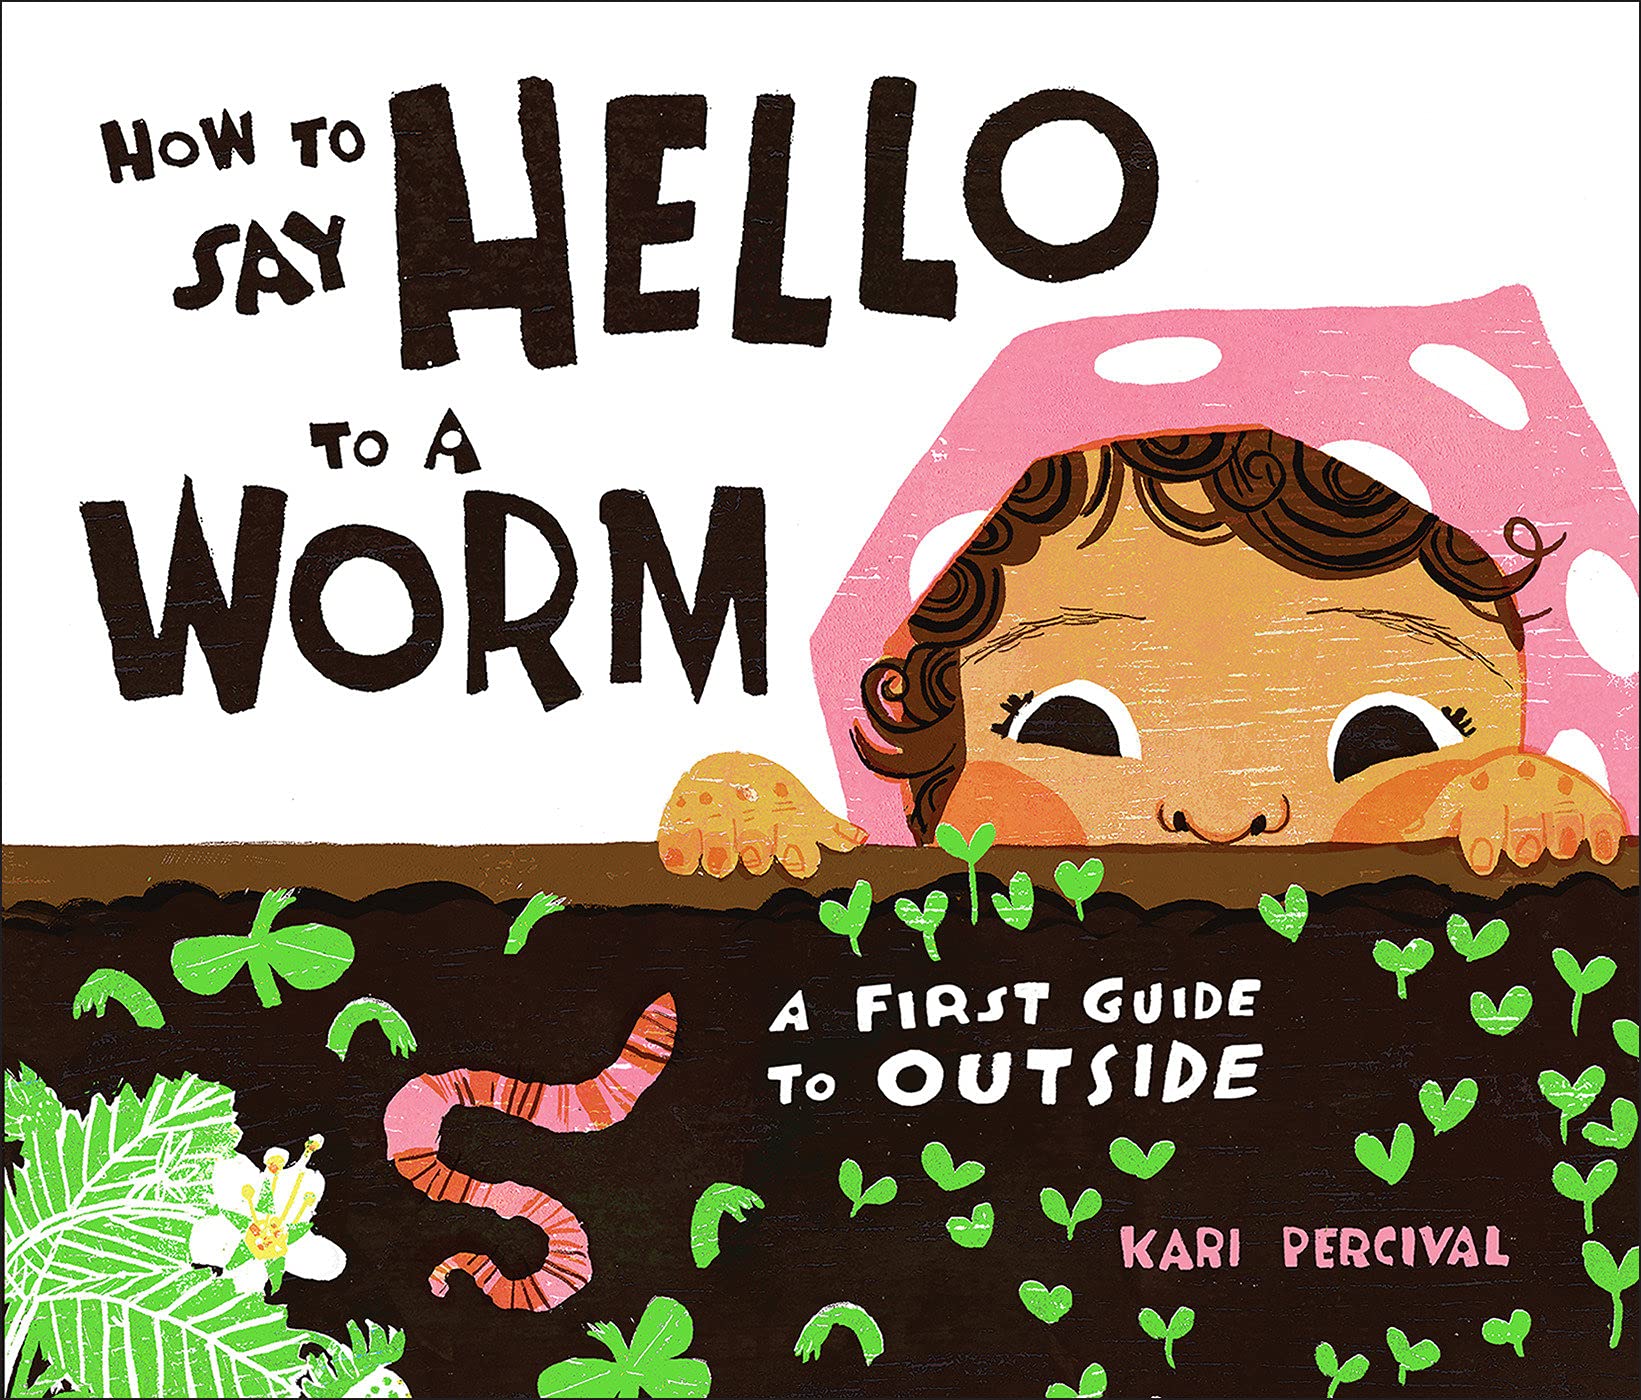
Kari creates colorful woodcut prints that show dynamic relationships between kids and nature. Her storytelling inspires small children and their grownups to make a positive difference in the world through connecting with nature. Her picture book HOW TO SAY HELLO TO A WORM: A FIRST GUIDE TO OUTSIDE (published by Rise x Penguin Workshop) is a perfect guide for preschoolers who love to get their hands dirty, play in nature, and learn all about how plants grow.
In this post, Kari tells us about the experiences that have shaped her work as an illustrator and storyteller and what inspires her to create books for children. I really loved hearing about all the interesting pieces of Kari’s life that have made her the book creator she is today.
Kari’s Interview
First, let’s talk a bit about you as an author and illustrator. Could you tell us more about what inspires you and what you love about being a creator of books for kids?
As my extended family is cleaning out old storage boxes, they send me these little picture books I wrote when I was a child, that they’d tucked away, that I hadn’t seen for 40 years. Little stories about nature, local wildlife, or my pets. When I was in grade school, I guess our teachers had us make books a lot, bound and covered in wallpaper samples. I could write and draw whatever I wanted in them, and I gave them as gifts to family members a lot. I guess when I write and illustrate picture books, its like I am still making and giving gifts out, except now its to the children of the world.
As an environmental educator AND picture book author/illustrator, how does each type of work relate to and inform the other?
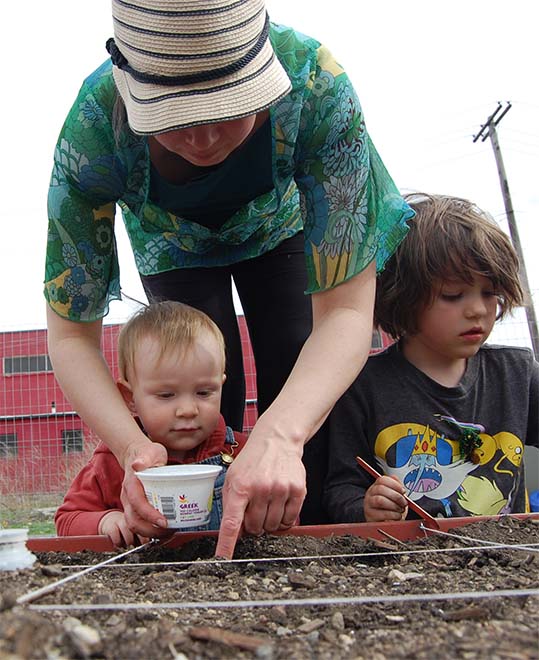
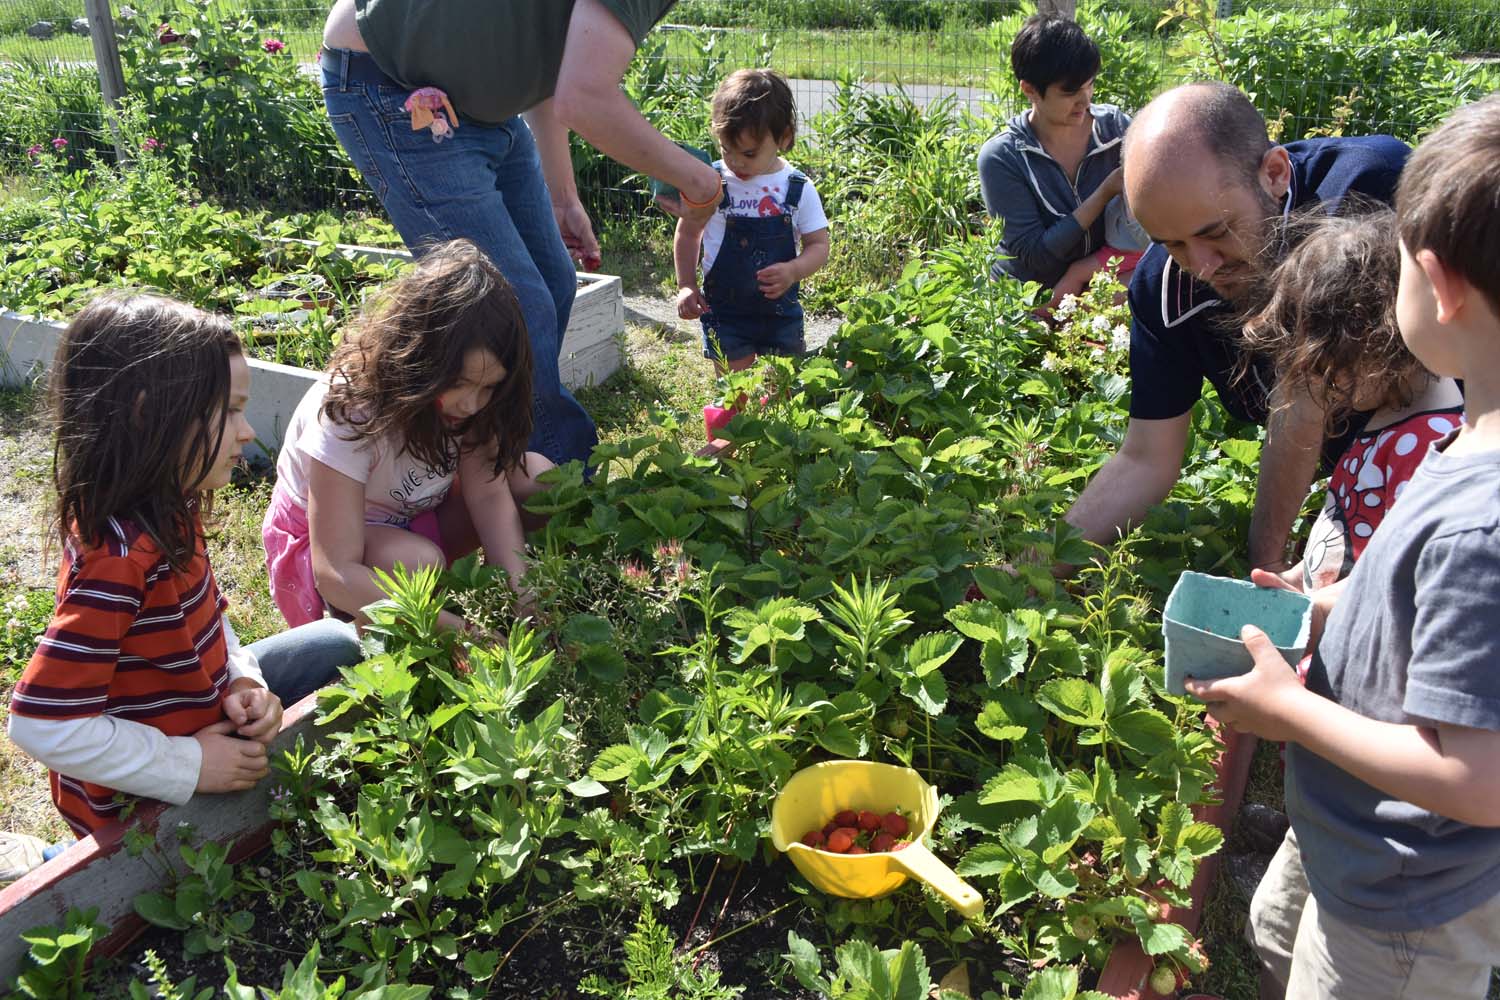
Children and parents working in the community gardensat the Early Bird Garden Club run by Kari Percival.
Teaching informs my writing, but also, my writing is motivated by my love of learning and my love of ecology, of a deep wonder and love for all the beautiful, vulnerable, magical and amazing life on Earth. I am an artist, but I went to graduate school to learn to be a science teacher. Although I love art, and it comes easily to me, I don’t think everyone should be forced to make art if they would rather play basketball or whatever thay love to do. But I do think its imperative that every young person learns about ecology, and biology, and environmental science, because every young person will grow up to be a voter and decision maker, and they need to know how we are all members of the web of life, and how our decisions affect all life on Earth. I worked as a science teacher in public schools for 10 years, and I hope to maybe go back someday, but I took a break when I had children, and that is when I started thinking of books I wanted to write.
How did you first get into creating children’s books? What made you want to pursue this type of art?
When I had my own children, I really enjoyed re-entering the world of children’s picture books as a parent. There are so many wonderful books, classics and new. There were also gaps: so many books I thought were missing from the shelf. I thought maybe I could apply my art and storytelling skills to making books to fill where I thought some gaps were. It seemed like a long shot, but maybe worth a try.
Let’s talk about the most recently published book you wrote and illustrated, HOW TO SAY HELLO TO A WORM: A FIRST GUIDE TO OUTSIDE. Can you tell us a little more about the book and what inspired you to write it?
I’m an environmental educator and so inviting kids outdoors and learning to grow food – even just to learn where food comes from – and see how we are made of food that is made of sunshine and how we share the world with other living beings, inviting and empowering very young children to become immersed in hands-on outdoor learning, edible education – that is my goal with this book.
When my kids were small, I started Early Birds Garden Club, a meet-up for toddler and parents that wanted to learn to grow food at our local community garden. Though leading the group, I learned what questions toddlers had about learning to garden, what questions they had about nature, and what gardening activities they enjoyed doing. My cracker jack agent, Teresa Kietlinski of Bookmark Literary, suggested I should write a book on how to garden for toddlers. She knew that I would know just where to start, because I knew just what types of questions curious kids that age had. So then I wrote HOW TO SAY HELLO TO A WORM. They say “write what you know” and that was true for me with this book.
A spread from Kari Percival’s book HOW TO SAY HELLO TO A WORM: A FIRST GUIDE TO OUTSIDE
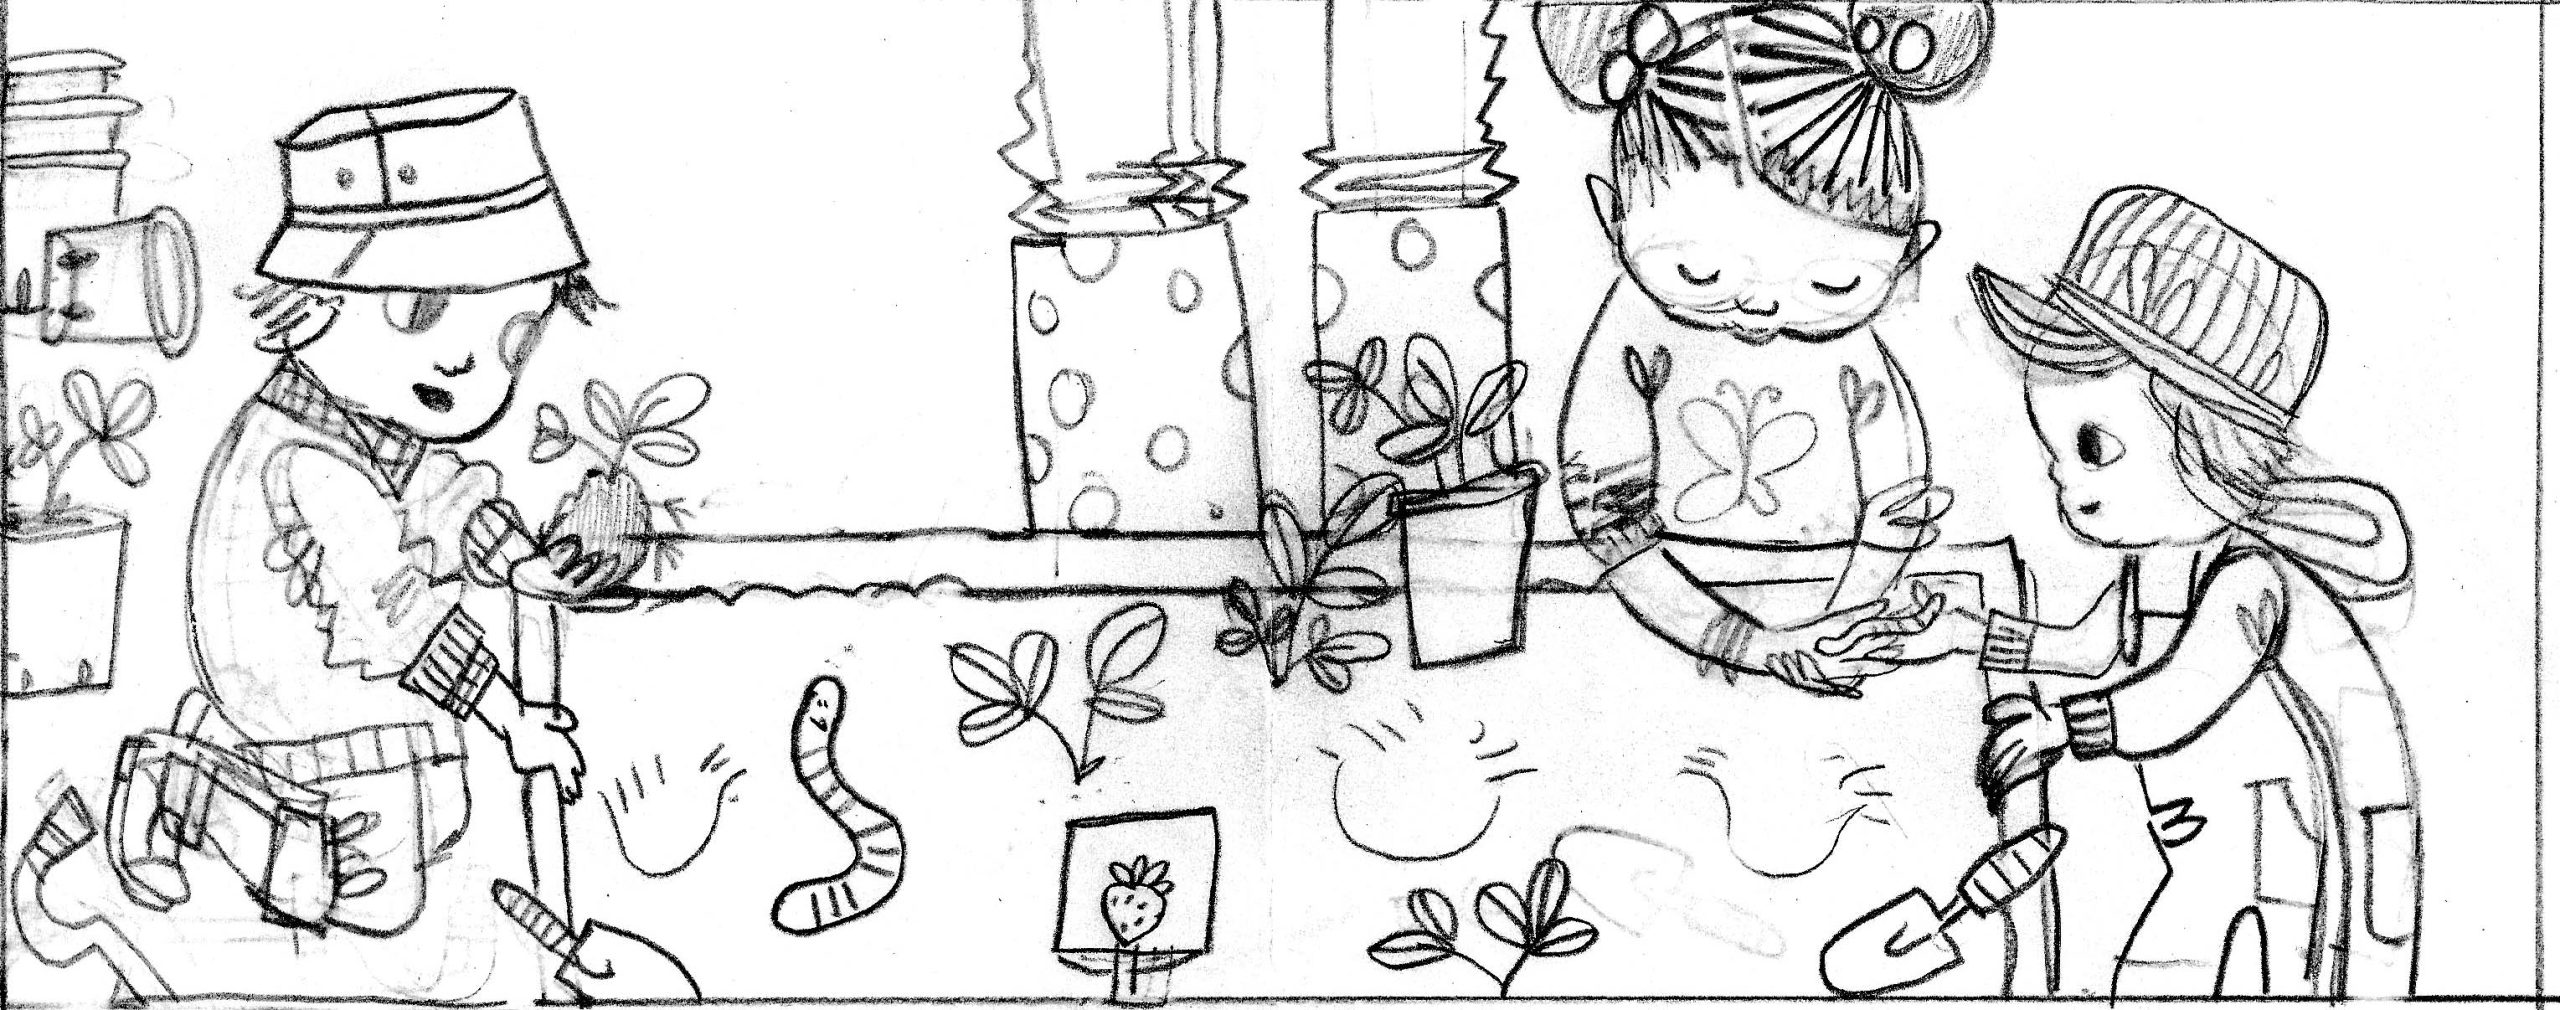
Kari’s sketch of the above spread prior to creating the final artwork.
What was your favorite part about creating HOW TO SAY HELLO TO A WORM? And what was a challenge you had to overcome while working on it, if any?
Botanicals: I loved drawing portraits of plants! And I loved the “casting call” – creating and getting to know all the characters of the little children who garden in the book. I also loved thinking of writing the book from the perspective of what questions the youngest garden explorers would wonder about. A challenge was cutting images that I wanted to include. Cutting is the hardest! Originally, I wanted more of the pictures to contain lots of kids doing lots of gardening activities, but the design team focused each composition on a certain interaction with fewer children and more space for the words. And that was actually probably good anyway when it came time to produce the final art on a tight timeline!
You also have a new book coming out soon called SAFE CROSSING, which will be published by Chronicle Books. What is that book about and what can kids and their grown-ups learn from it?
SAFE CROSSING is an informational fiction story about a family of community scientists who volunteer with an amphibian migration team in springtime. They help salamanders and frogs cross the street to avoid getting crushed by cars. When they realize that more needs to be done to protect these small creatures, they rally their community to build a wildlife tunnel so even more amphibians can cross safely. The story models grown-ups listening to kids ideas around protecting animals from harm.
What is your greatest hope for your work as a creator of books for kids?
As a parent and a teacher, I know how – after a long challenging day when you have given your all, are running on fumes and you have no more ideas of what to say to your child or your students, – what a relief it can be to hunker down and read a picture book togther. I am so thankful to all the picture book creators who help caregivers and teachers explore interesting, wonderful or difficult topics with their children, with beauty and sensitivity and humor and honesty. My hope is for my work to give caregivers and children more ways to find joy and meaning together, and to honor their impulses to share wonder and love of our beautiful world and life on earth.
What is something you’d like to tell aspiring picture book authors/illustrators?
Work or volunteer regularly with children in the age range of your target audience, doing something you love. Read books currently being published in the genre (within the last 5 years.) Find a community of writers or illutrators in the genre you aspire to publish in. Connect with them and ask them questions. Join critique groups in organizations like SCBWI, 12×12 or take classes where you can share work in a supportive environments where you can exchange feedback with others. Use your best manners, experiment a lot, share your experiments, note what work you do that people respond most to, and do more of that. Read you book outloud to yourself in the mirror and to young test audiences, notice where eyes glaze over and then edit those spots. Enter contests, be humble, and learn, learn, learn. Develop effective time habits, and organizational habits so that when opportunity knocks, you are ready with bells on. Ask someone knowledgable to look at a contract for red flags before you sign it.
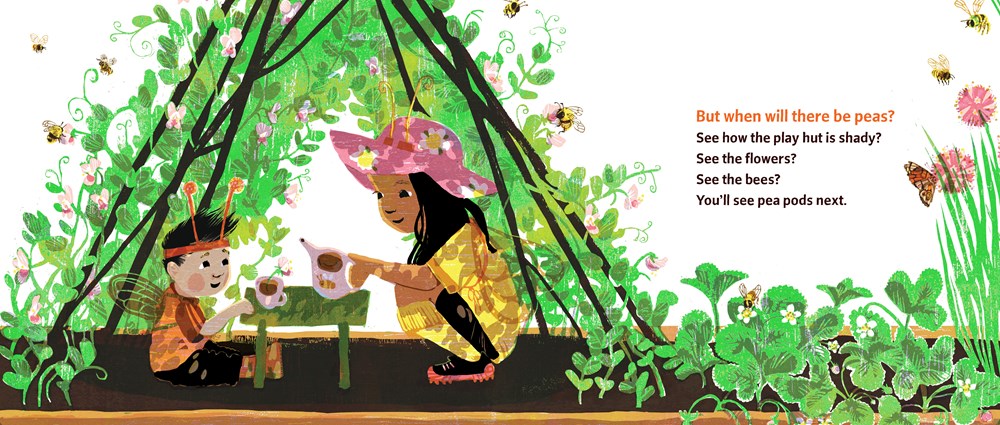
This page from HOW TO SAY HELLO TO A WORM explains to young children when peas will start growing in the vegetable garden.
See More from Kari Percival
You can learn more about Kari and see more of her work online. Check out the links and be sure to follow her on social media!
Are you a published or soon-to-be published children’s illustrator or author/illustrator who’s interested in being interviewed as part of the KidLit Connection series? If your work has a focus on nature, the environment, animals, or mindfulness, I’d love to chat with you! You can get in touch with me using the contact form on my site.
Various Measuring and Templating Tools for Artists
As illustrators and artists, there are a vast variety of tools at our fingertips that can make our work more interesting, easier, and more fun. This post is the first in a new series I’m writing called AN ARTIST’S TOOLBOX. The first topic for this series is about measuring and templating tools.
While many of us may prefer to freehand everything as much as possible because it feels more natural and more easy to go with the flow, there are also times where measuring and templating tools can not only help make measurements and shapes more accurate, they can also make our lives easier. In this post I’ll go through some of the measuring and templating tools I find myself using most often and some of their possible applications.
L-Square
L-Square ruler to create 90° angles.
The L-square as been one of the most helpful tools I own for measuring the initial dimensions of a piece, ensuring the corners are square and the horizontal and vertical lines are the same length. In the past, using only a ruler, I sometimes found myself with corners that weren’t quite square, resulting in one measurement being slightly longer than the other. Having to erase the initial lines and start over is just plain annoying. If you don’t notice your error until the piece is finished, it goes from annoying to downright frustrating. The L-square helps fix this measuring dilemma with nice precise square corners.
Draw one horizontal line and one vertical line all in one shot, making sure to mark where the end of your lines are. Then, flip the L-square around and do it again on the next two horizontal and vertical lines, lining up with the ends of the previous drawn lines. You end up with nice square corners and even lines!
I have an L-square from Blick that is 24” on one edge and 14” on the other edge. This is usually sufficient for my illustrations. But, squares come in many sizes, so consider what works best for your own work. Many places carry L-squares, including local hardware stores.
Benefits of the L-square:
90° square corners
Precise line measurements
Easier and faster to make accurate outlines for a new piece
BONUS: Metal squares are also helpful for creating a straight edge for cutting paper with an X-acto blade
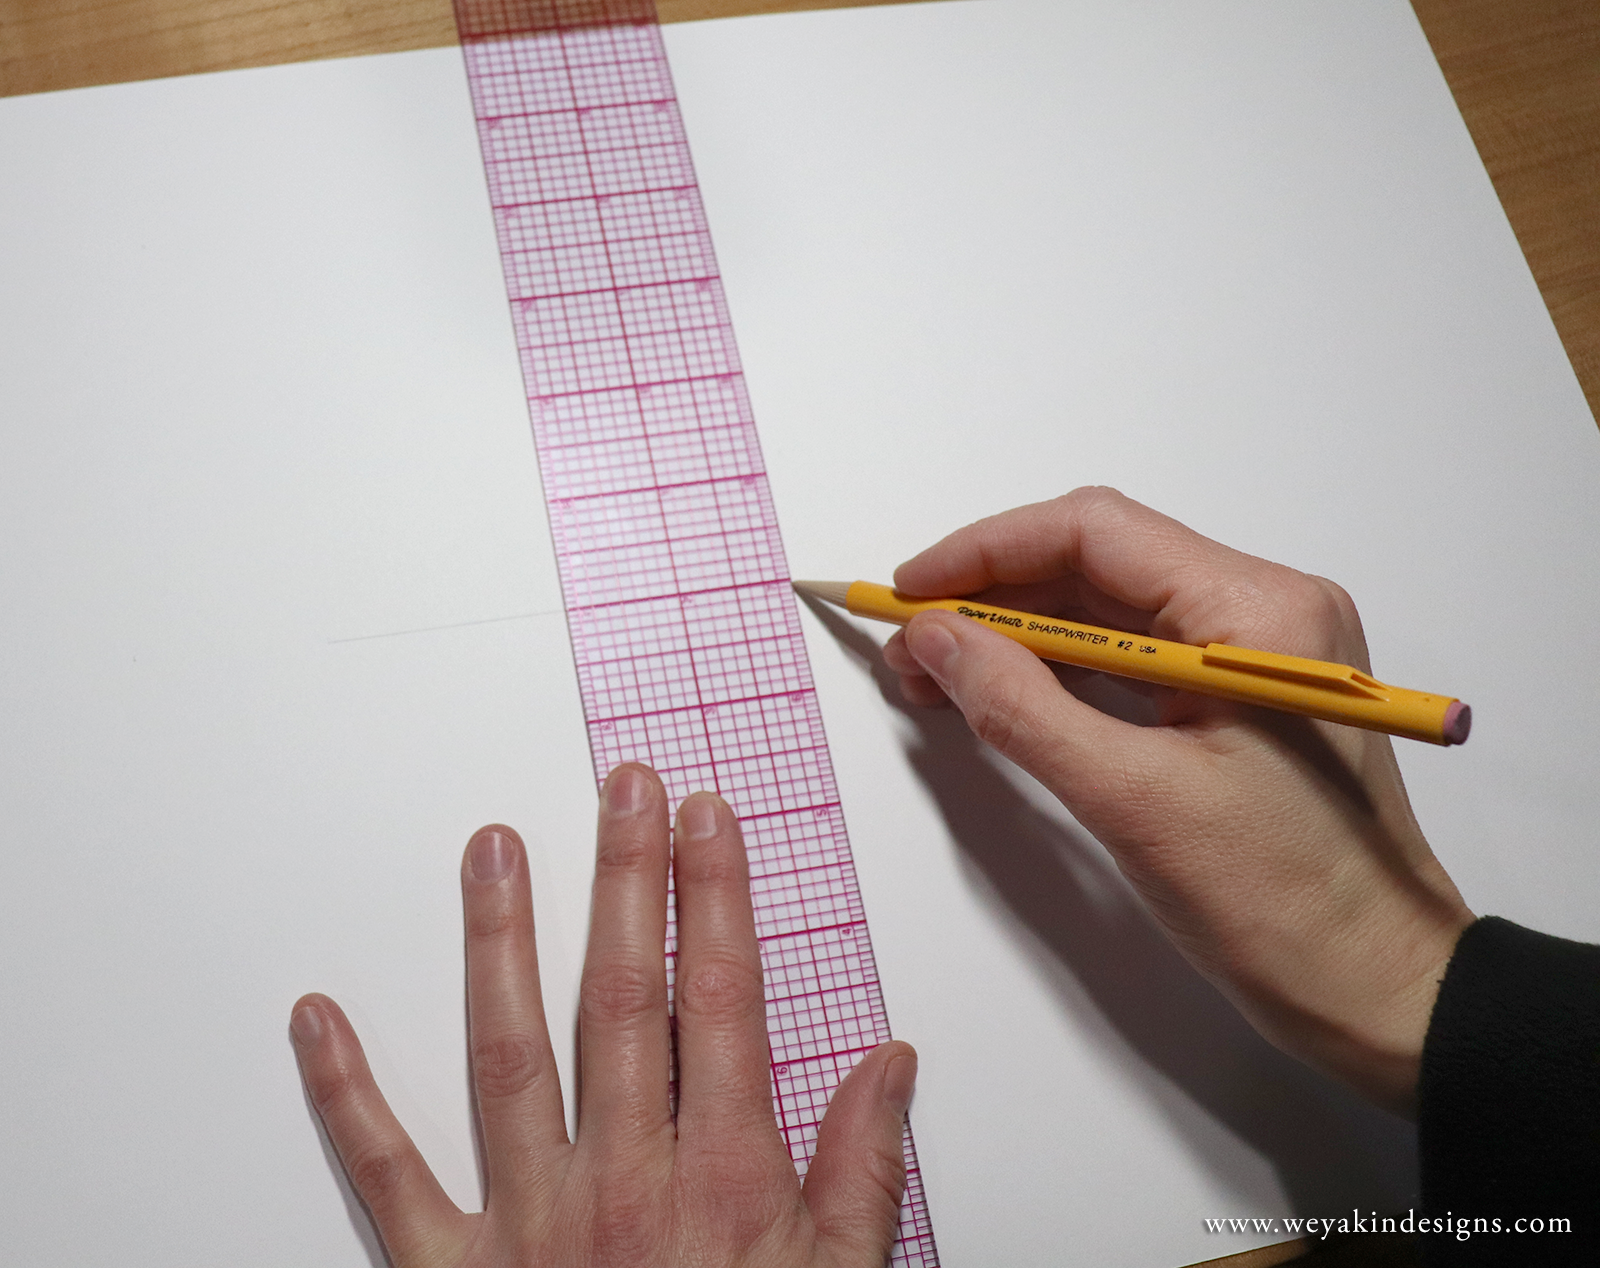
Clear Grid Ruler
Clear grid ruler made by Westcott to draw accurate lines.
The clear grid ruler has been one of my go-to rulers for many years. I find this variety of ruler more helpful than a standard solid-colored ruler. The see-through grid allows you to see your work beneath the ruler so you can more accurate place your lines and line up with previously drawn lines. I find it especially helpful for illustrations that involve a lot of linear shapes, such as houses, windows, and tables. They’re also helpful for creating the horizon lines when dealing with tricky perspective pieces.
I have an 18” long and 2” wide clear grid ruler made by Westcott. Check with your local art stores or order one online. I bought my very first one from the school co-op at my alma mater, the University of Connecticut and got many great years of use out of it before needing to purchase a new one.
Benefits of the Clear Grid Ruler:
See-through grid makes it easier to see your existing piece below the ruler
The grid allows you to line up with previously drawn lines
Helpful and faster for drawing linear objects such as houses, windows, doors, and furniture
Helpful and faster for drawing horizon lines for tricky perspective pieces
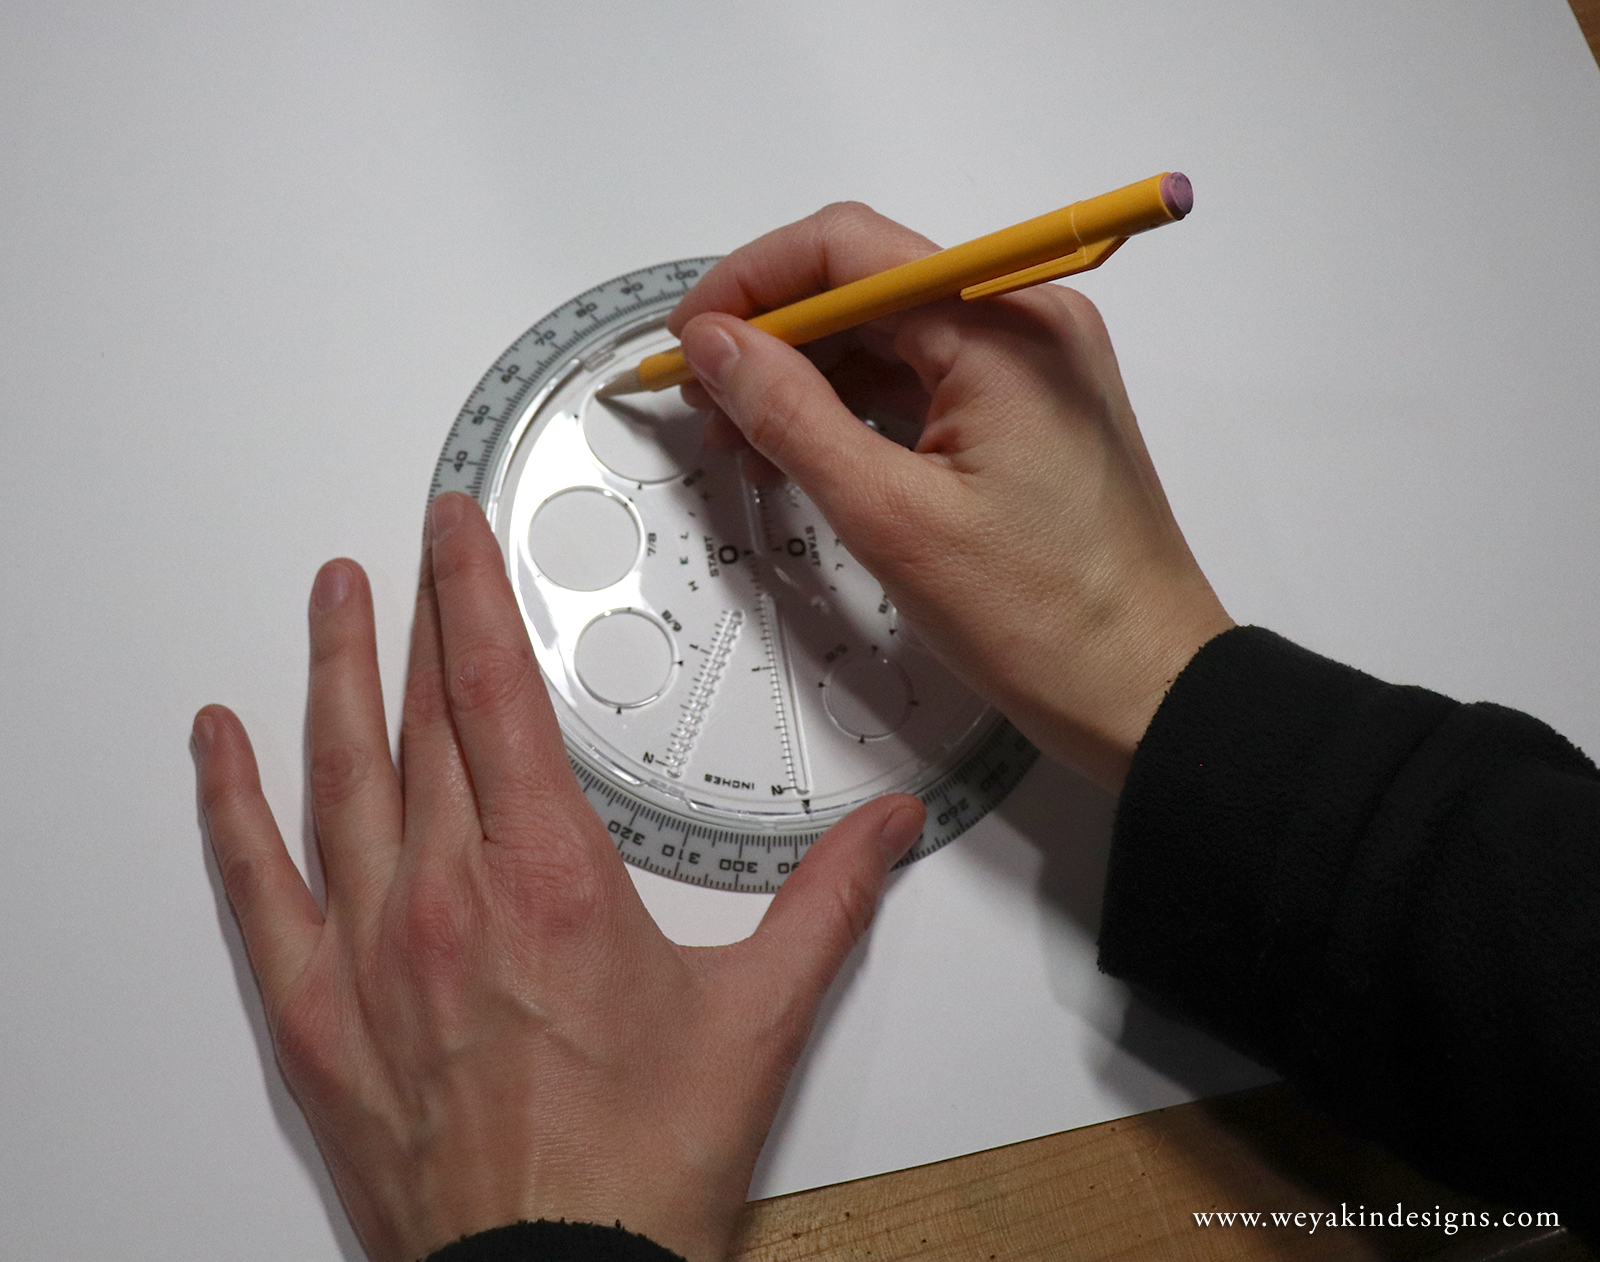
Circle Maker Tool
A circle maker tool made by Helix.
The circle maker tool is something I more recently discovered as a handy all-in-one circle templating device. It serves as a protractor, compass, and circle template so you can make accurate circles of many sizes, up to about 5.75” in diameter. I’ve found it helpful for drawing things like moons, balls, circles for containing a smaller drawing on the page, and other round objects. It’s especially nice when you need to make multiple circles that are all the same size.
I have the Angle and Circle Maker by Helix. Ask your local art store if they carry this sort of tool or you can order it from an online art store.
Benefits of the Circle Maker Tool:
Make many sizes of circles with one tool
Works as a protractor, compass, and template
Easy to make many circles that are the same size
Makes circle-drawing faster and more accurate
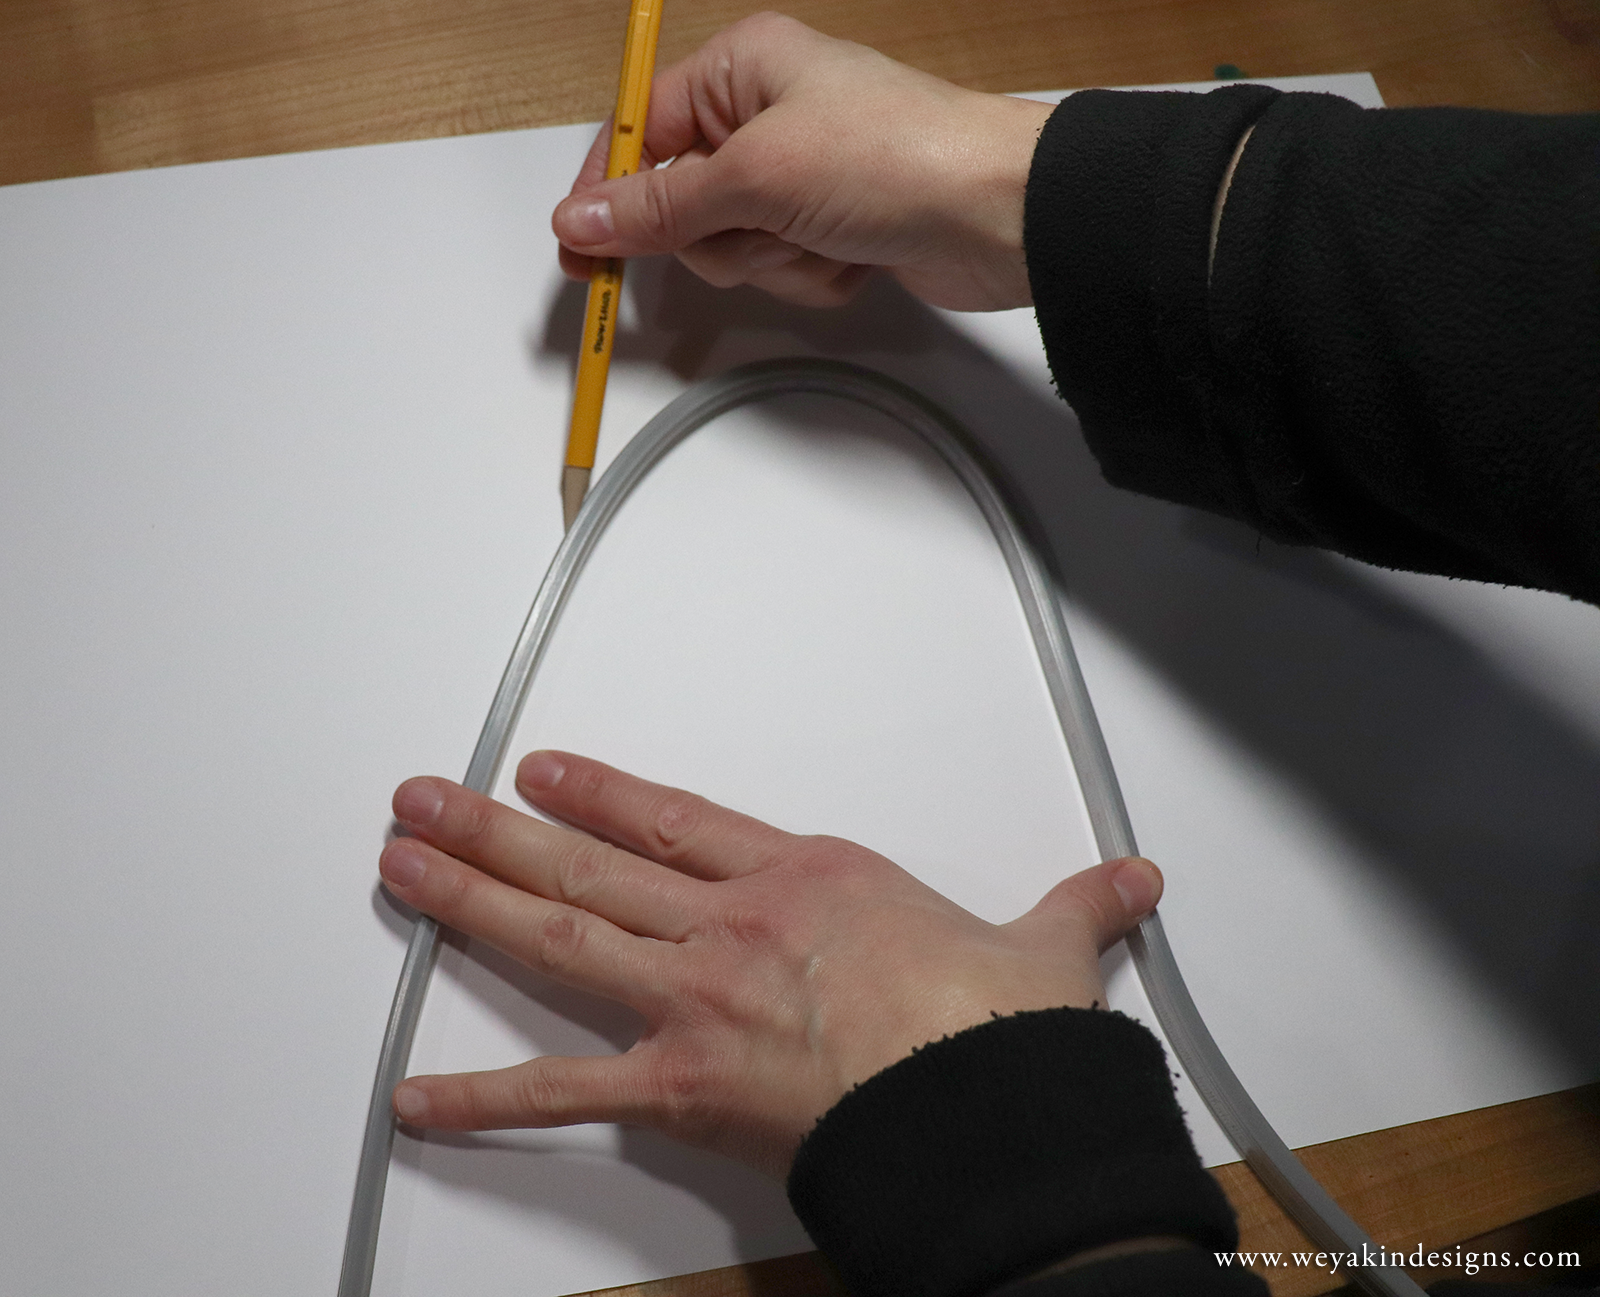
Flexible Curve
A flexible curve ruler to make organic shapes.
The flexible curve is like the handy snake friend of illustration that you never knew you needed. This bendy ruler allows you to make your own custom curvy shapes and trace that shape onto your page. This allows you to create more organic shapes, but also draw it more smoothly. You can also more easily draw that shape multiple times once you’ve formed it—the flexible curve keeps its shape until you change it! One other benefit of the flexible curve is that because it has a ruler on each side, you can also measure shapes that aren’t straight.
I have a 32” long flexible curve made by Alvin, but they come in several sizes ranging from 12” to 40”. You can ask your local art store if they carry them, or if they can order one for you, or you can order one online.
Benefits of the flexible curve:
Make custom organic shapes
Create a smoother curved line than free-hand drawing
Use the shape as a template for creating repeated shapes—the curve keeps its shape until you change it!
Measure lines that aren’t straight.
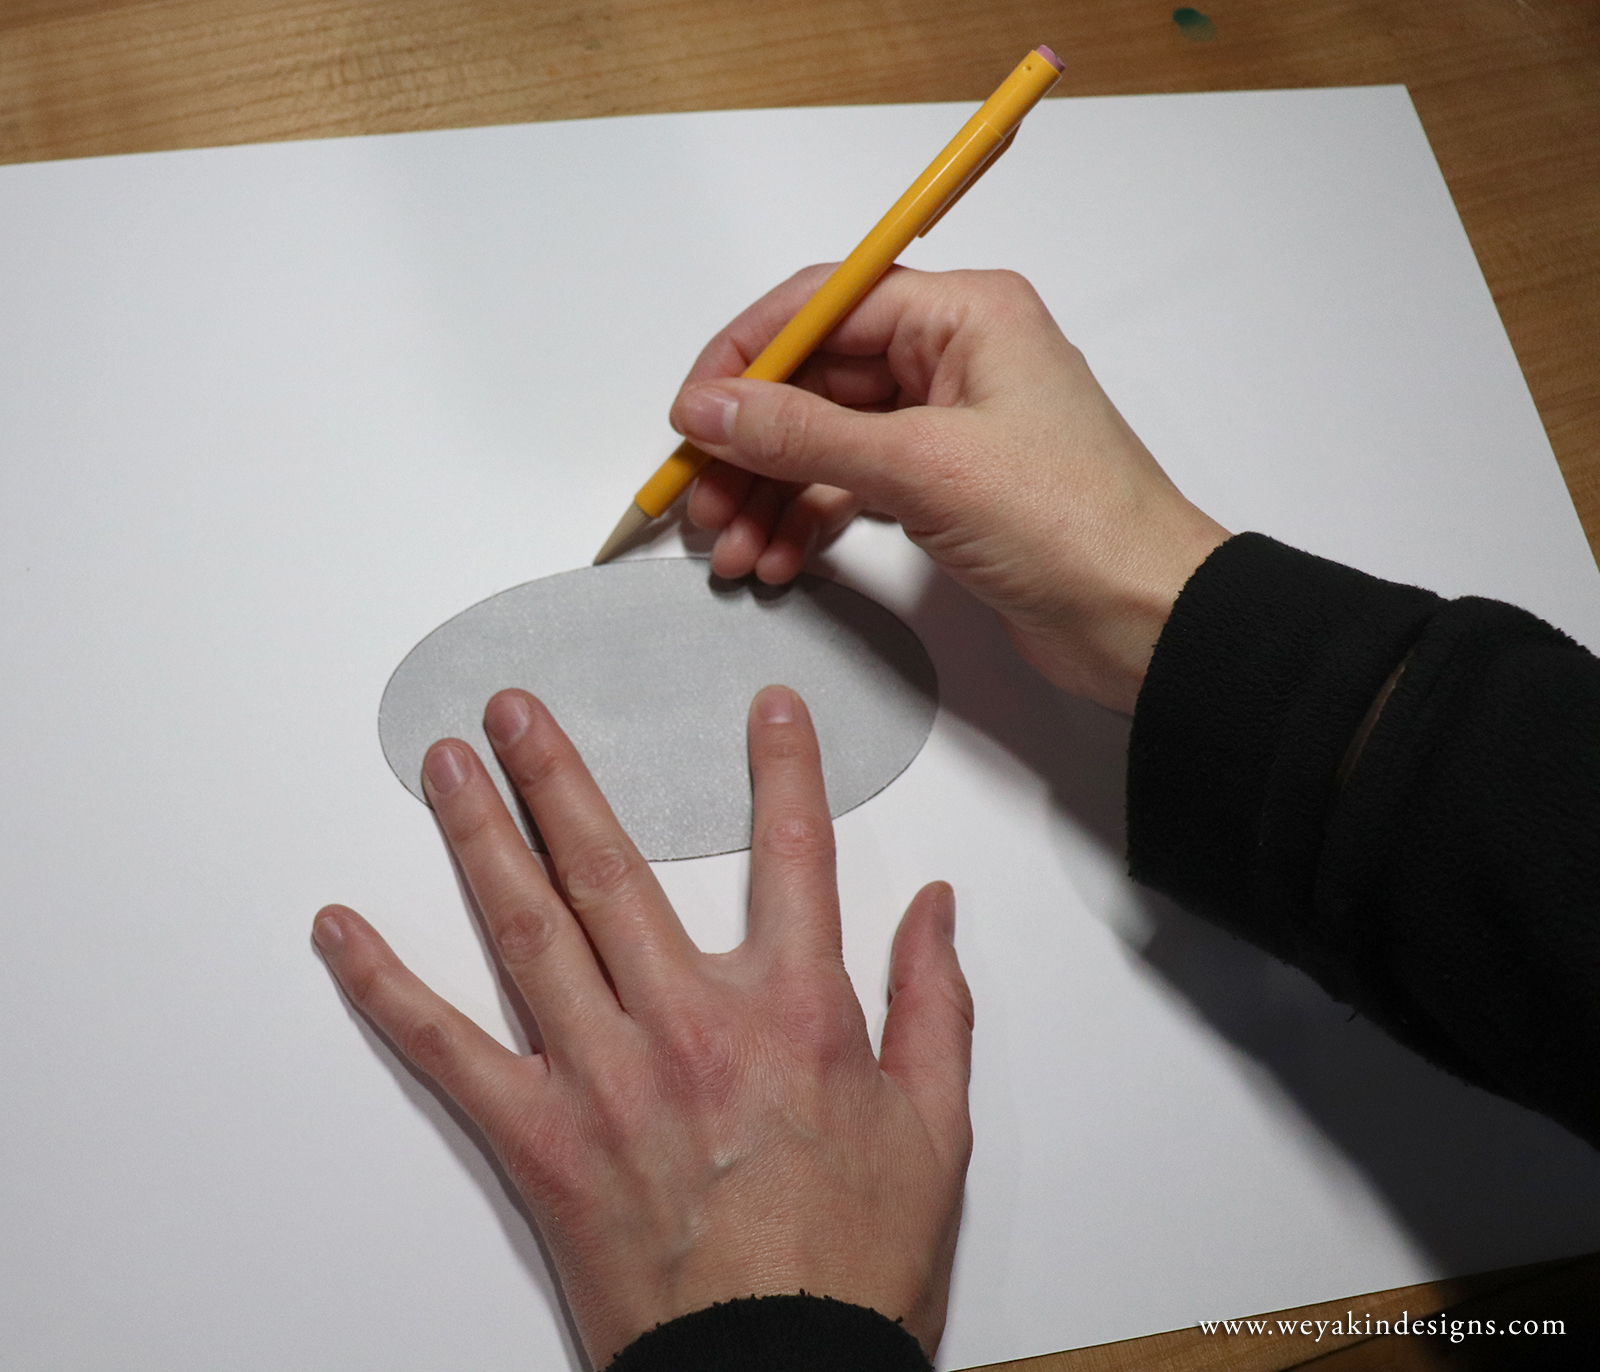
Homemade Templates with Card Stock
Homemade template made from cut card stock paper.
Sometimes I find there’s a shape I need to make that isn’t available with any of my other template tools. I love keeping card stock on hand to make my own custom templates, similar to the templates elementary school teachers make for class art projects. You can free-hand draw your shape and then cut it out so you can repeat that shape by tracing it. Or you can use the computer.
If you want a more precise shape, you can draw your shape on the computer using a program such as Adobe Illustrator or even Microsoft Paint. There are a lot of programs that allow you to make basic shapes. From there, you can print your shape out and then carefully cut it out by hand. Then, you have a handy template you can trace.
Benefits of homemade templates with card stock:
You can make nearly any shape you want
Makes it easy to draw repeated and consistent shapes
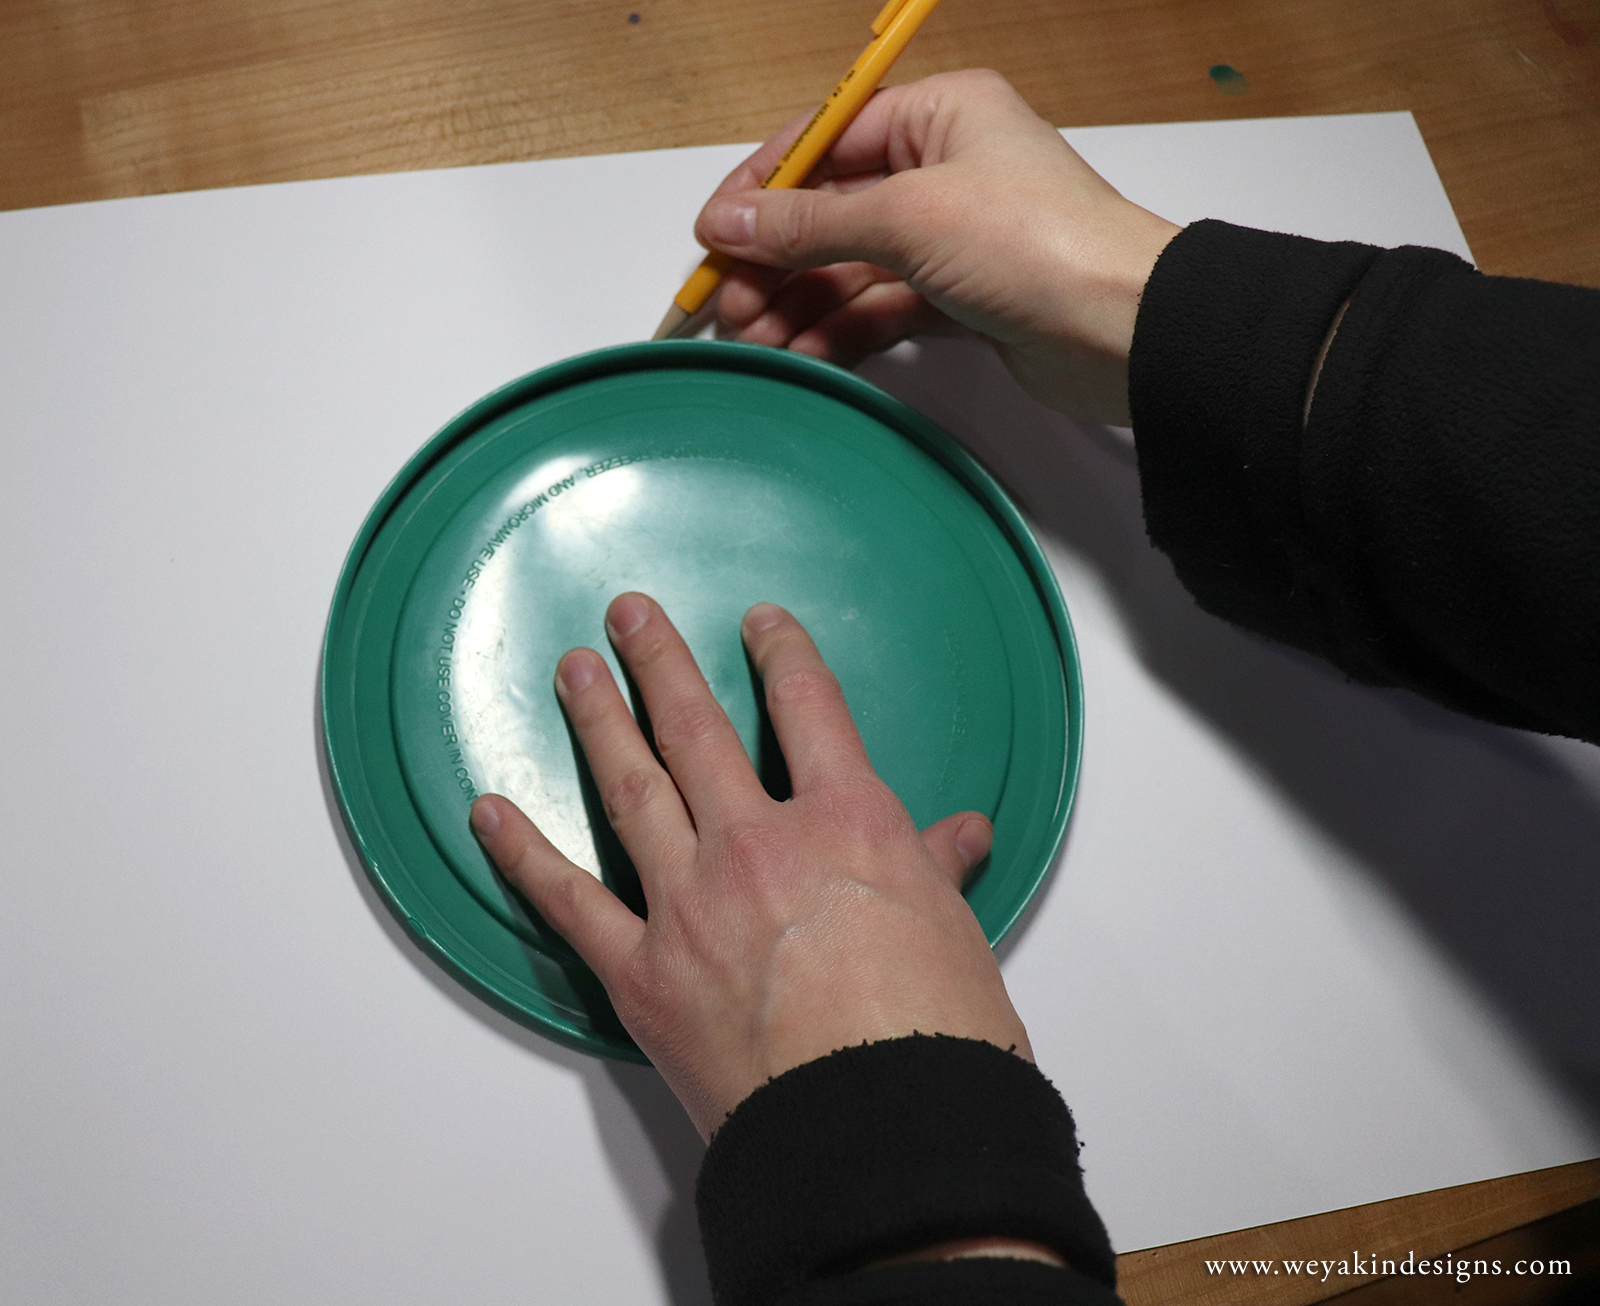
Container Lids
A container lid from the kitchen as a template.
Yes, you read that right. Container lids are one of my templating tools. When I need a shape that I don’t have another tool for, I go to my kitchen and see what I have. I have a lovely set of Pyrex glass dishes in various sizes with lids. Those lids are the perfect circle templating tools when I need a circle larger than my circle maker tool. It’s also something you don’t need to buy and probably already have in your house!
Benefits of container lids:
Cheap and already in your house
Different shapes and sizes that other tools might not provide
Measuring and templating tools are helpful pieces of equipment that can make our lives easier as artists and illustrators. The six tools mentioned above are just some of the many measuring and templating tools available to artists. These are the ones I find myself using the most and I hope you find some of them helpful too. Do you have some other measuring and templating tools you love? I’d love to hear about it! Leave a comment below to share your favorite tools.
Welcome to the refreshed Weyakin Designs blog! This space is to share educational resources, fun information, and general updates with friends and followers to utilize and enjoy. Among the types of posts I plan to share are art tutorials and tutorial videos, tell you about some other cool artists I know, or show demonstrations of how I make my art.
I’m excited to share with you in the magic of art and nature! Thanks for joining me.